In my opinion, canned salmon is an unsung hero in the food and nutrition world. Convenient, versatile and super-nutritious, it’s a shame that it’s so under-appreciated.
Why don’t we use canned salmon more often in our recipes and meals? Perhaps it conjures up memories of the dry, flavorless salmon patties of your childhood. Perhaps it has to do with the lack of foodie “buzz”, because the culinary world hasn’t exactly embraced it either. I mean, when have you ever seen it featured in a dish on a menu at a trendy restaurant?
With the negative connotations and the lack of fanfare, canned salmon hasn’t had much of a chance to shine. I think it’s time to change that! Here’s why:
Bring on the Canned Salmon! 3 Reasons Why It’s Great.
It’s Versatile! – Canned salmon can be used for salads, burgers, meatballs and so much more! That seems like a pretty great blank canvas if you ask me!
It’s Convenient! – All you need is a can-opener, no cooking required. Highly portable and easy to use. The definition of the modern connivence food.
It’s Nutritious! – Loaded with nutritious Omega-3 fats as well as selenium and protein, canned salmon is an easy way to fit more fish (you should be eating at least 8 or more ounces per week!) into your diet.
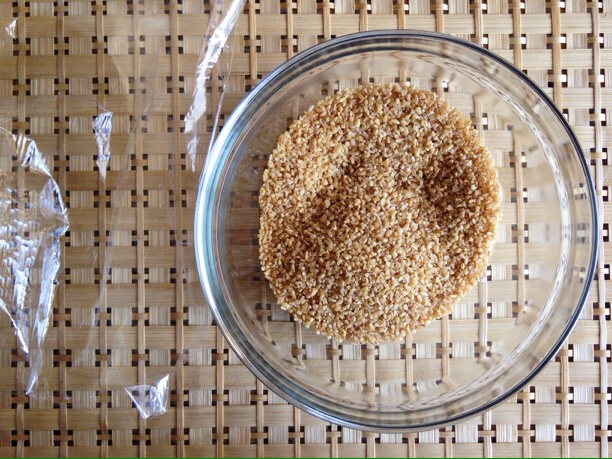
Place bulgur in a medium bowl. Add salt, then cover with boiling water. Immediately cover the bowl with a piece of plastic wrap and let bulgur steam for about 20 minutes.
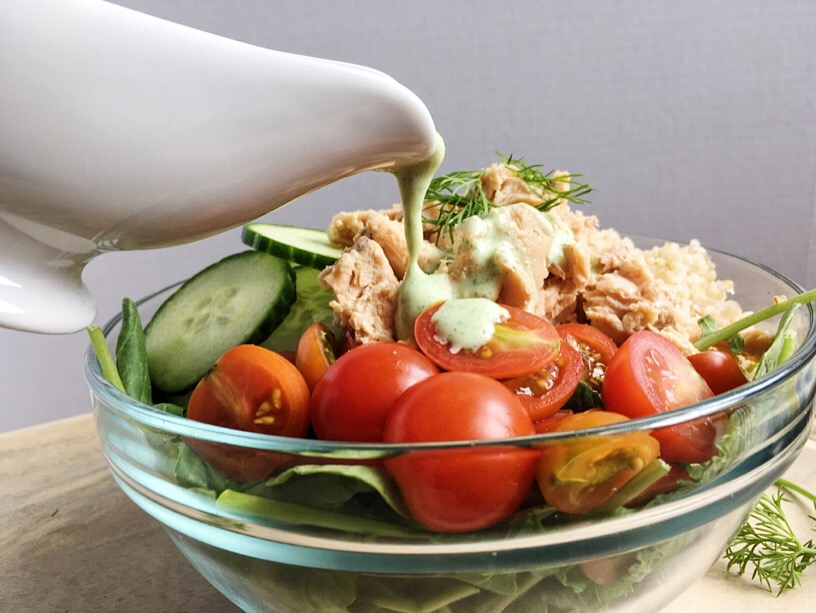
To a blender add the the Greek yogurt, lemon juice, garlic and dill. Add a pinch of Kosher salt and blend until smooth. (Dressing can be made without a blender, finely chop garlic and dill and then whisk all ingredients together.)
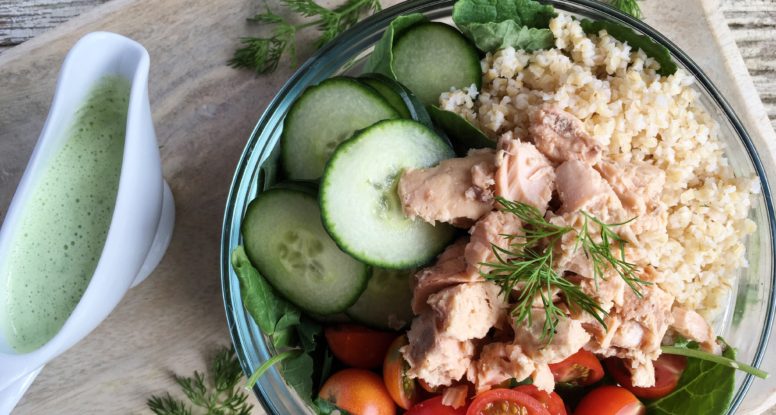
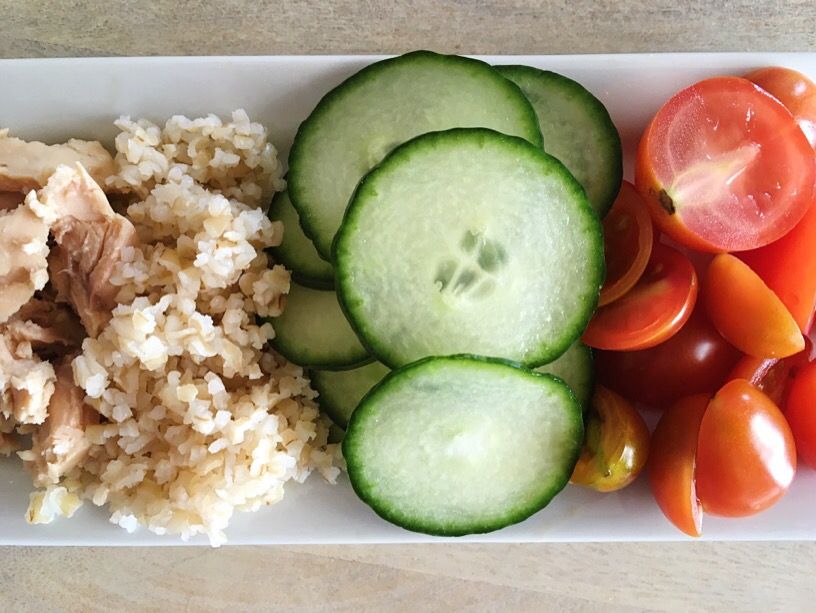
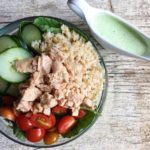
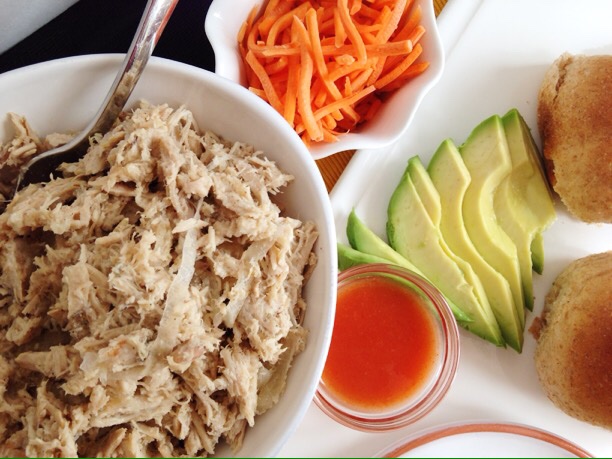
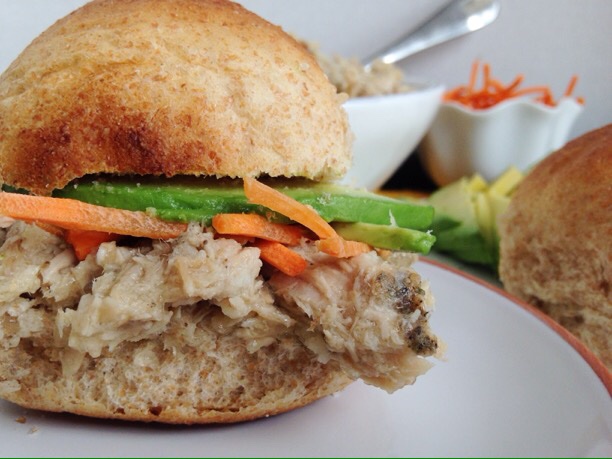
Divide lettuce and portion into bowls. Top each bowl with bulgur, salmon, cucumber and tomatoes. Drizzle with dressing and serve.
The Fertility Friday series celebrates the mighty mushroom.
Thank goodness this little fungi is a fertility-friendly food. Mushrooms boast some powerful nutrition – think Vitamin D, selenium and B vitamins such as riboflavin – all nutrients that are beneficial to fertility. In fact you can head on over to Shaw Simple Swaps to learn more about Vitamin D and selenium! But before you go, learn why I think you should include more mushrooms in your diet (even if you’re not struggling with infertility!). I’ve got a super simple recipe that starts with delicious sautéed mushrooms and ends with fresh thyme and toasted pine nuts! Yum!
Let’s focus for a moment on an underlying theme present in most of the foods and recipes we recommend for fertility. That theme is the power of a plant-based way of eating. The research shows that eating more plants is a great way to nourish and fuel your body for fertility. Plant foods contain a variety of vitamins, minerals, antioxidants and other nutrients, all of which play a role in making you the most healthy version of yourself, while also preventing chronic disease. And mushrooms, while fungi, make plant-focused eating easy.
Here’s Why You Should Use More Mushrooms In Your Cooking:
Umami. Just what is that? It’s the 5th sense of taste and it’s just as important as it’s fellow tastes, sweet, sour, salty and bitter. Umami means “savory” and that’s exactly how mushrooms behave in food applications. They add a “meatiness” when there isn’t any meat and that can leave you feeling more satisfied. It’s an easy way for people to transition into eating more plant-based foods, which leads me to my next point…
Interest. If you want people to eat and enjoy their food, it helps if you keep them interested. At least this is what I’ve learned with my work as a chef and dietitian. If the food your prepare has just one note and that note is boring, than no way can you convince yourself or anyone else to eat it. This is where mushrooms can help. Since there are so many varieties, all boasting their own unique flavor, they can instantly add interest and intrigue to a meal. This is a win-win, because you’ll be getting more plant-based foods in while showcasing just how delicious and easy it is to do so. Which takes me to my final point…
Flavor. Remember my mention above about each variety of mushroom having it’s own unique flavor? The flavor difference is actually quite amazing and is something many people don’t take advantage of. Cremini mushrooms, for example, have mineral and earthy tones, while shiitakes sharply boast that umami savoriness. Think about how that flavor can boost the flavor of other foods too. Think how amazing sautéed mushrooms taste! That taste means you might need less fat or salt, both of which we don’t necessarily need more of in our diets.
Next time you’re at the grocery store, don’t forget to add mushrooms to your cart. Besides nourishing and fertility-friendly, they’re loaded with satisfying umami, adding interest and flavor to your nourishing fertility-friendly plant-focused way of eating.
Oh and before I forget! For my meat-lovers, have no fear! I’m not saying forgo meat, no way! It has a place on the fertility-friendly food list. But I figure we could all use a little more encouragement when it comes eating more plant-based foods.
Feeling lost? RESOLVE is a non-for-profit that helps people dealing with infertility. They’re a great resource and can even connect you with people in your area going through the same thing. You’re not alone! Feeling inspired? Why not be apart of National Infertility Week and share your blog posts, tweets and Facebook posts about your journey. Use the hashtag #startasking to make it easy for people to follow you on social media.
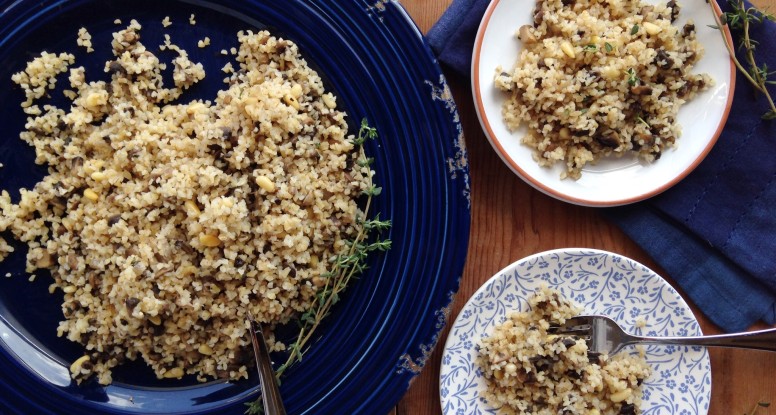
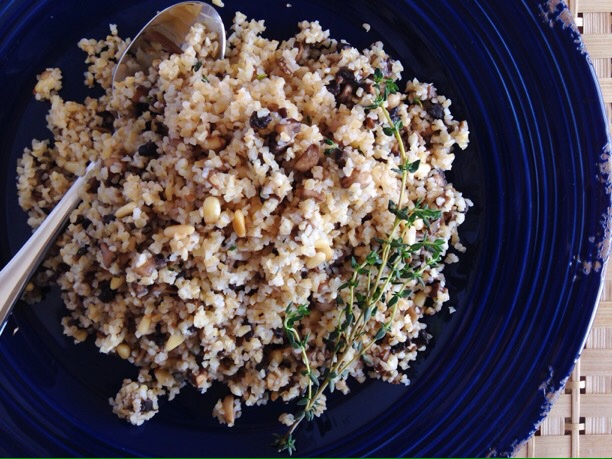
And here are the beautiful pictures of Sautéed Mushrooms with Bulgur
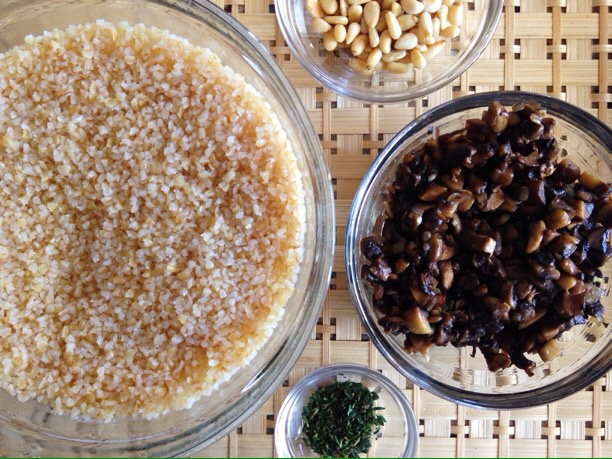
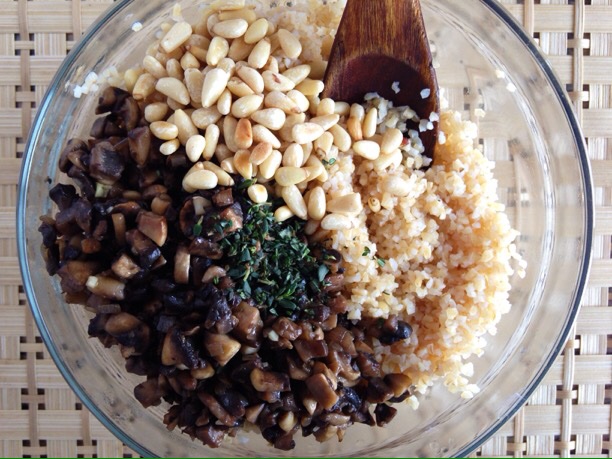
Finely chopped mushrooms sautéed until golden then tossed with bulgur, fresh thyme and pine nuts.
Ingredients
Scale
3/4 cup bulgur
1 1/2 cups boiling water
Kosher salt
2 tablespoons pine nuts
1 teaspoon olive oil
1 tablespoon butter
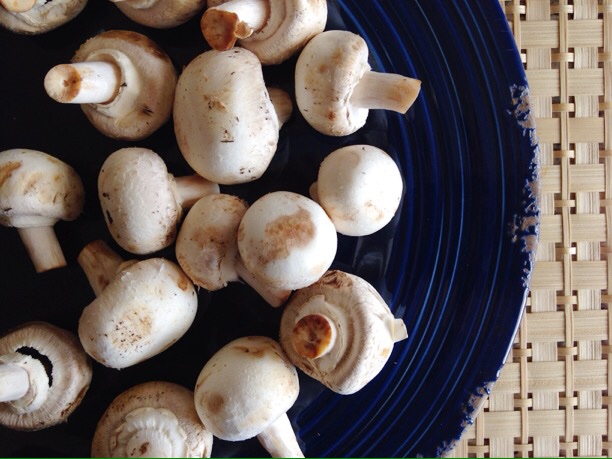
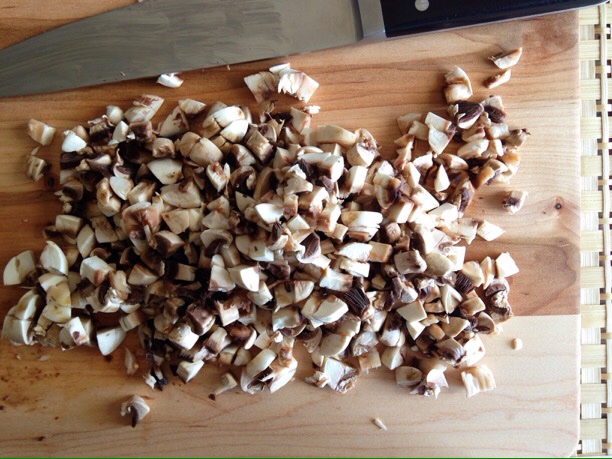
8 ounces mushrooms (cremini or a blend), cleaned and chopped
2 tablespoons finely chopped shallot (about 20g)
1 clove garlic, chopped
black pepper
1 teaspoon fresh thyme leaves, chopped
Instructions
Place bulgur in a medium bowl. Add 1/4 teaspoon Kosher salt, then cover with boiling water. Immediately cover the bowl with a piece of plastic wrap and let bulgur steam for about 20 minutes.
Heat a skillet over medium-high heat, add the pine nuts and toast, stirring occasionally until lightly browned, about 3-4 minutes. Remove from pan and reserve.
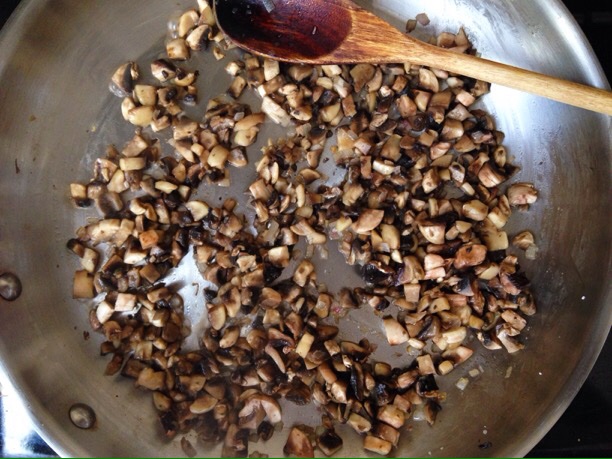
Turn heat down to medium, add the olive oil and butter to the skillet. Once butter has melted, add the shallot and saute until softened, about 2-3 minutes. Increase heat to medium high, Add the chopped mushrooms and a sprinkle of salt and continue cooking another 5 minutes.
Remove plastic wrap from the bulgur and drain any excess liquid. Add the mushroom mixture to the bulgur along with the toasted pine nuts, black pepper and fresh thyme and stir to combine. Garnish with extra thyme if desired and serve.
Love cheese? Sure you do! How about grilled cheese? Oh yes, of course you do!
Did you know that this delicious comfort food can actually be a nutritious choice, even when it comes to fertility? It’s true!
And here’s some amazing news, not only is it National Grilled Cheese Month, but it’s also Fertility Friday and that means it’s time to get started on this series of posts dedicated to nutrition and fertility. In last week’s post, I introduced you to this series and today, I present you with the goods I promised – delicious, nutritious insight on food and fertility. Once you’re done here, don’t forget to check out Liz’s post over at Shaw Simple Swaps for her amazing post and recipe. You don’t want to miss it!
Ok, back to that grilled cheese. First, let me say that I love that these two days are intertwining, because grilled cheese can be a nutritious, fertility food. Who knew, right? Well, I did, but let me explain. It’s all about variety and moderation and fertility friendly foods.
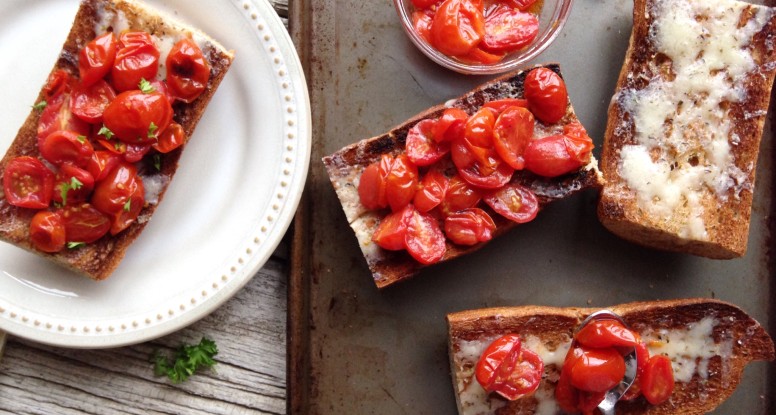
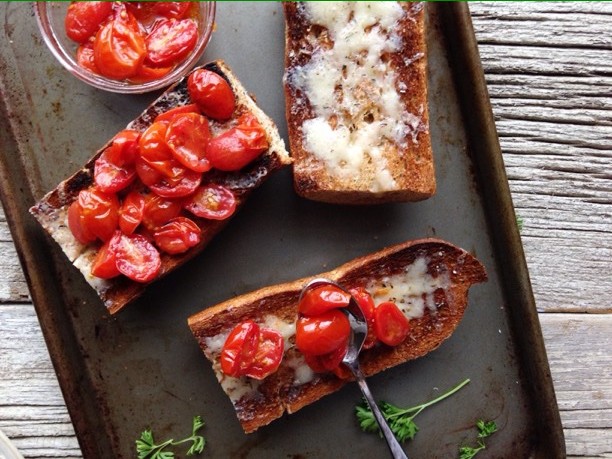
Let’s take my recipe for Sharp Cheddar Grilled Cheese with Broiled Tomatoes as an example:
Whole Grains: This recipe starts with a whole grain baguette base. Why whole grain bread? Well, because it is more nutritious than it’s refined, white bread counterpart. Whole grains have more vitamins and nutrients and even more fiber. See, I told you, more nutrition!
Fertility Focus – Whole grains help regulate blood sugar. Who cares about blood sugar? You should. You see, refined white breads, sugary cereals and candies can cause your blood sugar to spike quickly. Your pancreas has to work over-time to drive that blood sugar down. To do this, it sends out a handy hormone known as insulin to do to battle all of that sugar. This results in a high level of insulin in your bloodstream which have been indicated by research, to inhibit ovulation. So, no thank you white bread, white rice, chips and the like. I’ll stick with my whole grains!
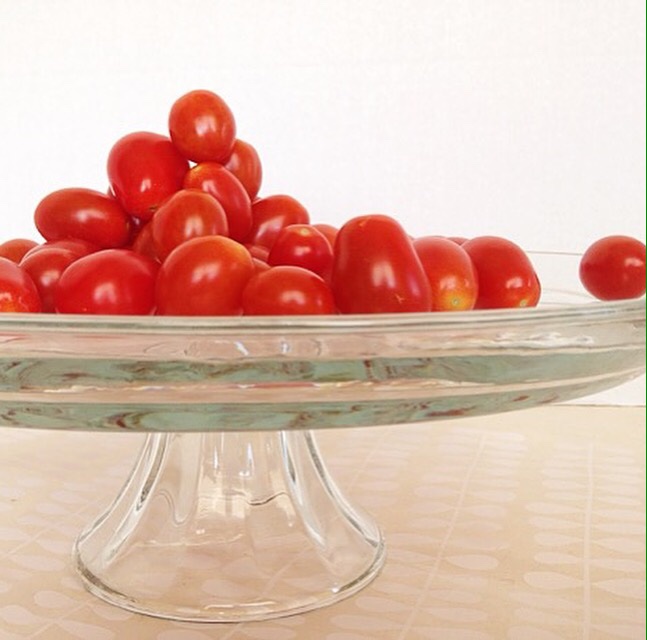
Tomatoes: Who doesn’t love a sweet, juicy tomato? Ok, well, I didn’t until my early 20’s, but I’ve learned my lesson. These little red dynamos pack a serious nutritional (we’re talking Vitamin C and Vitamin A) punch. So eating them is a real win-win in my book! Tomatoes are also a great source of lycopene, a compound responsible giving tomatoes their vibrant red color. Lycopene just happens to also be a powerful antioxidant. Antioxidants keep us healthy by preventing damage from free radicals. This is great health insurance, considering if free radicals are left to their own devices, they can do serious harm to our healthy cells and DNA.
Fertility Focus – Men, take note. Lycopene may offer some benefits in terms of fertility. More research is needed, but there is evidence that lycopene could help with not only sperm count, but also sperm viability. Seems like a good reason to eat more tomatoes to me.
Whole Milk Cheese: This recipe uses sharp, whole milk cheddar cheese because of it’s great flavor. Sharp cheddar is so brilliantly savory and rich, that you don’t need a lot of it. And here’s the good news, cheese might be a great fertility food (see below) plus it’s also a fabulous source of bone-building calcium.
Fertility Focus – The Nurses Health study revealed that women who ate ate least one serving of whole milk or dairy foods a day were less likely to experience infertility caused by an inability to ovulate. What does this mean for you? It means you can try swaping one serving of your typical low-fat or fat-free dairy foods with their whole milk counterparts. But tread lightly here, as those foods will still be high in calories. Bottom line, make this temporary adjustment but modify other foods in your diet to allow for the extra calories.
Amp up the nutritional value of your grilled cheese by adding delightfully delicious broiled tomatoes.
Ingredients
Scale
1/2 (15-ounce) whole-grain baguette, sliced in half horizontally
1 teaspoon + 1 tablespoon olive oil
1 garlic clove
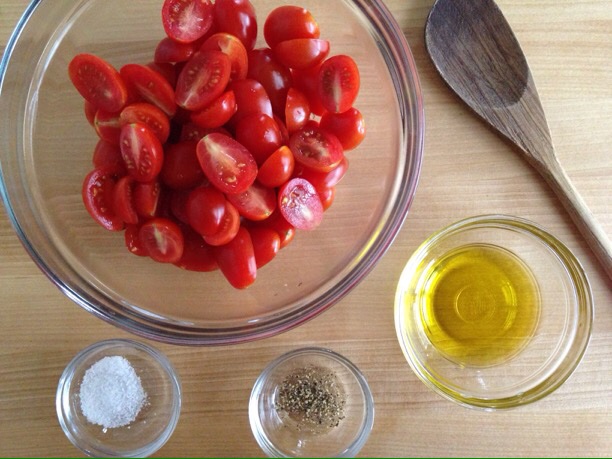
1 1/2 cup cherry tomatoes, halved
1/4 teaspoon Kosher salt
freshly ground black pepper, to taste
1 cup shredded sharp cheddar cheese
dash Italian seasoning
Instructions
Preheat the broiler.
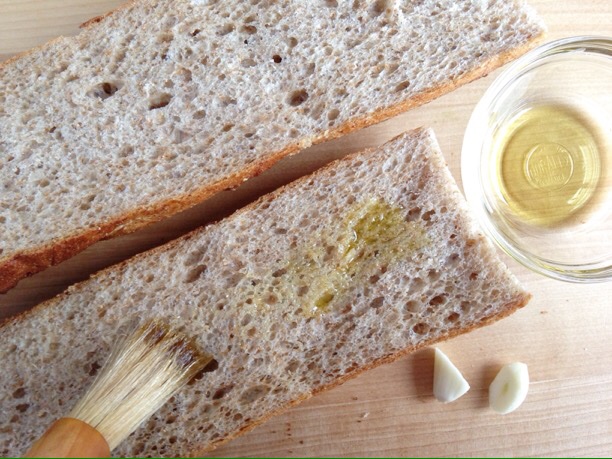
Place the cut baguette on a medium-size sheet pan. Brush the cut sides of the bread with 1 teaspoon olive oil. Slice garlic clove in half and rub over cut sides of the baguette. Place in the oven and toast 1-2 minutes or until lightly browned.
To a mixing bowl, add the tomatoes, 1 tablespoon of olive oil, salt and black pepper. Spread out onto a small sheet pan lined with foil. Broil for 5 minutes, stirring halfway through cooking time. Remove and reserve.
Sprinkle cheese evenly over bread slices, then dust with Italian seasoning. Place in the oven and broil 3-4 minutes.
To serve: Distribute the broiled tomatoes on top of toasted bread halves, cut as desired. Serve immediately.
Notes
For more fun and flavor, consider topping with fresh herbs before serving. Fresh, thinly sliced basil or freshly chopped parsley would be a fabulous addition!
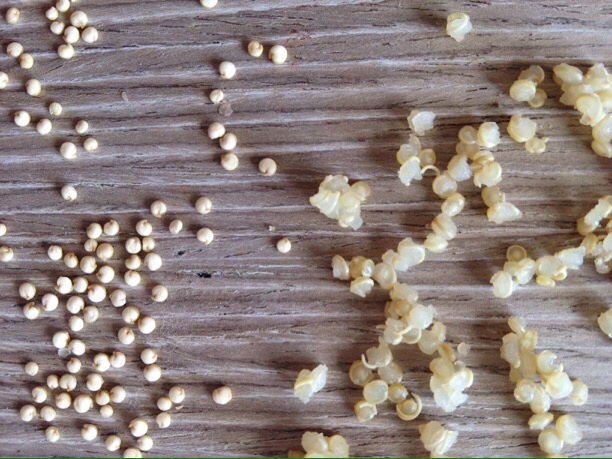
I’m trying to convince you that quinoa’s “moment” isn’t over!
In fact, in my opinion, this little powerfully nutritious seed, is still something that should be a staple at your dinner table.
Besides being nutritious, quinoa is super easy to prepare. All you need is some water, salt and a pot and 15 minutes. Yes, that’s it. Simple.
And get this, it freezes beautifully! Yes, it does! Simply let it cool and then place it into a freezer bag. Break off pieces as you need it and enjoy. It’s magical!
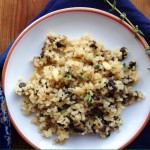
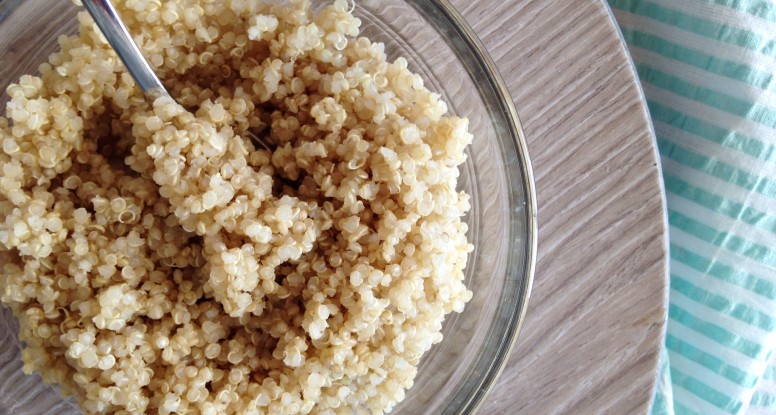
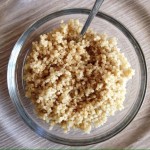
And here are the pretty picture of Freezer Quinoa:
Make it once, enjoy it many times! This recipe makes a big batch of quinoa perfect for freezing!
Ingredients
Scale
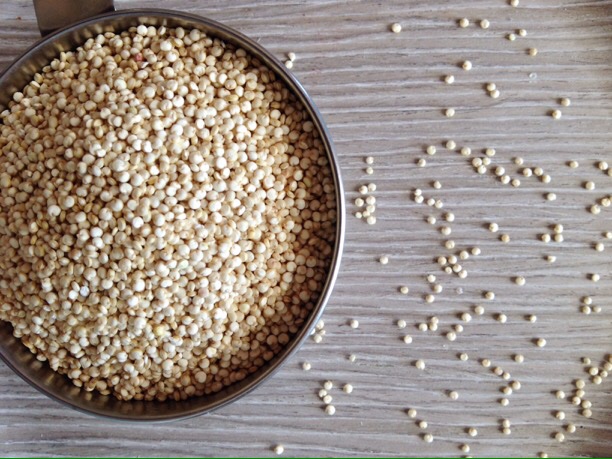
1 cup quinoa
2 cups water
1/4 teaspoon Kosher salt
Instructions
Place quinoa and water in a saucepan and bring to a boil over medium-high heat. Season with salt and reduce heat to a simmer and cook, uncovered for about 15 minutes. Drain off any excess liquid.
For faster cooling, spread cooked quinoa out onto a sheet pan.
Once cooled, place quinoa in a re-sealable freezer bag. Label and store in the freezer.
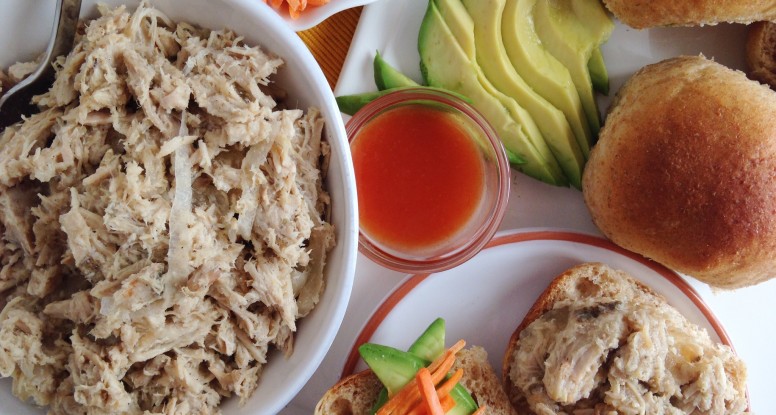
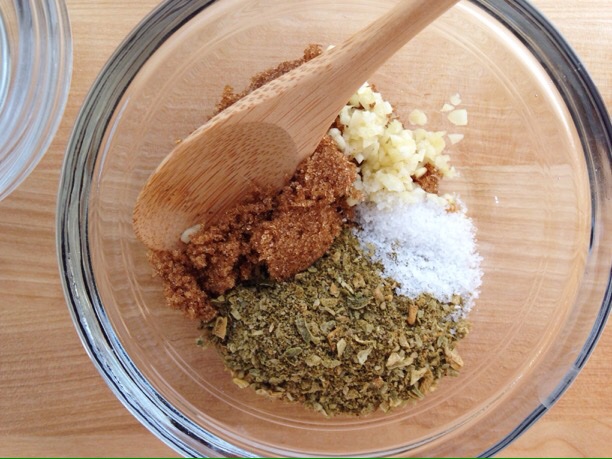
Why I made this recipe: Because certain people in my life (ahem, my friend since the 2nd grade, to be precise) told me they need quick recipes that taste good, can serve a small army, I mean, family, and aren’t loaded with unhealthy ingredients. Enter the Slow Cooker Jamaican Jerk Pork recipe.
Why I love this recipe: Mission accomplished! I’m pretty sure I met all of the criteria established during the serious brain storming session when said friend (see above) was last in town for a visit. Fast, simple ingredients, large quantity, tasty, healthy and freezable! Woo hoo! It’s always good to make sure your friends are happy.
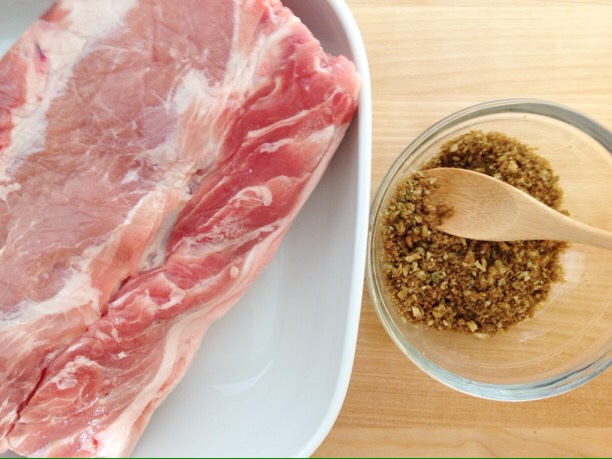
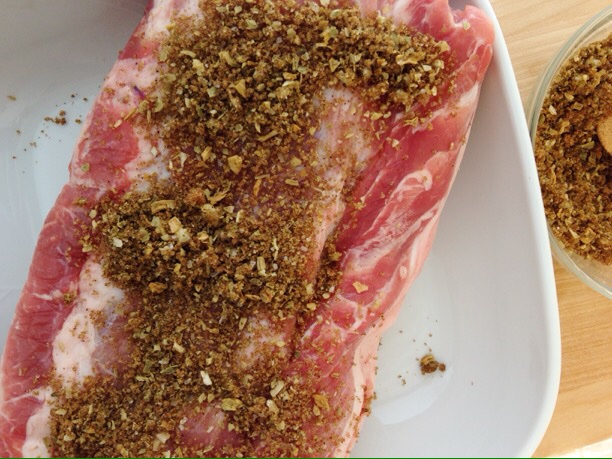
Why this recipe is healthy: Instead of using pork shoulder, a relatively fatty cut of pork, I chose pork loin roast. This is a leaner cut and performs quite well in the slow cooker. Sometimes there’s a little extra layer of fat on this cut too, so feel free to cut some of that off before putting the rub on it. Besides that, pretty much that dry rub, pineapple and slow-cooking make this a relative healthy alternative to so many other pulled pork recipes.
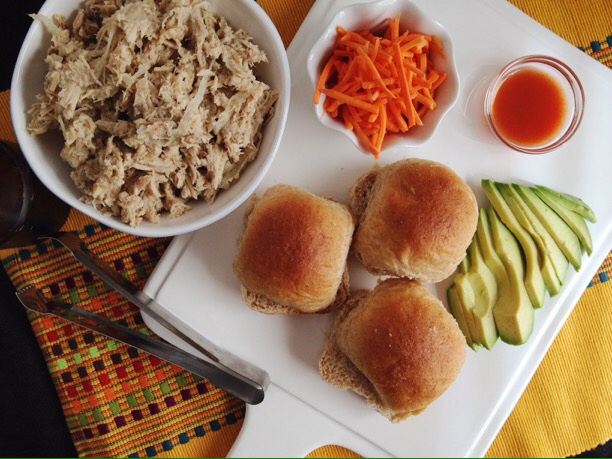
A simple rub of vibrant jerk spices makes this pork perfect in a sandwich, on top of a bed of lettuce or whole grains, stuffed in a pita or as a topping for pizza.
Ingredients
Scale
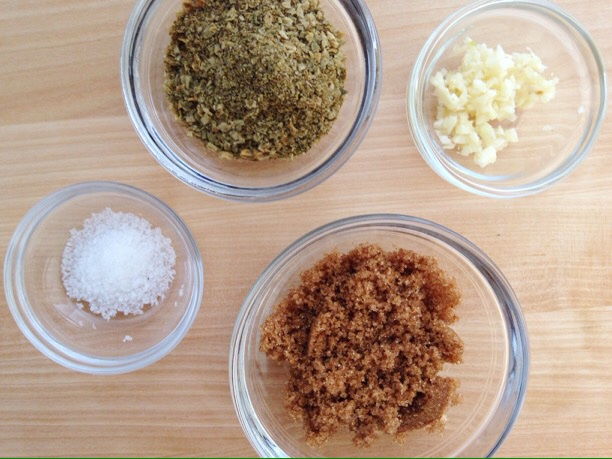
2–3 tablespoons jerk seasoning (use 2 for less heat, 3 for more heat)
2 tablespoons packed brown sugar
2 cloves garlic, minced
1/2 teaspoon Kosher or sea salt
2 1/2 pounds pork loin roast, trimmed of excess fat
1 small yellow or white onion, sliced
1/2 cup + 1/4 cup pineapple juice
1 1/2 cups chicken or vegetable broth
2 tablespoons apple cider vinegar
Kosher or sea salt, to taste
Instructions
In a bowl, combine the jerk seasoning, brown sugar, garlic and salt. Rub seasoning mixture all over pork roast. If doing this step the night before, place the pork in a rimmed baking dish or rimmed sheet pan, cover and refrigerate.
Spread the sliced onions in the bottom of a 4 1/2-6 quart slow cooker. Place pork roast on top of the onions.
Pour 1/2 cup pineapple juice and the chicken broth around the roast. Cover slow cooker with a lid and cook on low for 8 hours.
Carefully remove 1 1/2 cups of cooking liquid and discard. Using two forks, shred pork in the slow cooker. Add the remaining 1/4 cup pineapple juice and the apple cider vinegar. Cover and cook on low for at least 30 more minutes. Season with salt and serve.
Notes
This recipe makes about 6 cups of pulled pork. Lucky you!
Not hot enough? Top with a dash of hot sauce before serving.
Making sandwiches? Top with a carrot or cabbage slaw tossed with a simple dressing of apple cider vinegar, Dijon mustard and canola oil.
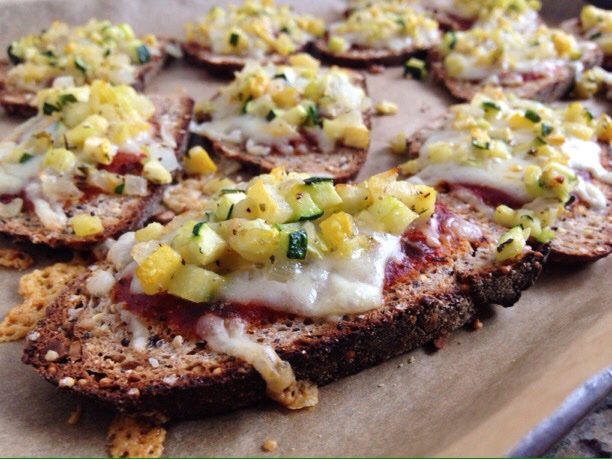
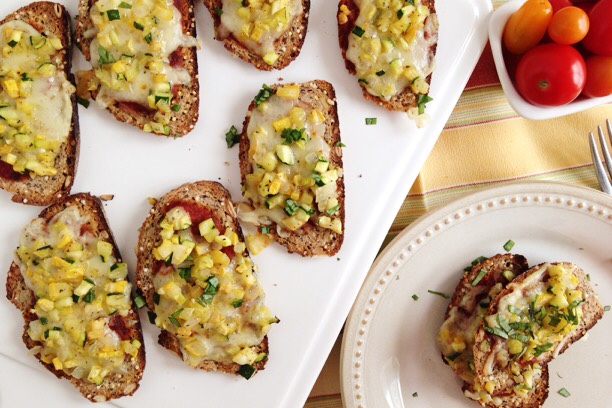
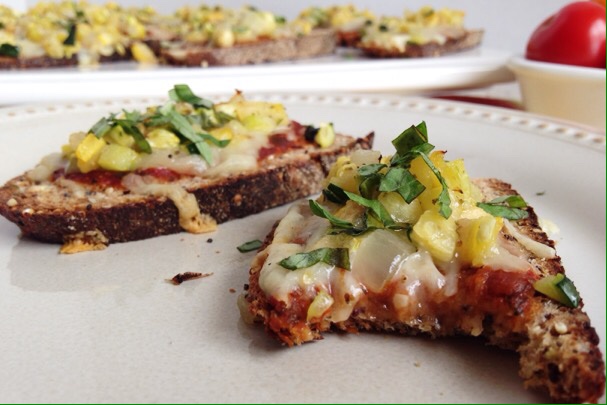
You love it so much that you insist on ordering it at least once a week from your favorite pizza place. While that’s fine and good, it’s um, actually not. Many pizza places load on the heavy toppings and leave you feeling like you just ate a vat of oil topped with a salt lick. Yuck. Ok, well, maybe it tastes good at the time, but it can leave you feeling pretty gross. But don’t worry, I have a solution! My famous (or soon-to-be-famous) Easy Pizza Toasts.
Yes, pizza can be yours and it can taste good and leave you feeling awesome!
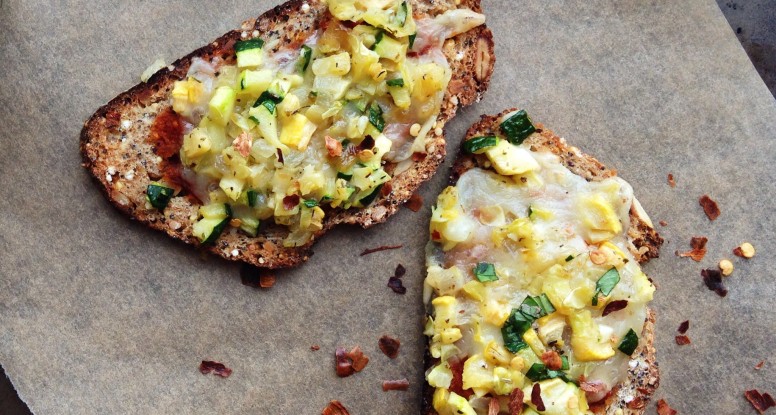
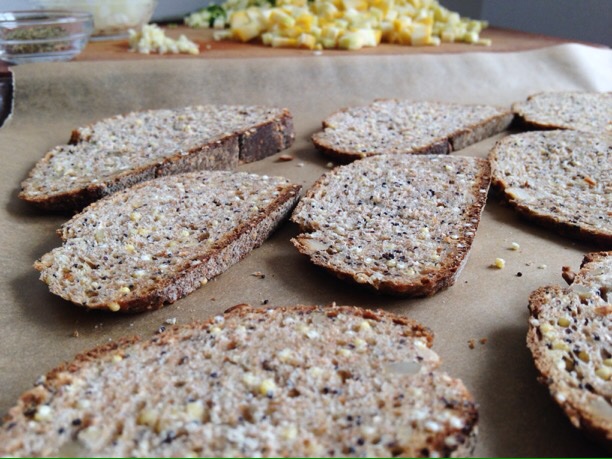
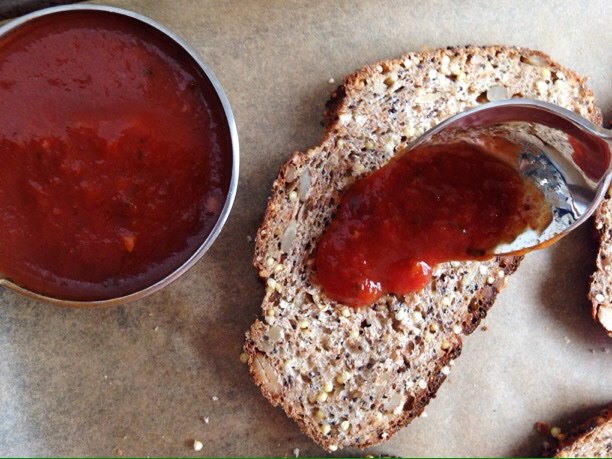
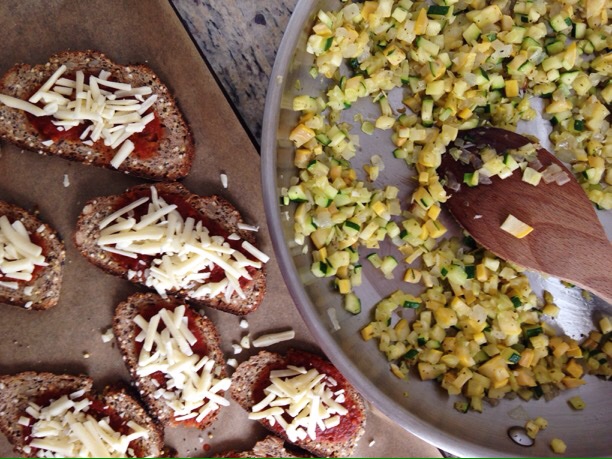
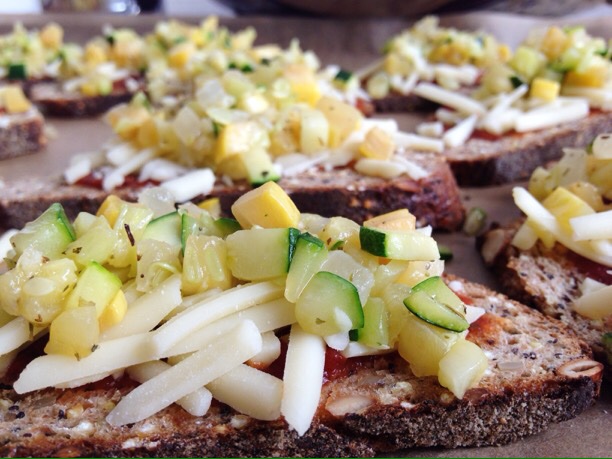
What’s the trick? There isn’t one! Yup, it really is easy. Let me explain. Start with some yummy whole wheat bread then slice it thinly. Cook up some yummy veggies (this toast I made with onions and squash) – hint, cut them up small so that they cook fast (this also makes them look super cute on your toasts). Spread a little marinara on top of those bread slices, top with a little cheese (a good, flavorful sharp cheddar is my favorite), then add the veggies. Slide them into the oven for about 10 minutes and you’ve got Easy Pizza Toasts!
So, no more heavy pizza for you (ok, have it every once in awhile), instead enjoy the crispy, crunchy, veggie-goodness of these Pizza Toasts!
Quickly sautéed veggies piled high on whole grain bread topped with cheddar cheese then toasted in the oven.
Ingredients
Scale
1/2 loaf, 15-ounce whole wheat baguette, cut into 1/2-inch thick slices on the bias
1 tablespoon olive oil
1/2 small onion (about 2 1/2 ounces), diced small
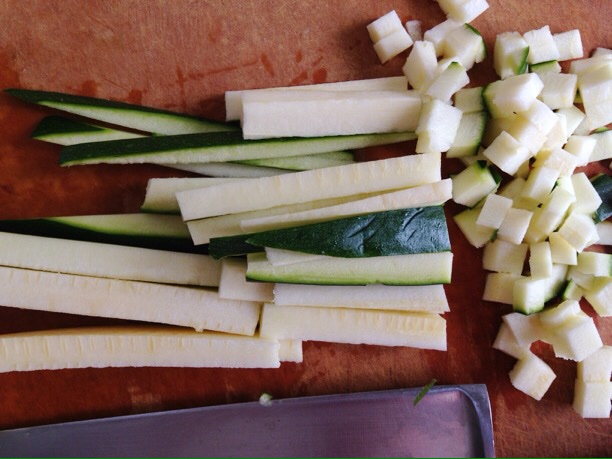
1/2 medium zucchini (about 5 ounces), diced small
1/2 medium yellow squash (about 5 ounces), diced small
1/2 teaspoon salt
1 clove garlic, finely chopped
1/2 teaspoon oregano
1 cup canned or jarred marinara sauce
2 cups shredded cheddar cheese
1/4 cup fresh basil, thinly sliced
Instructions
Preheat the oven to 400’F. Line a 9×13-inch sheet pan with parchment paper or foil.
Heat the oil in a large pan set over medium heat. Add the onion and cook stirring often, until softened, about 5 minutes. (You may need to adjust the heat to prevent burning.) Stir in the zucchini, squash and salt and cook an additional 5 minutes, stirring frequently. Add the garlic and oregano and cook one more minute. Remove pan from the heat.
Spread marinara sauce evenly over bread slices, then sprinkle with cheese. Top each slice with some of the squash mixture. Transfer pan to the oven and bake for 10 minutes or until bread is toasted and cheese has melted.
Garnish with fresh basil before serving.
Notes
This recipe makes 20 pizza toasts. A great appetizer or main dish!
It’s time for a new recipe! And here it is, the Short and Sweet (this is what I am calling my new abbreviated, get-to-the-point recipe blog posts) version!
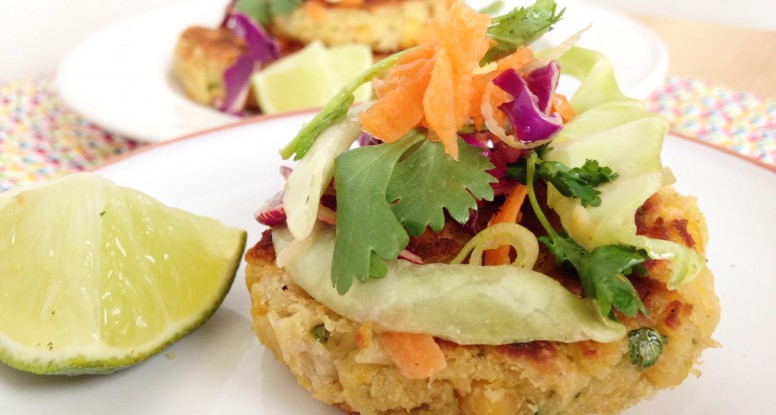
Why I made this recipe: Because I love Thai food and I adore veggie burgers, so why not combine them?
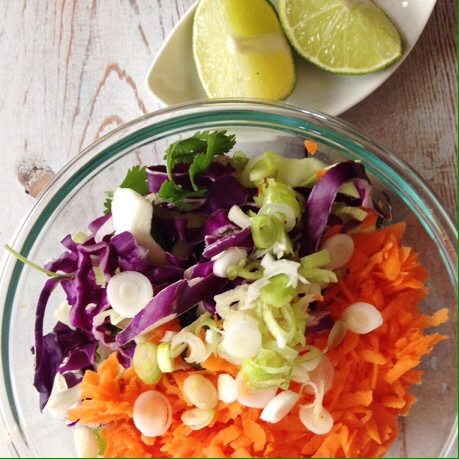
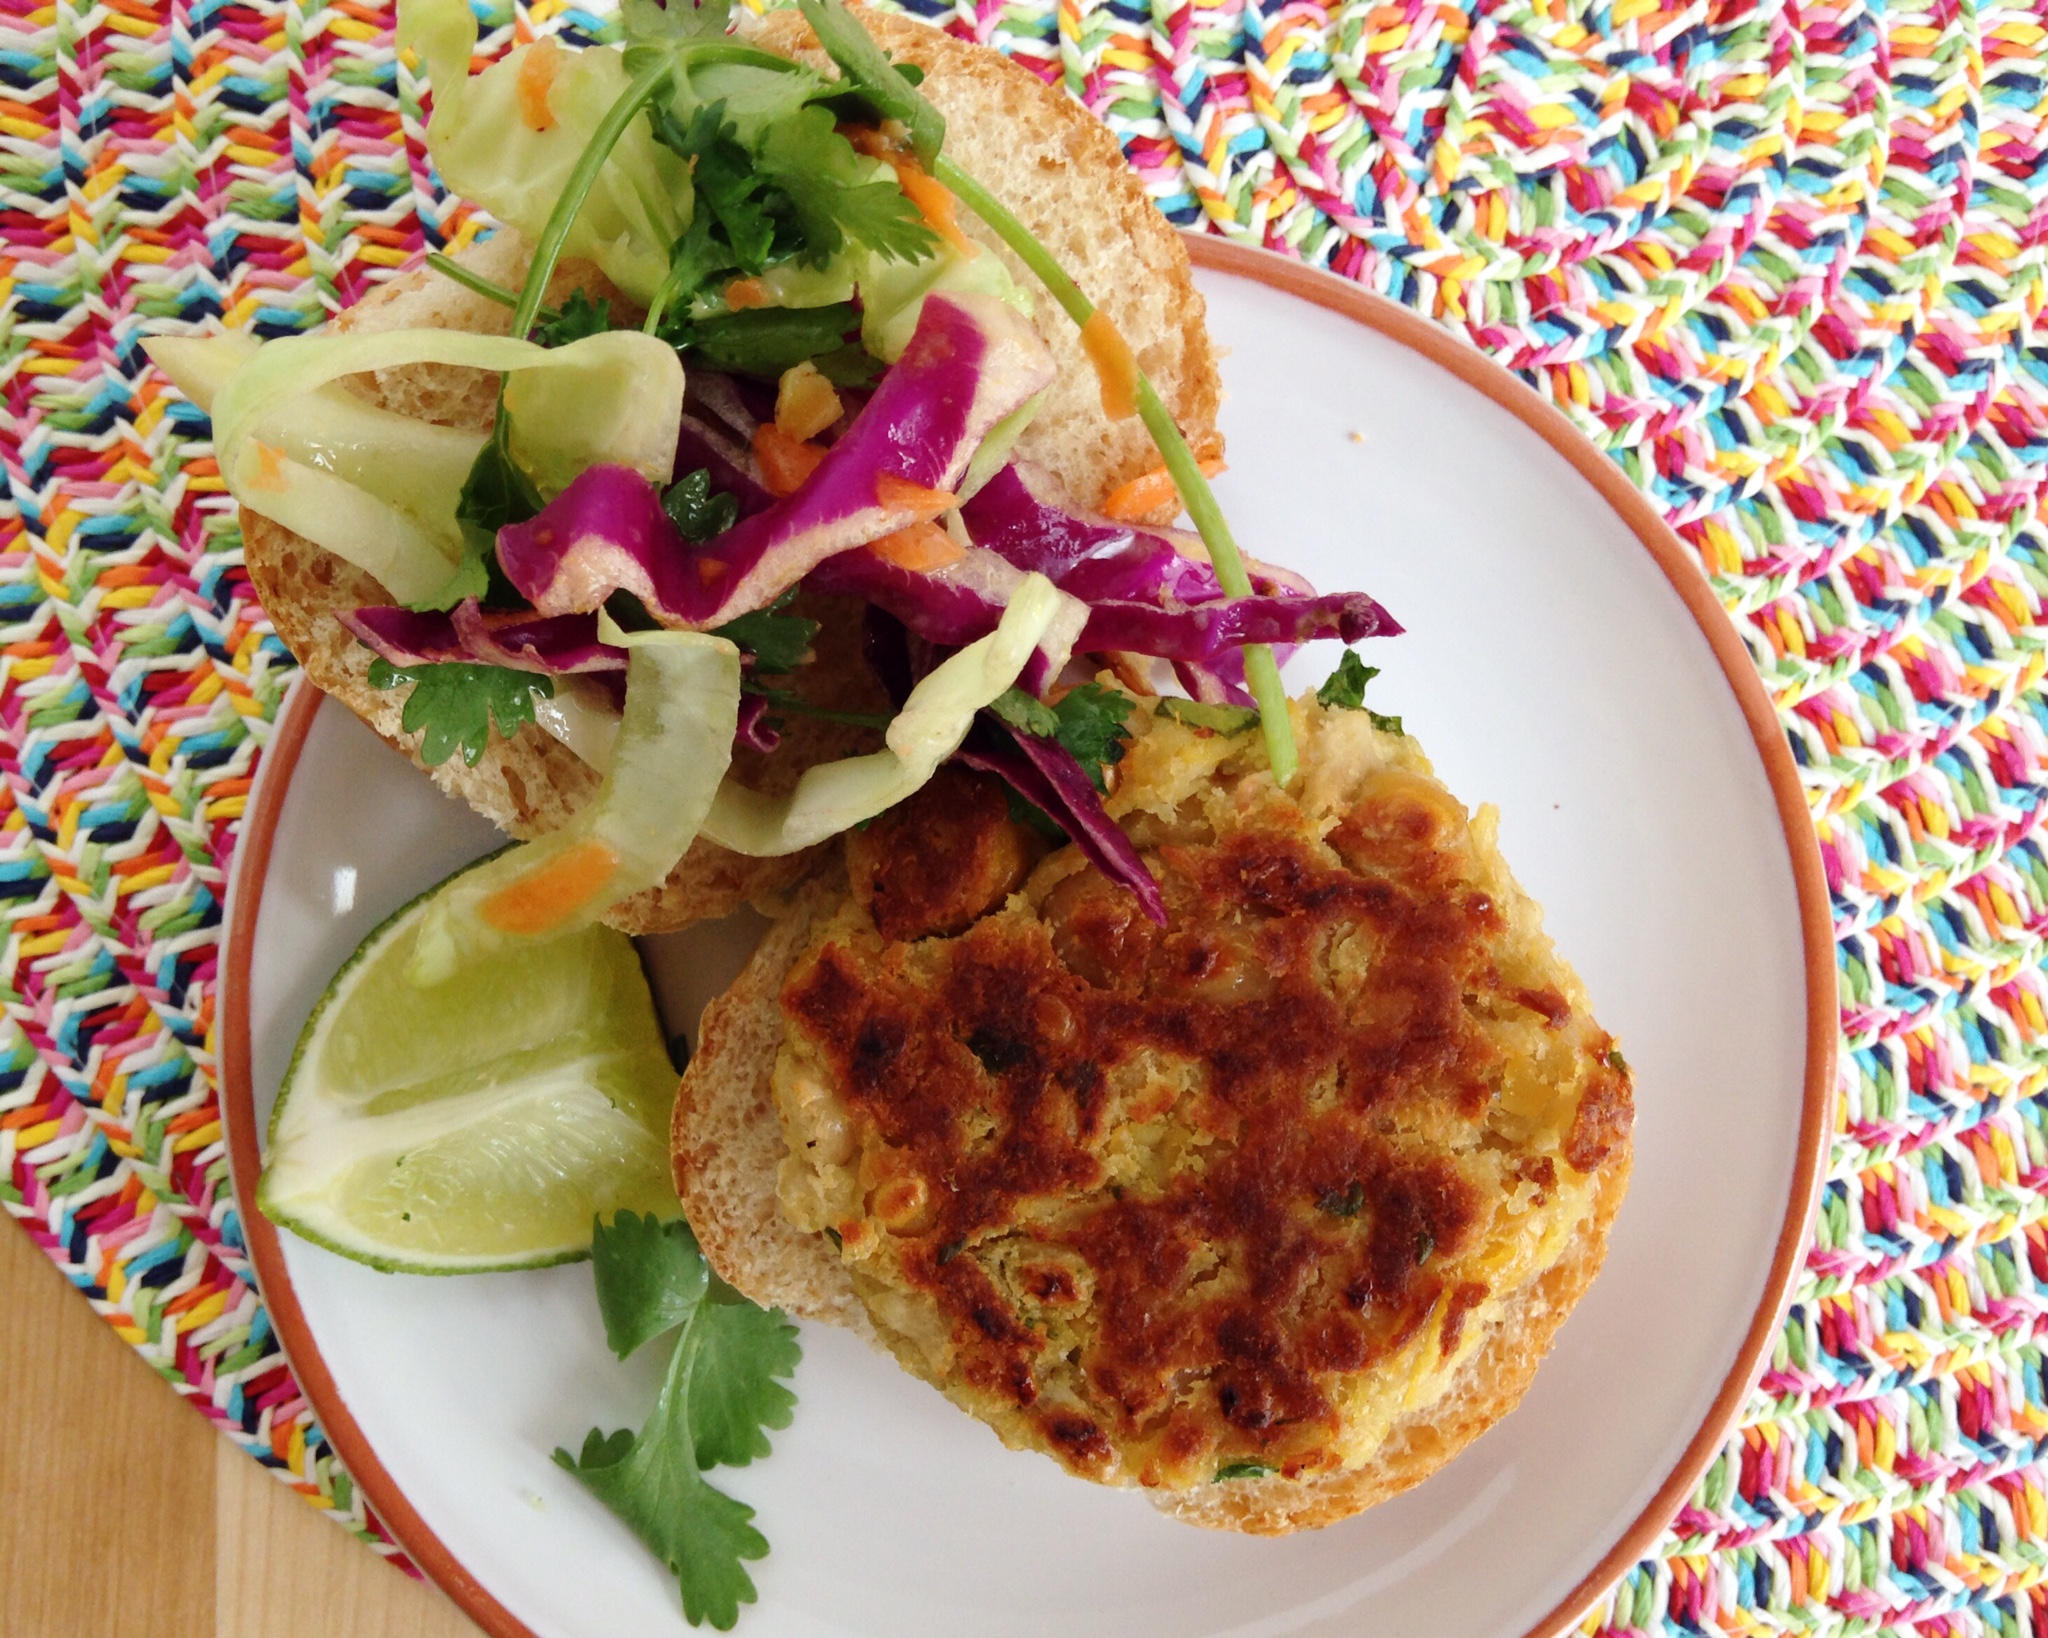
Why I love this recipe: Because these little chickpea burgers are super flavorful, satisfying and with the lime-infused slaw, taste so clean and refreshing.
How this recipe is healthy: I’m sure I don’t have to tell you this, but Americans don’t eat enough fiber. Getting enough is a tall order considering the average adult needs between 25-35 grams of fiber each day! One easy way to get more fiber is to eat more beans. Beans can help fill your “fiber bucket” to the tune of about 8 grams per half cup, and these burgers make it easy. And there’s more! Besides fiber, beans are also a superb source of lean vegetarian protein and they offer other goodies like folic acid and iron. The beans are great, but so is the slaw, which is made with fresh veggies including cabbage and carrots then tossed in a light lime-infused vinaigrette. It’s a nutrition-packed, satisfying meal!
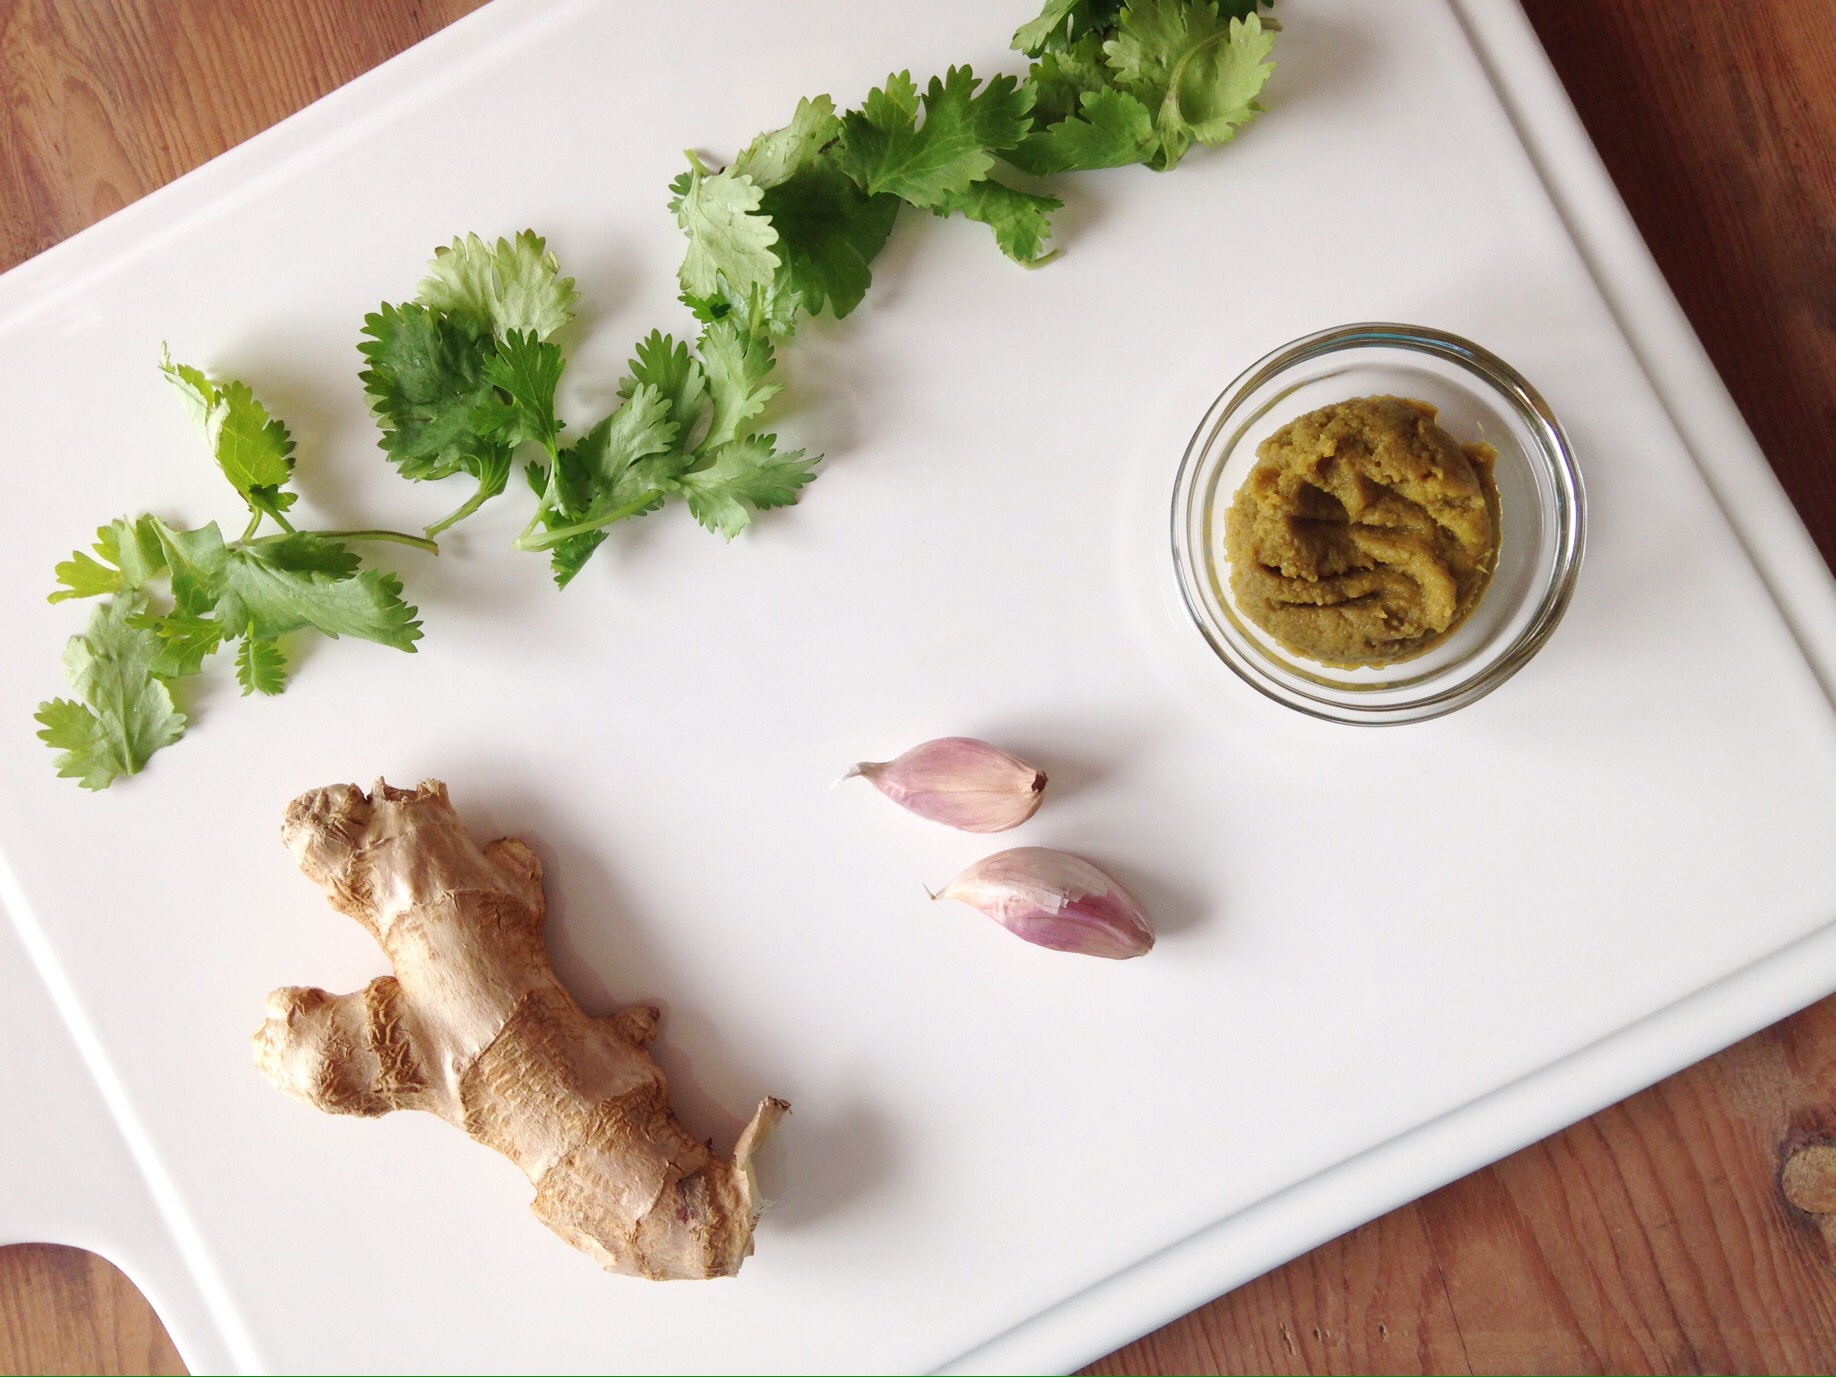
A chickpea burger that’s bursting with fresh garlic, ginger and Thai Green Curry paste then topped with a refreshing lime-infused cabbage slaw.
Ingredients
Scale
For the slaw
2 teaspoons Dijon mustard
1/2 lime, zested and juiced
2 tablespoons olive oil
1 1/2 cups shredded cabbage (red or green or both!)
1 cup shredded carrots
1 green onion, white part only, thinly sliced
1/4 cup cilantro leaves
For the burgers
1 15-ounce can chickpeas, drained and rinsed
1 15-ounce can white beans, drained and rinsed
1 large egg
1 tablespoon olive oil
1/4 cup cilantro, chopped
1 tablespoon + 1 teaspoon thai green curry paste (and up to 2 tablespoons)
1 teaspoon grated fresh ginger
2 cloves garlic, grated
1/4 teaspoon sea salt
3 tablespoons plain bread crumbs
4 teaspoons olive oil, divided
10 small whole wheat hamburger buns or dinner rolls, split in half and toasted
Instructions
For the slaw
Combine the mustard, lime zest and lime juice together in the bottom of a medium mixing bowl. Gradually add the olive oil, whisking until incorporated. Add the cabbage, carrot, green onion and cilantro and toss to combine.
Cover and refrigerate until ready to eat.
For the burgers
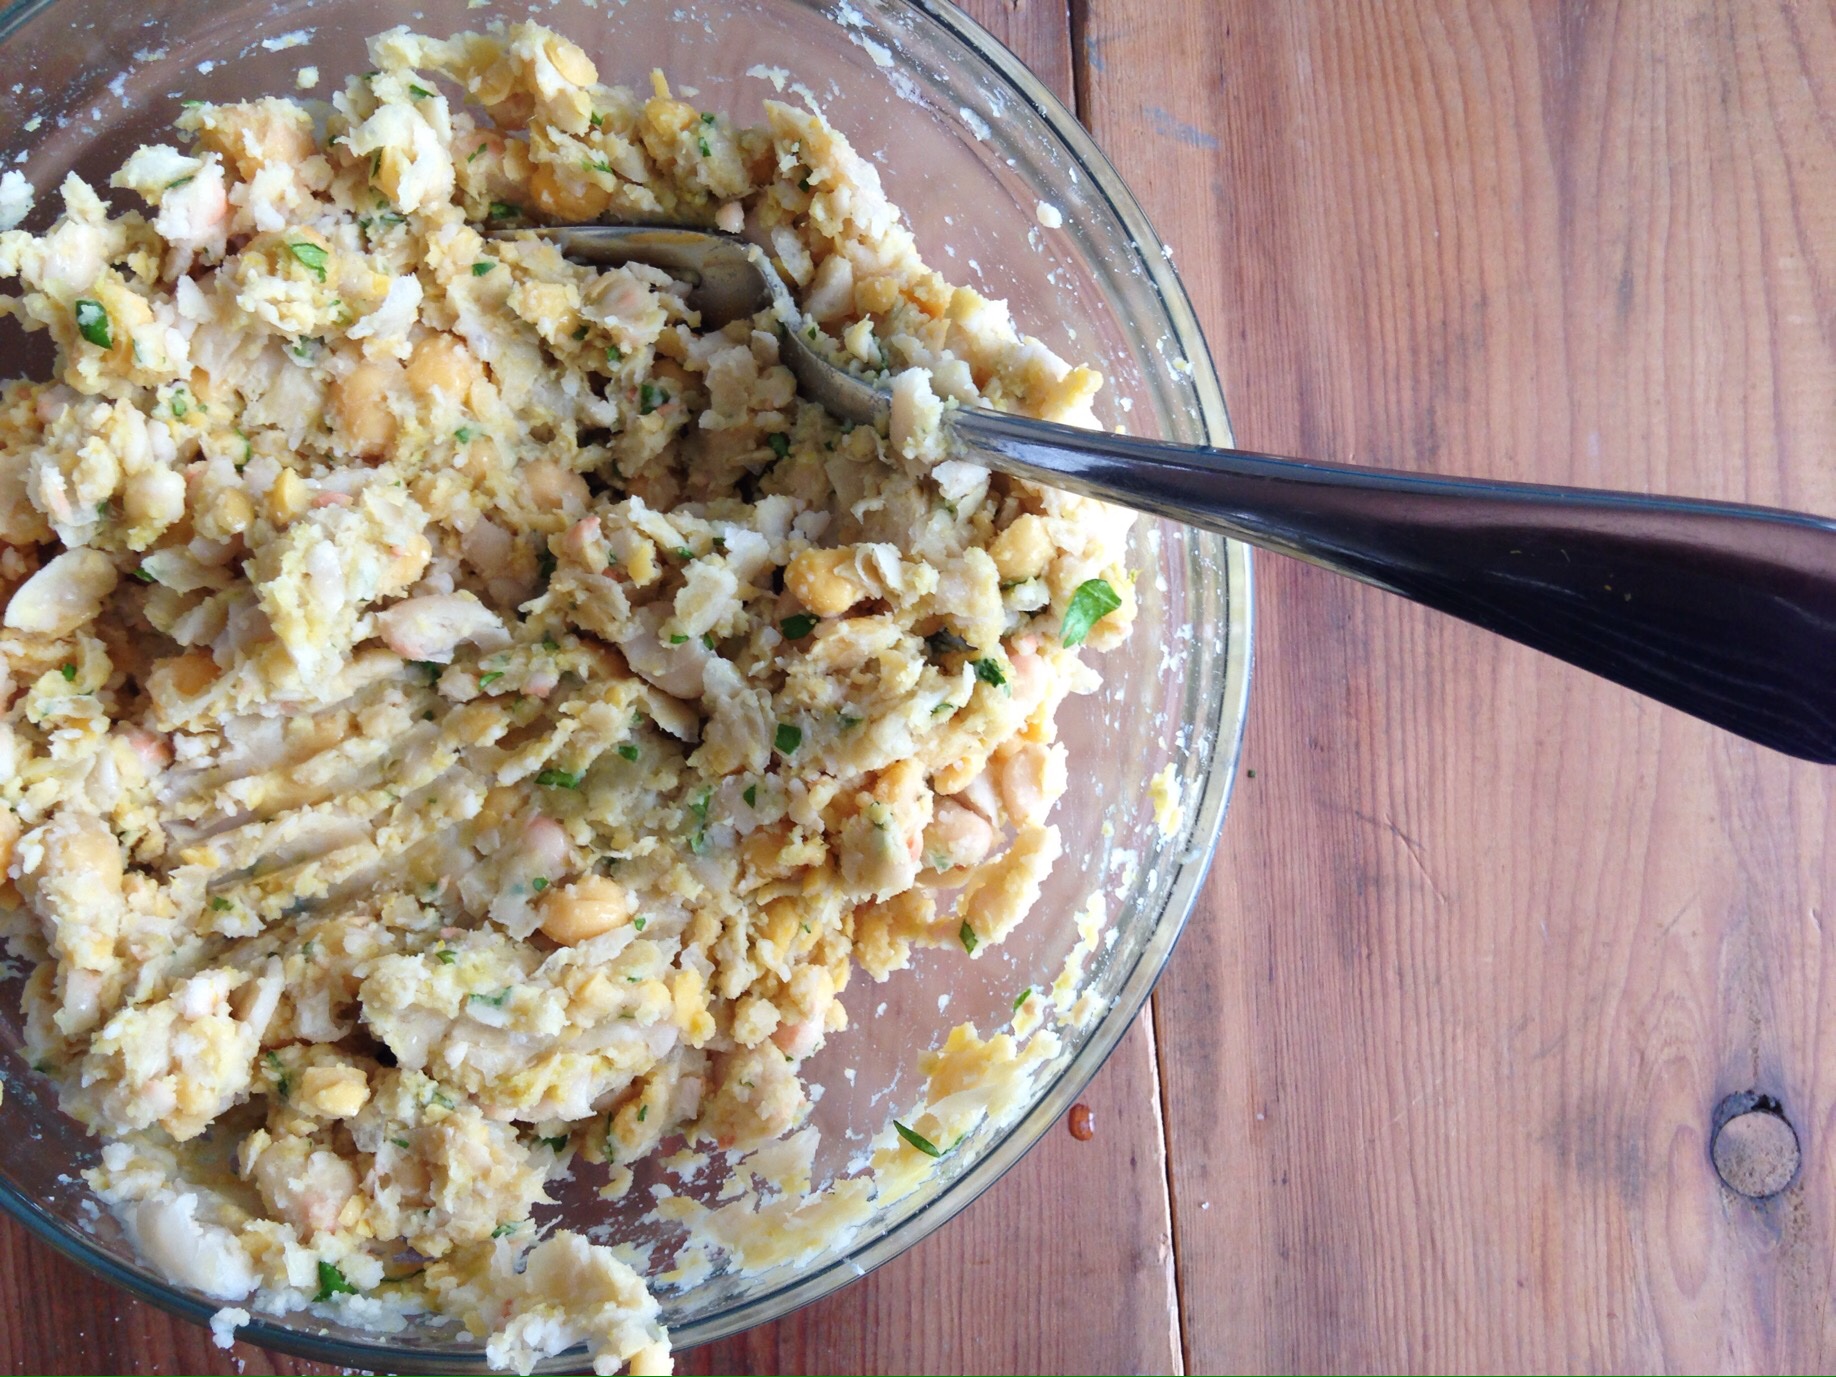
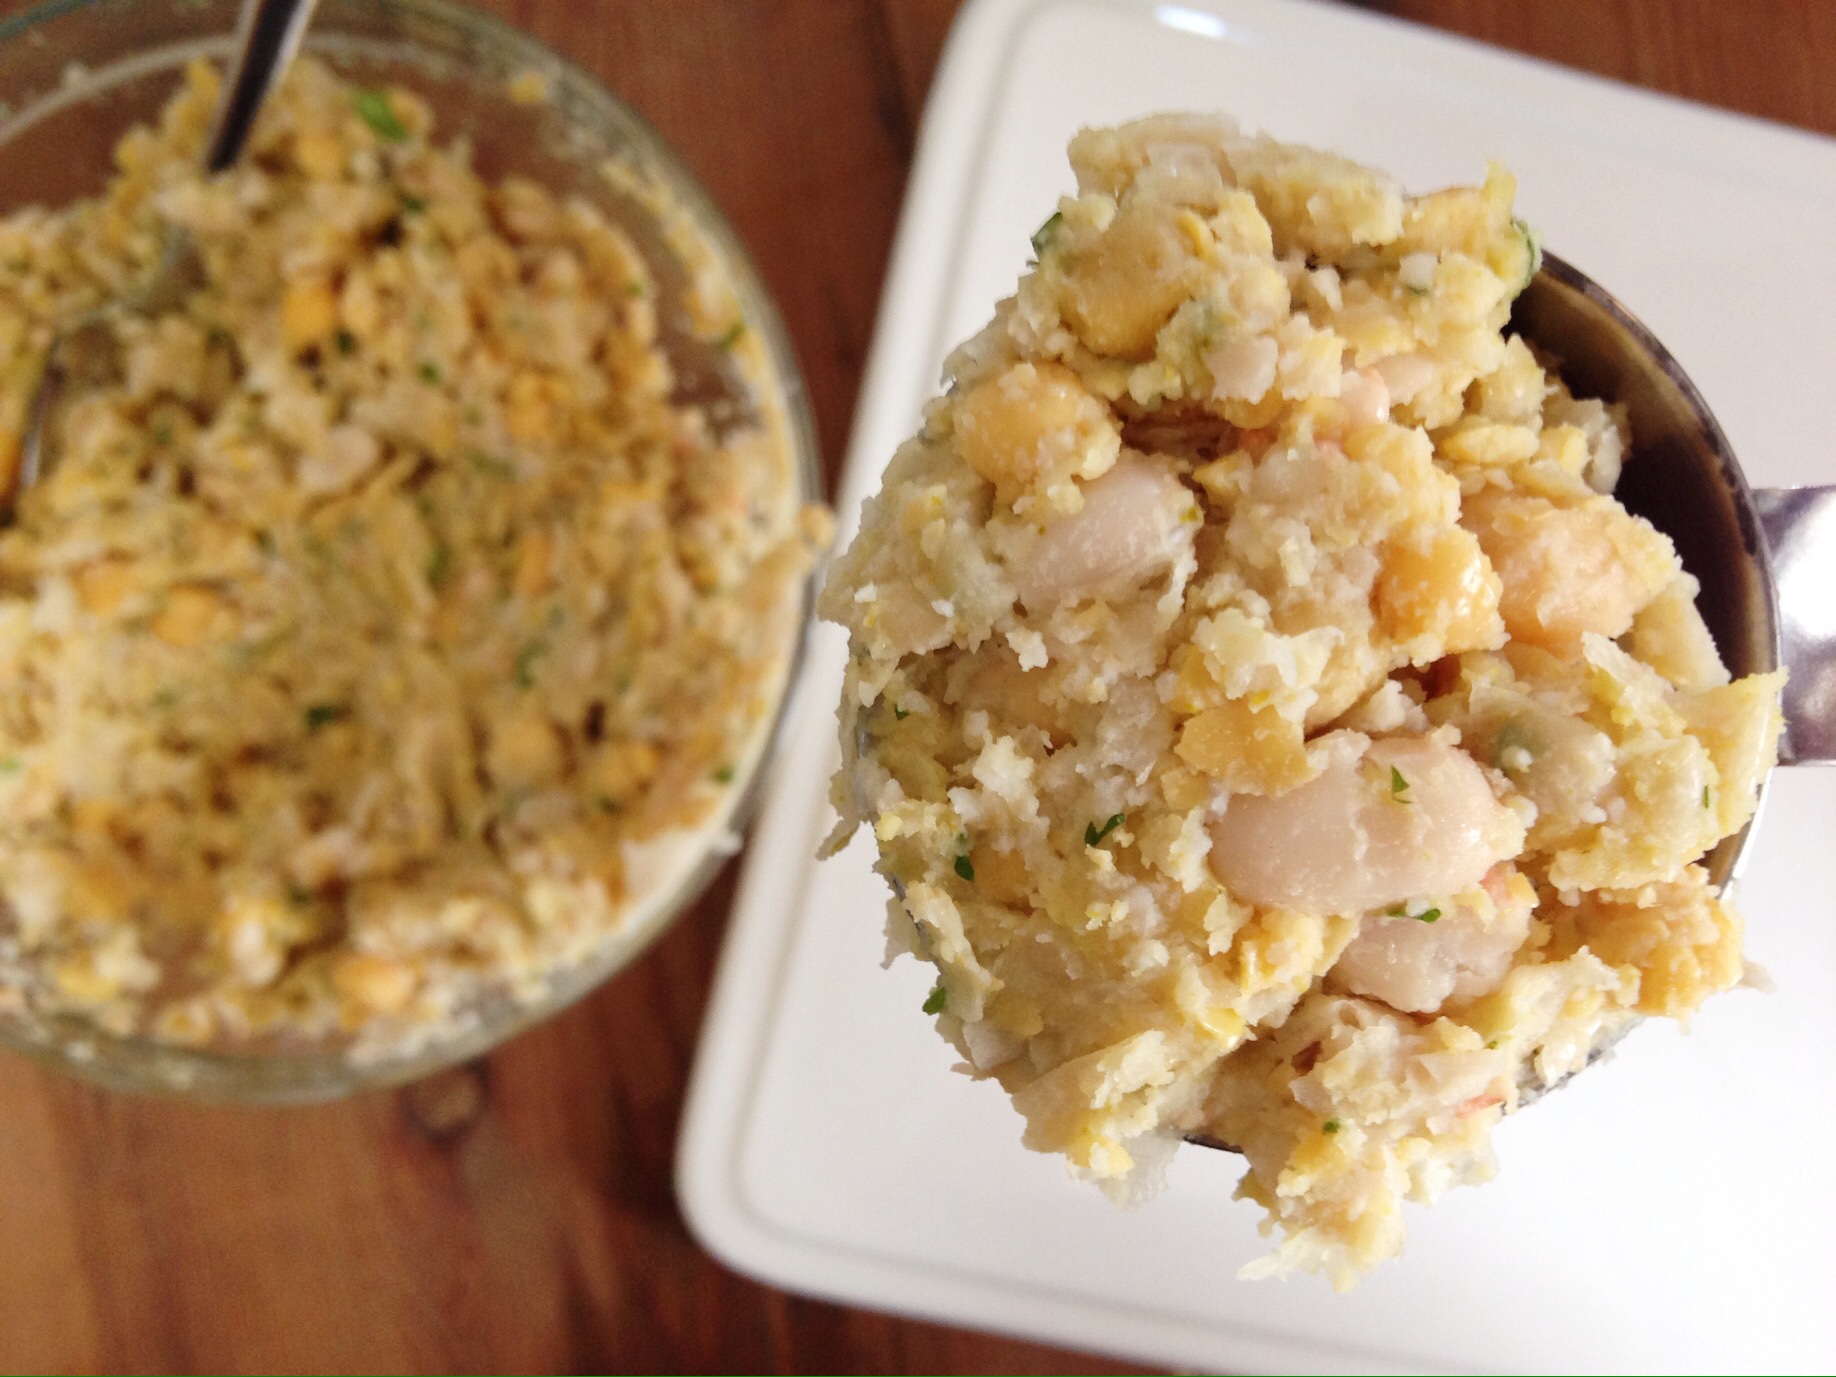
Place beans in a large mixing bowl and partially mash with a fork or avocado (or potato) masher.
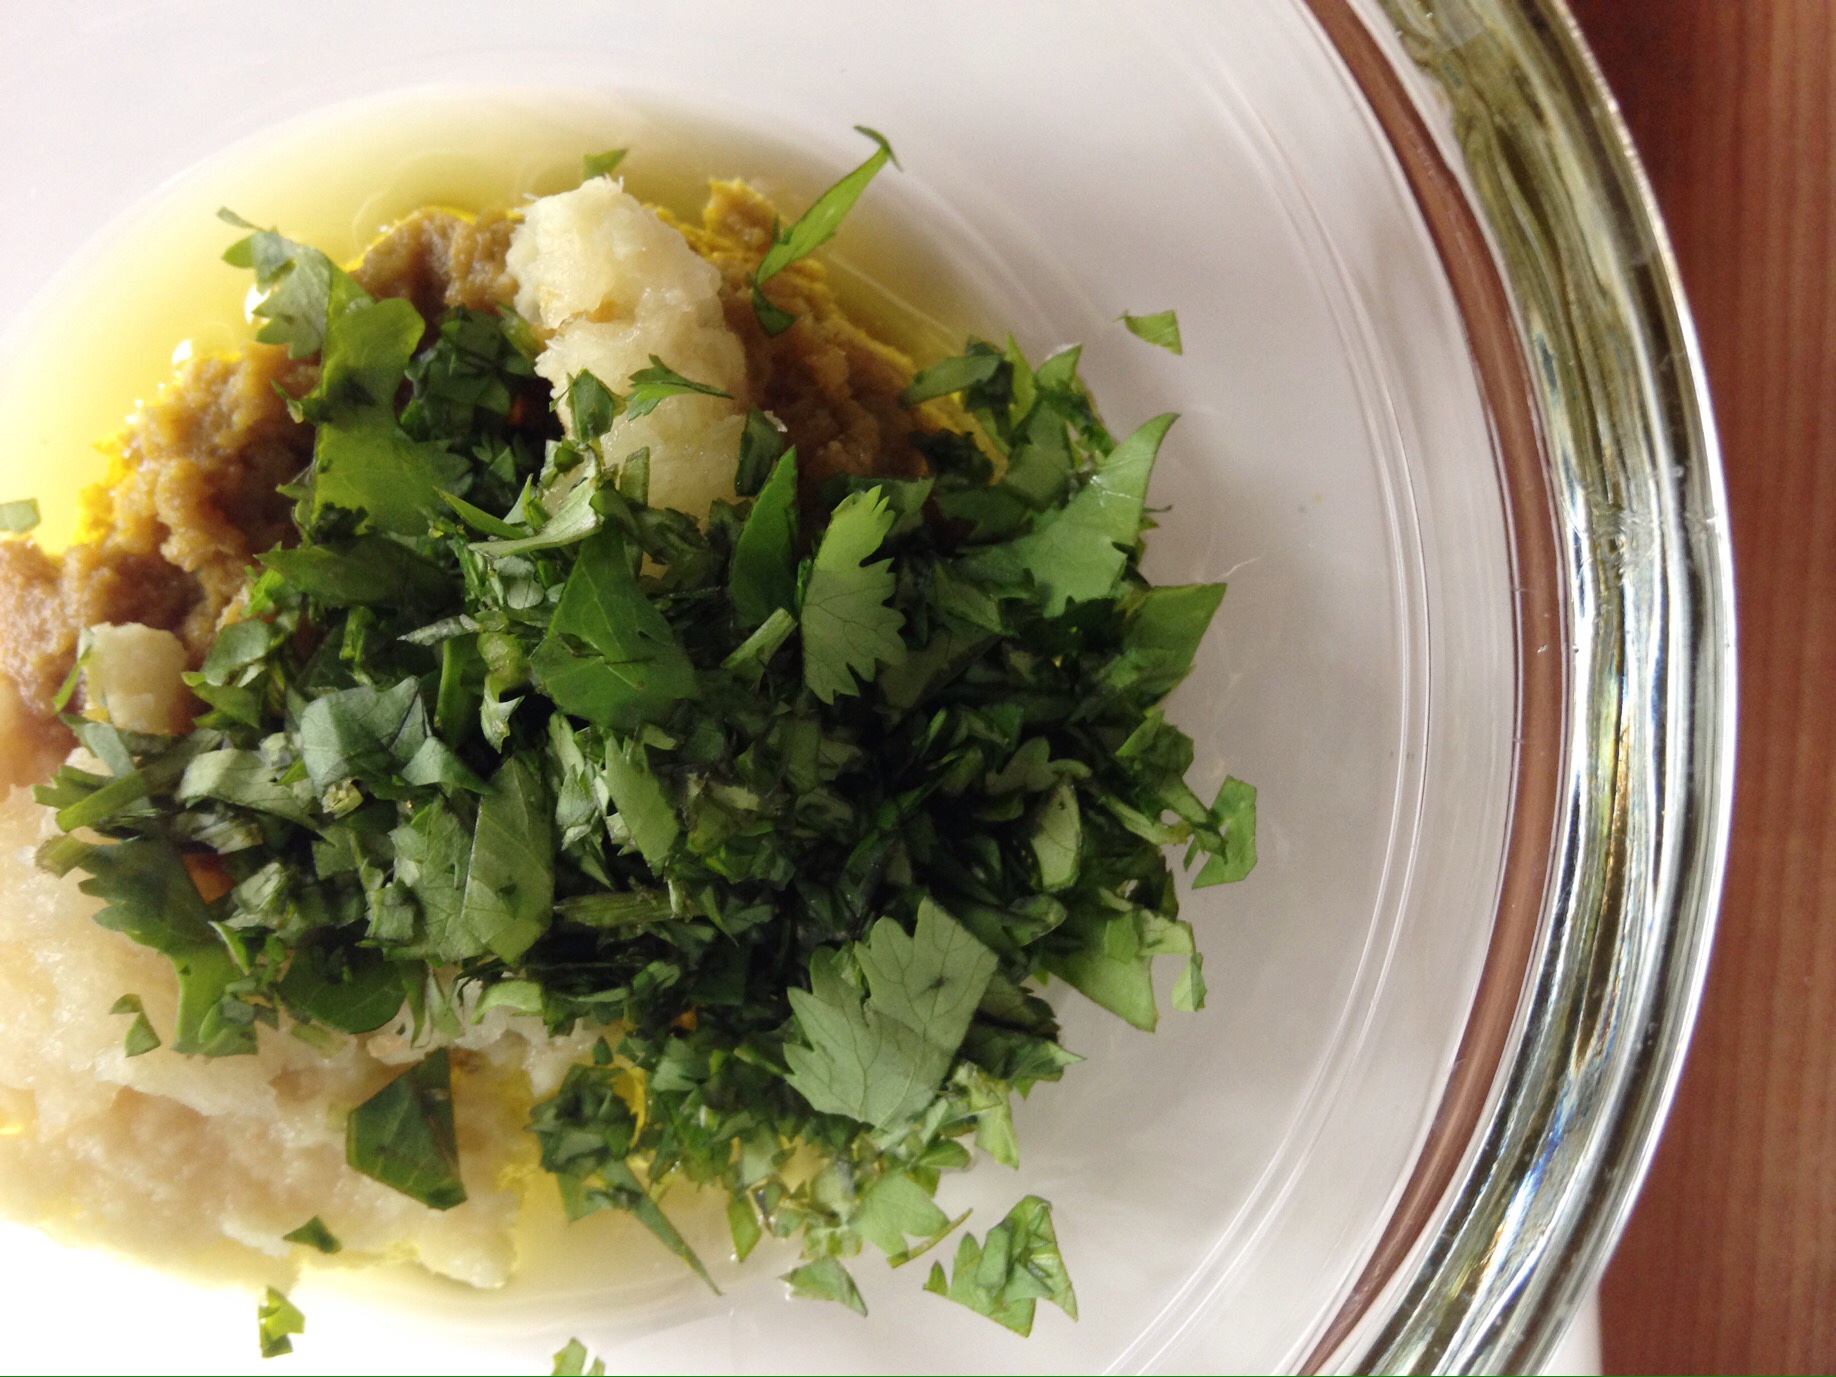
In a separate bowl, whisk the egg together with the olive oil, cilantro, curry paste, ginger, garlic and salt. Add mixture, along with the bread crumbs, to beans and stir to combine.
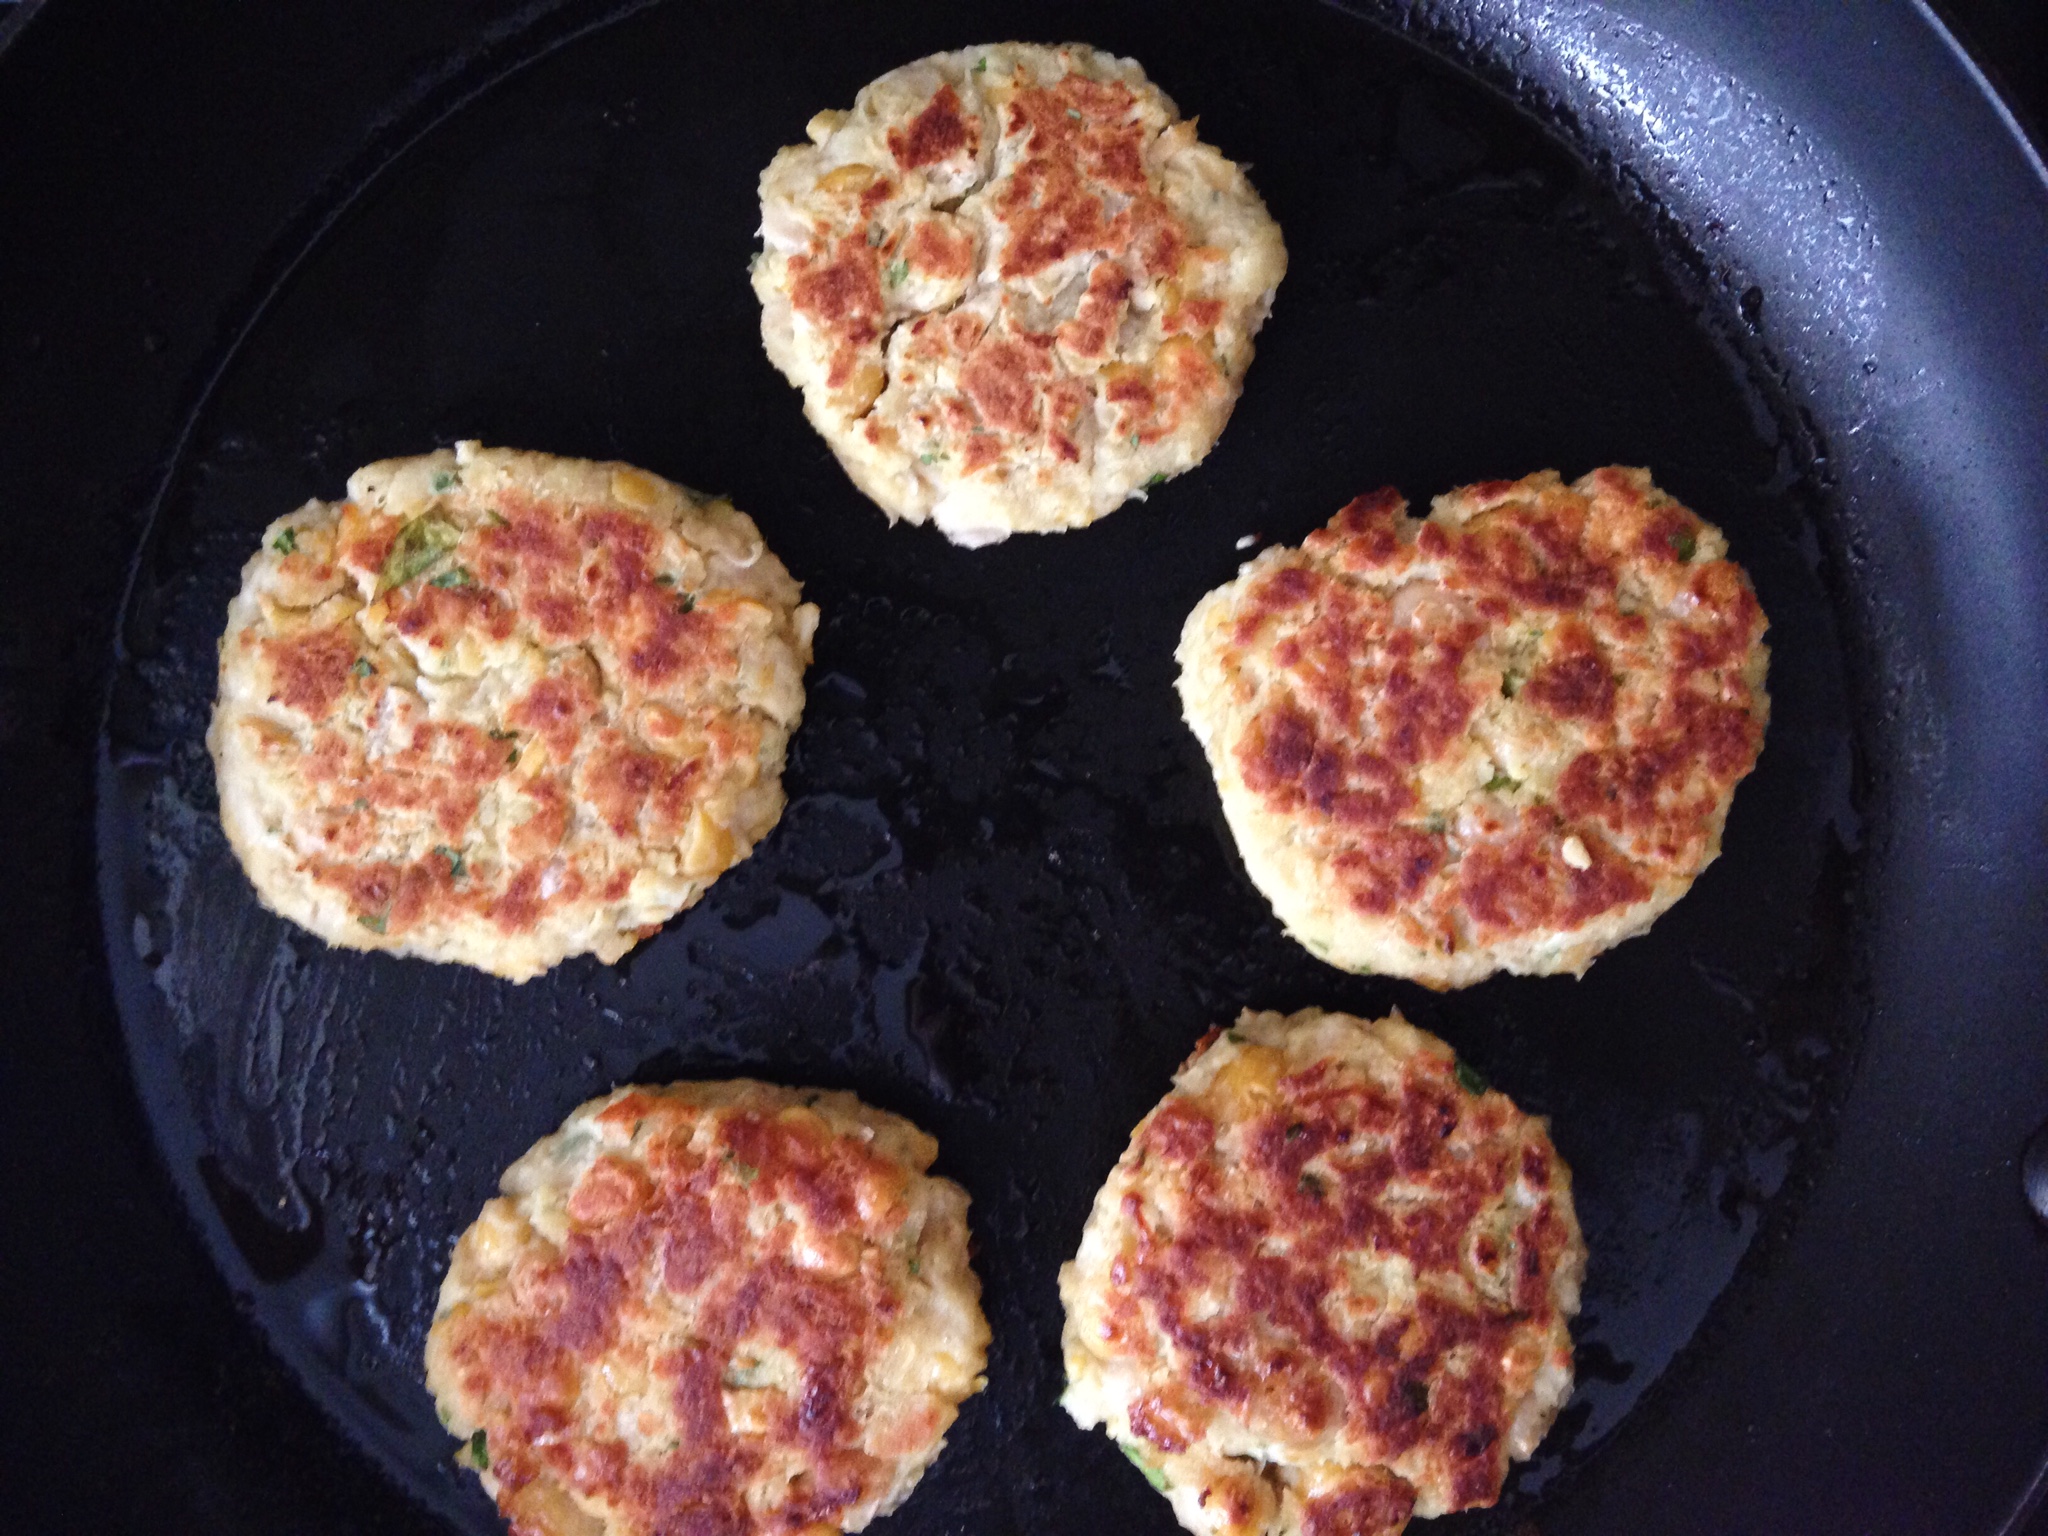
Using a 1/4 cup measure, loosely scoop out the bean mixture and shape into patties.
Heat half of the olive oil in a non-stick pan set over medium heat. Add half of the patties and cook for about 5 minutes. Carefully flip them over and cook an additional 5 minutes. Remove the patties from the pan and cover with foil to keep them warm. Add the remaining oil and repeat the process with the remaining patties.
Place the cooked patties on the toasted buns and top with a rounded 1/4 cup of the slaw. Serve immediately.
Notes
Attention vegans and others with egg and gluten allergies! You can make these without the egg and breadcrumbs. Simply omit them and follow the instructions as written. The burgers will be a little crumbly, but still super tasty. And enjoy the burger sans bun or opt for a GF bun for all you gluten sensitive folks.
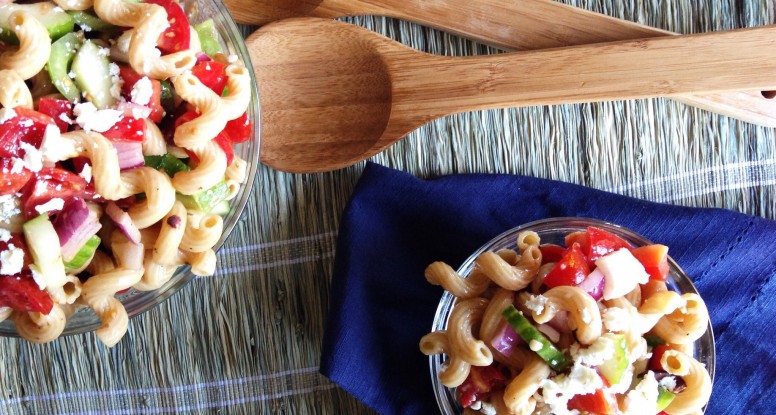
I am trying something new. I know you’re busy, and there are likely times that you don’t even read my blog posts. Don’t worry, I’m not mad, I totally get it. You just want the recipe. I’m excited to start off this series with a simple recipe for Greek Pasta Salad.
I adore tacos. Besides pizza, no other food is better in my opinion. I love tacos because they are the perfect vehicle for so many other great foods. Just think about it. Tacos are delicious filled with grilled chicken and a simple pico de gallo. They are also fantastic loaded with spicy oven-baked tofu and a refreshing cilantro cabbage slaw. And how about fish? I mean, who doesn’t love a fish taco?
In my house, tacos rule and I am constantly finding new fillings for my favorite food. To honor “Meatless Monday“, I came up with a vegetarian taco recipe that earned two thumbs up from my little family. These black bean and mushroom tacos are bursting with flavor and umami, so even if you’re a meat-eater, you won’t miss the meat. They are simple to make and many of the ingredients can be prepped the day before so that all you have to do is cook and serve. You’re welcome!
Besides being simple and delicious, tacos are also a great, healthy option for any meal. Use a whole grain tortilla and fill it with lean meats or beans and top with plenty of fresh produce like sautéed peppers, shredded kale or romaine lettuce, chopped tomatoes and thinly sliced jicama. Or why not fill it with last night’s veggie stir-fry or leftover quinoa and grilled corn? Be creative and have fun with your tacos! The options are truly limitless.
In the mean time, try these black bean and mushroom tacos. They’re sure to make your Meatless Monday meal a success!
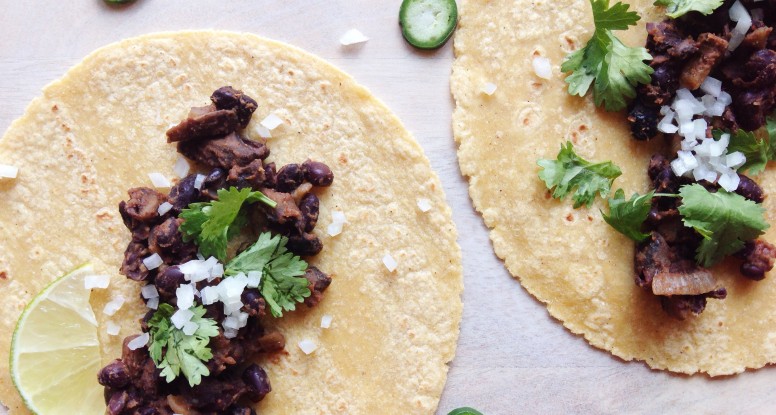
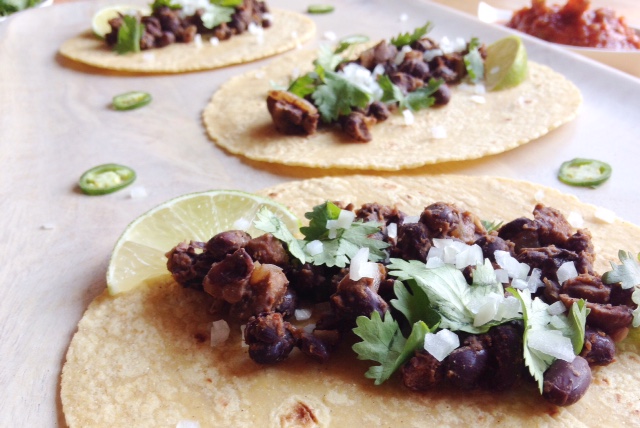
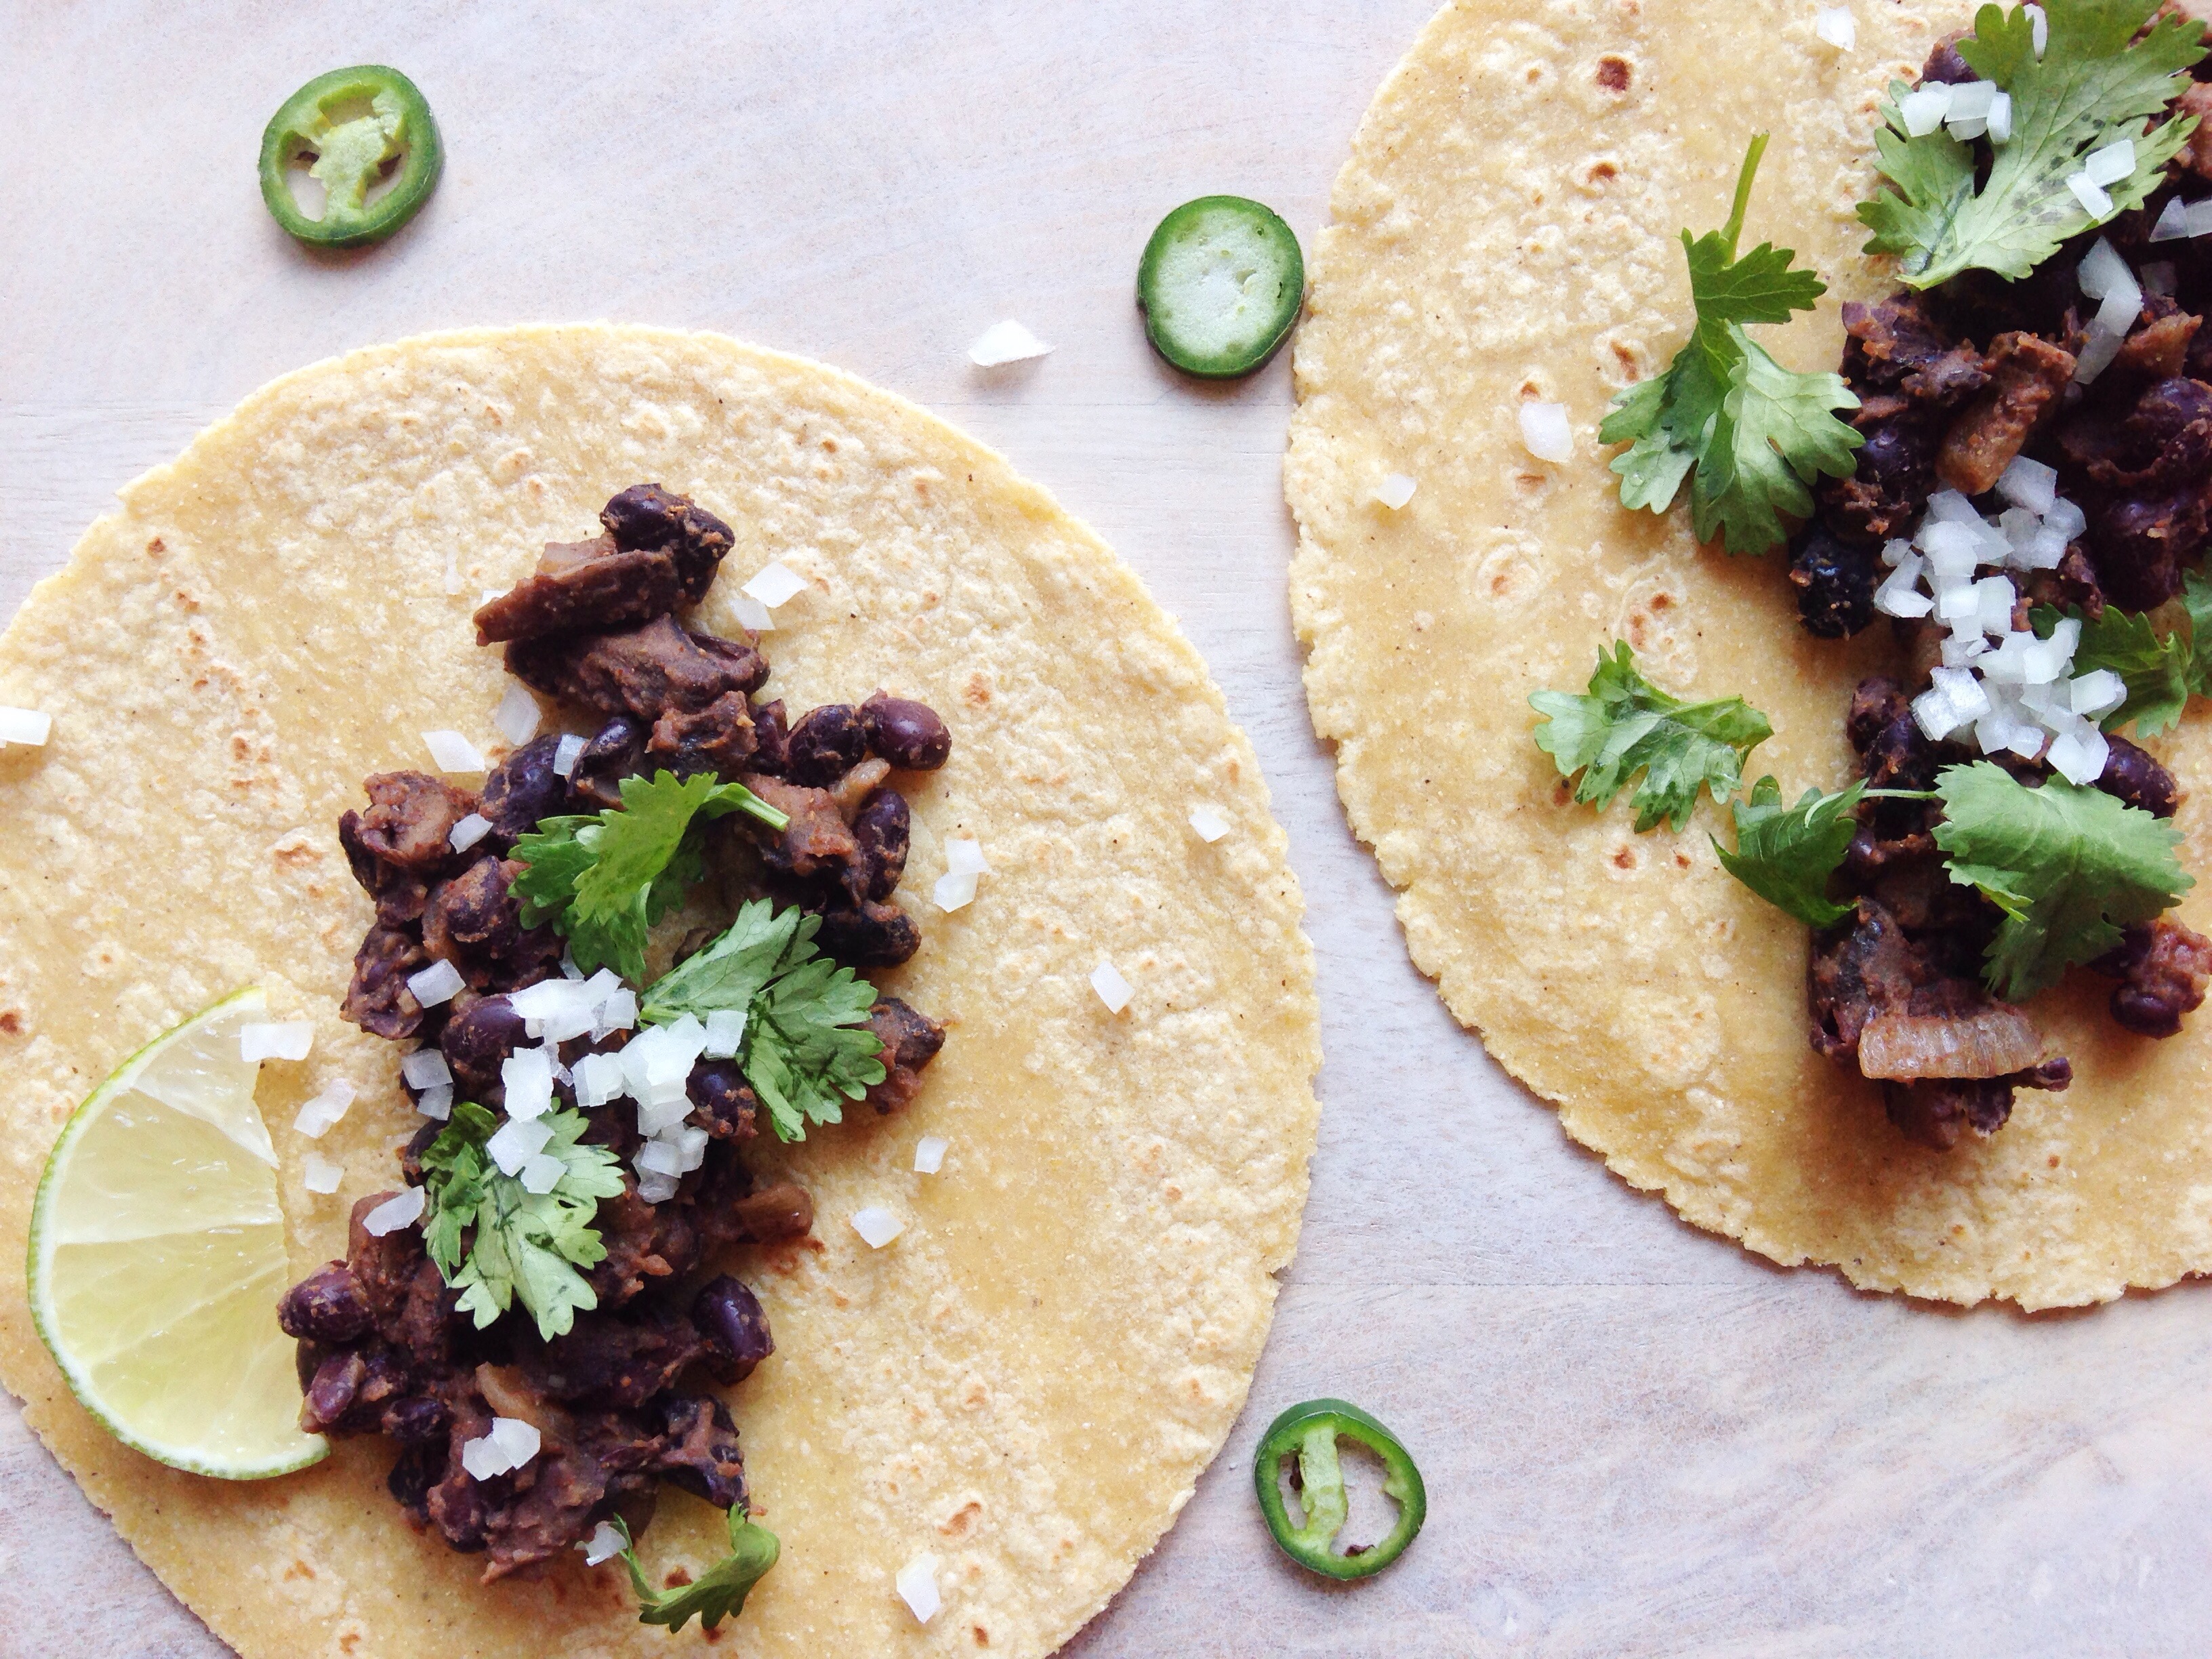
Perfect for taco night! A delicious sauté of mushrooms and black beans makes the perfect filling for tortillas.
Ingredients
Scale
1 tablespoon olive oil
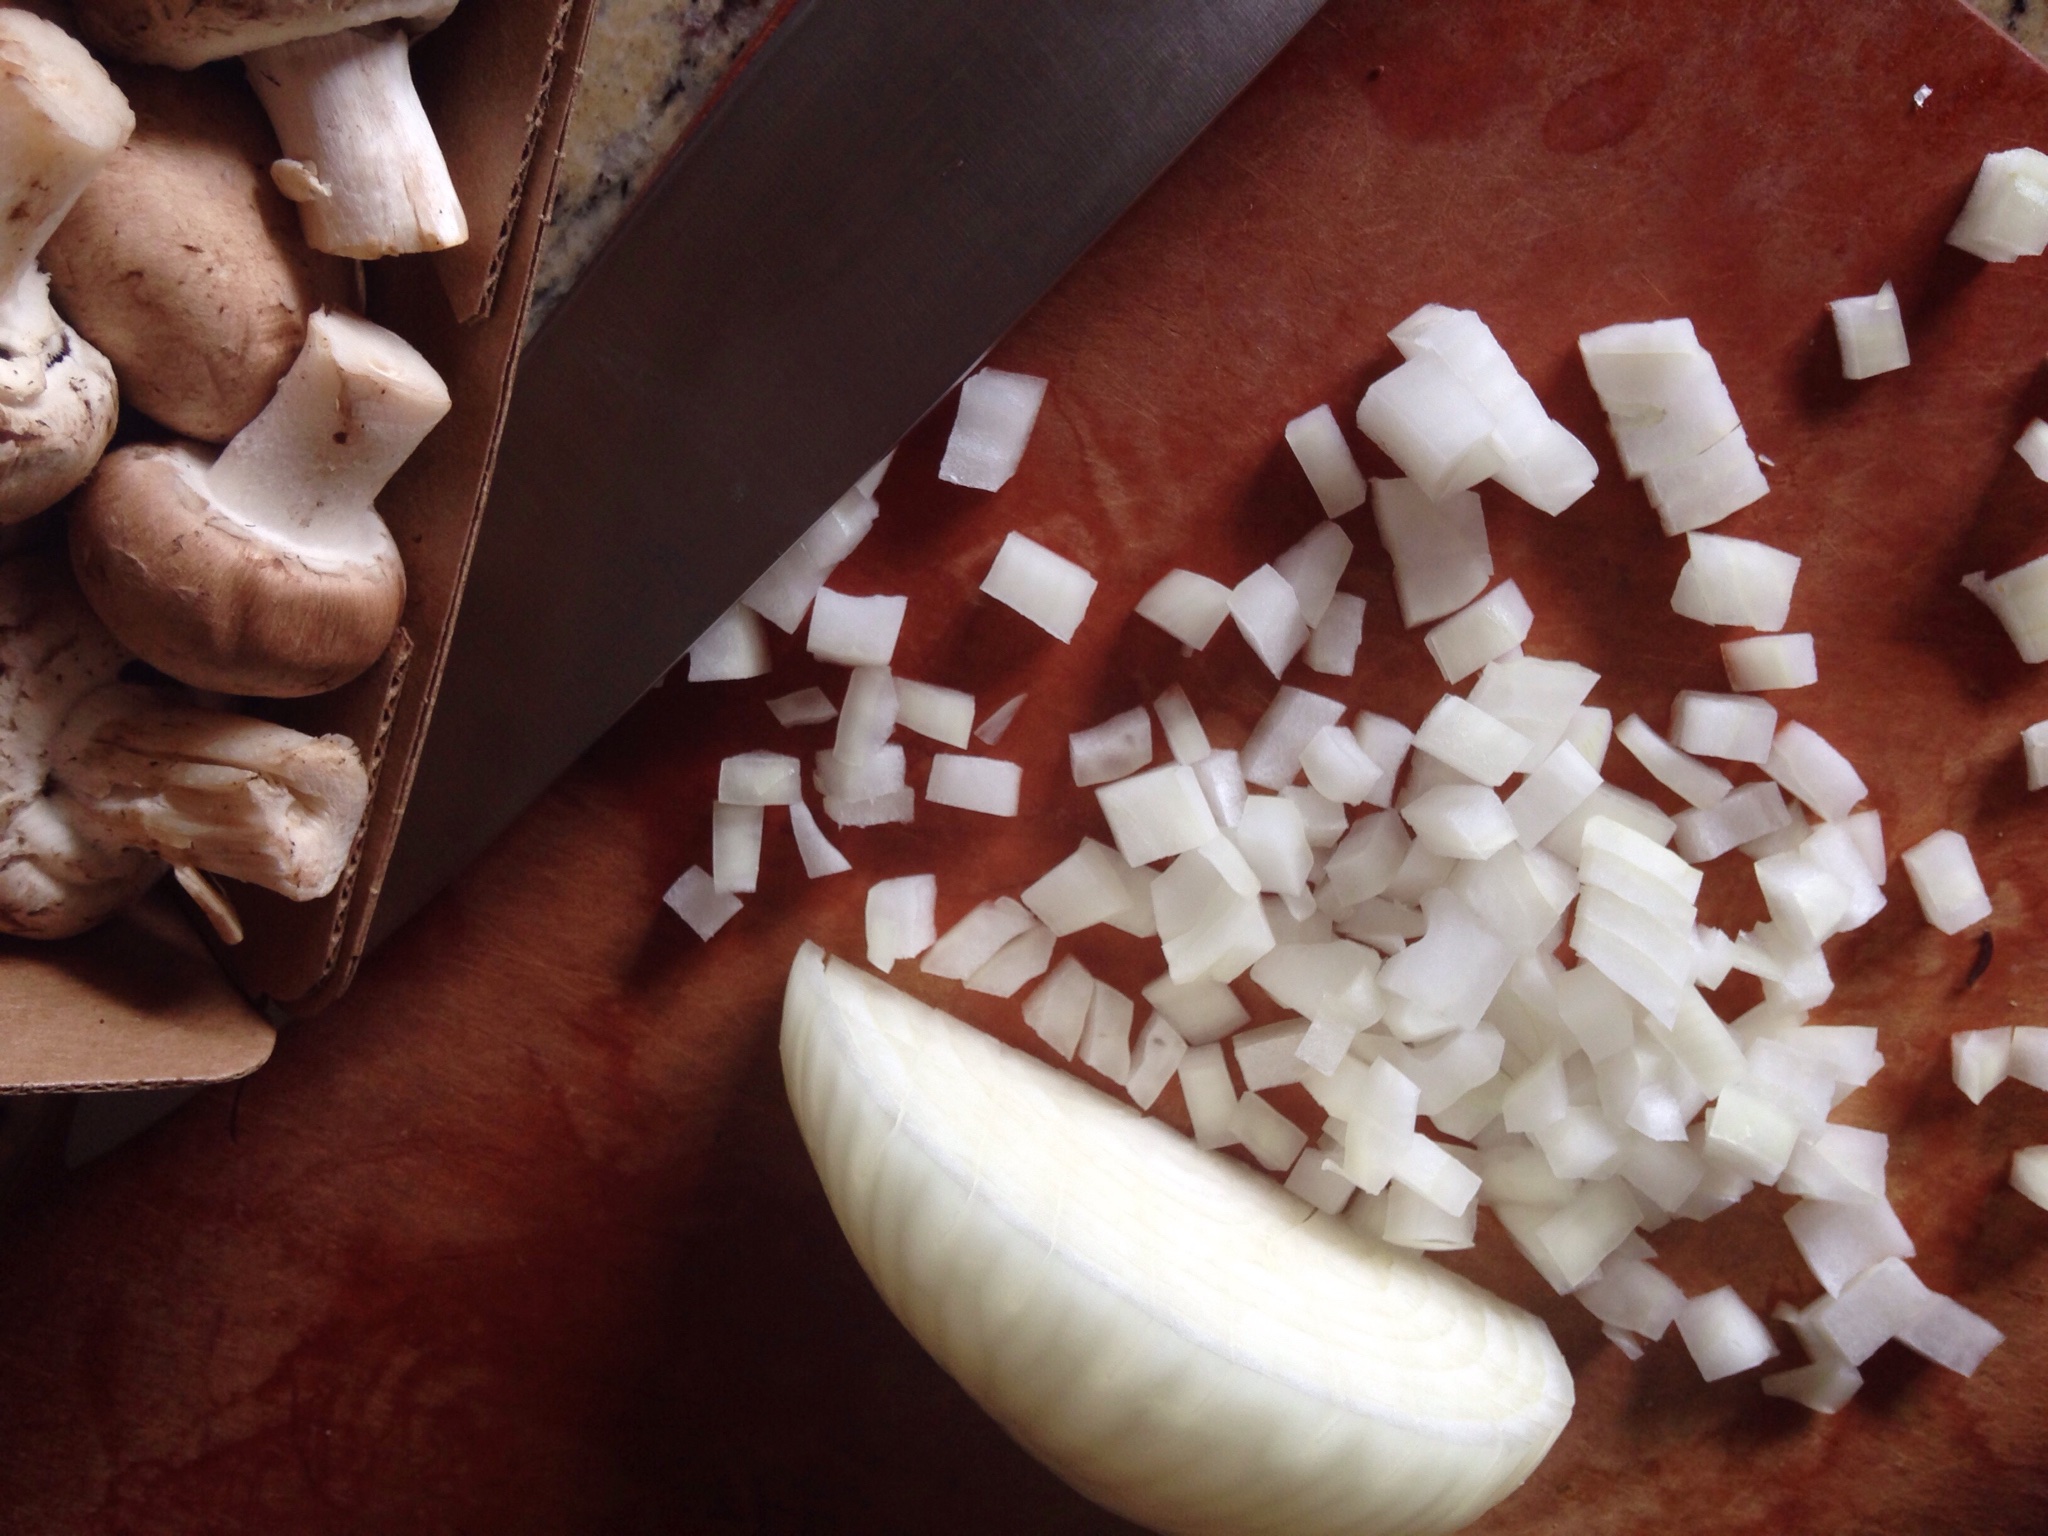
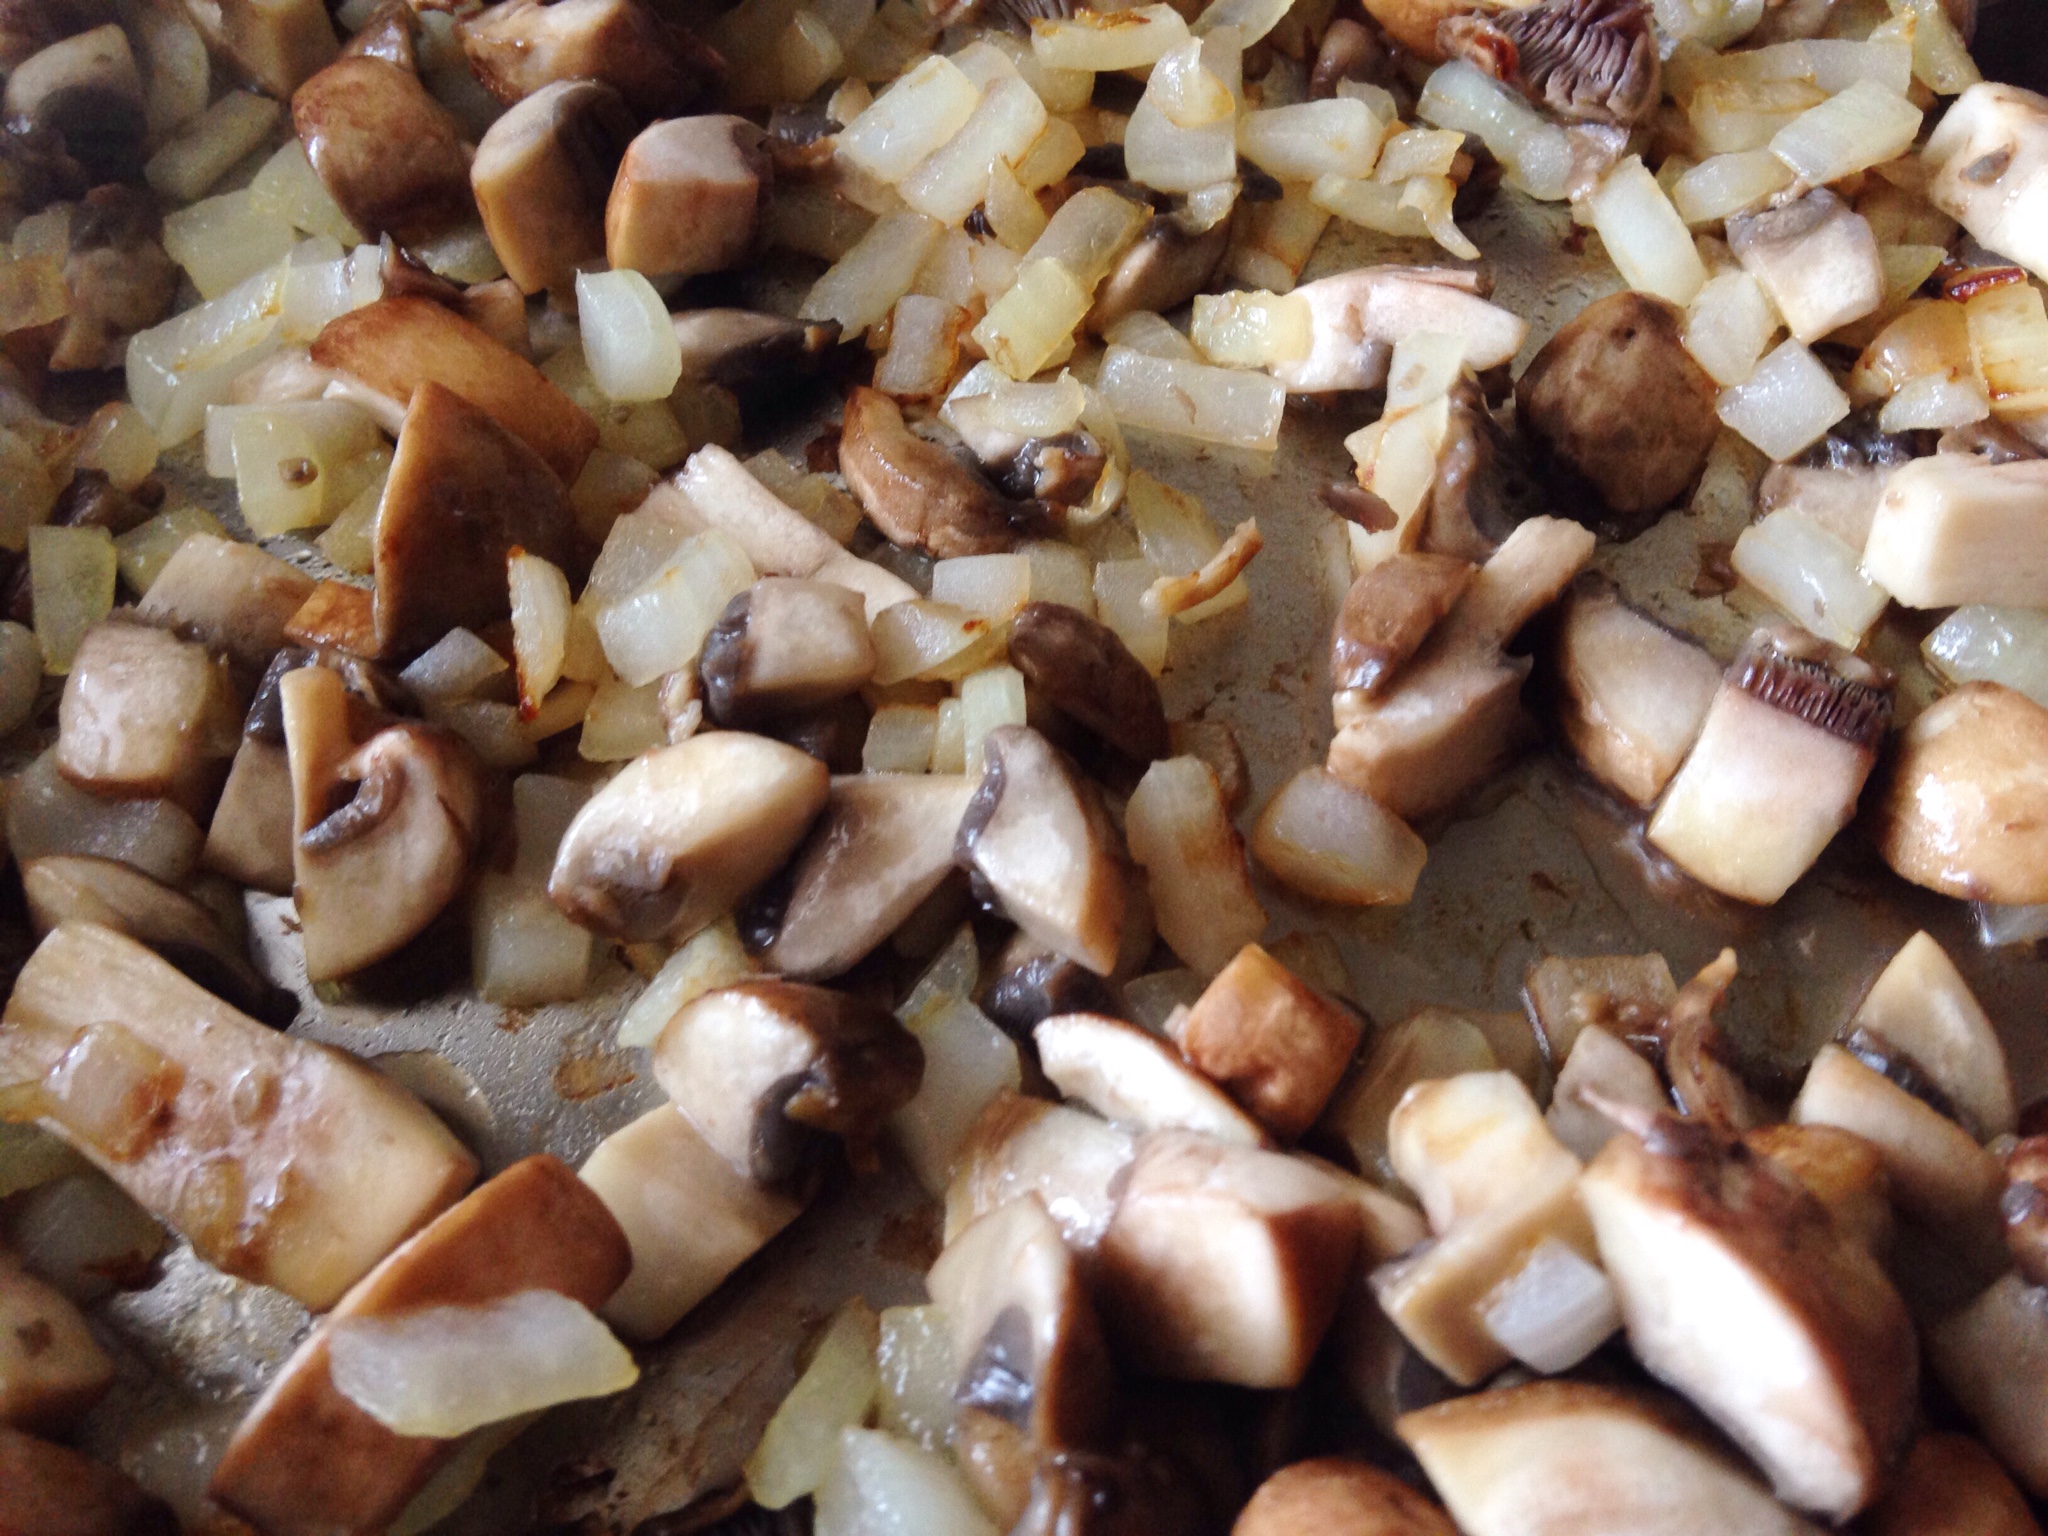
1 cup chopped white onion
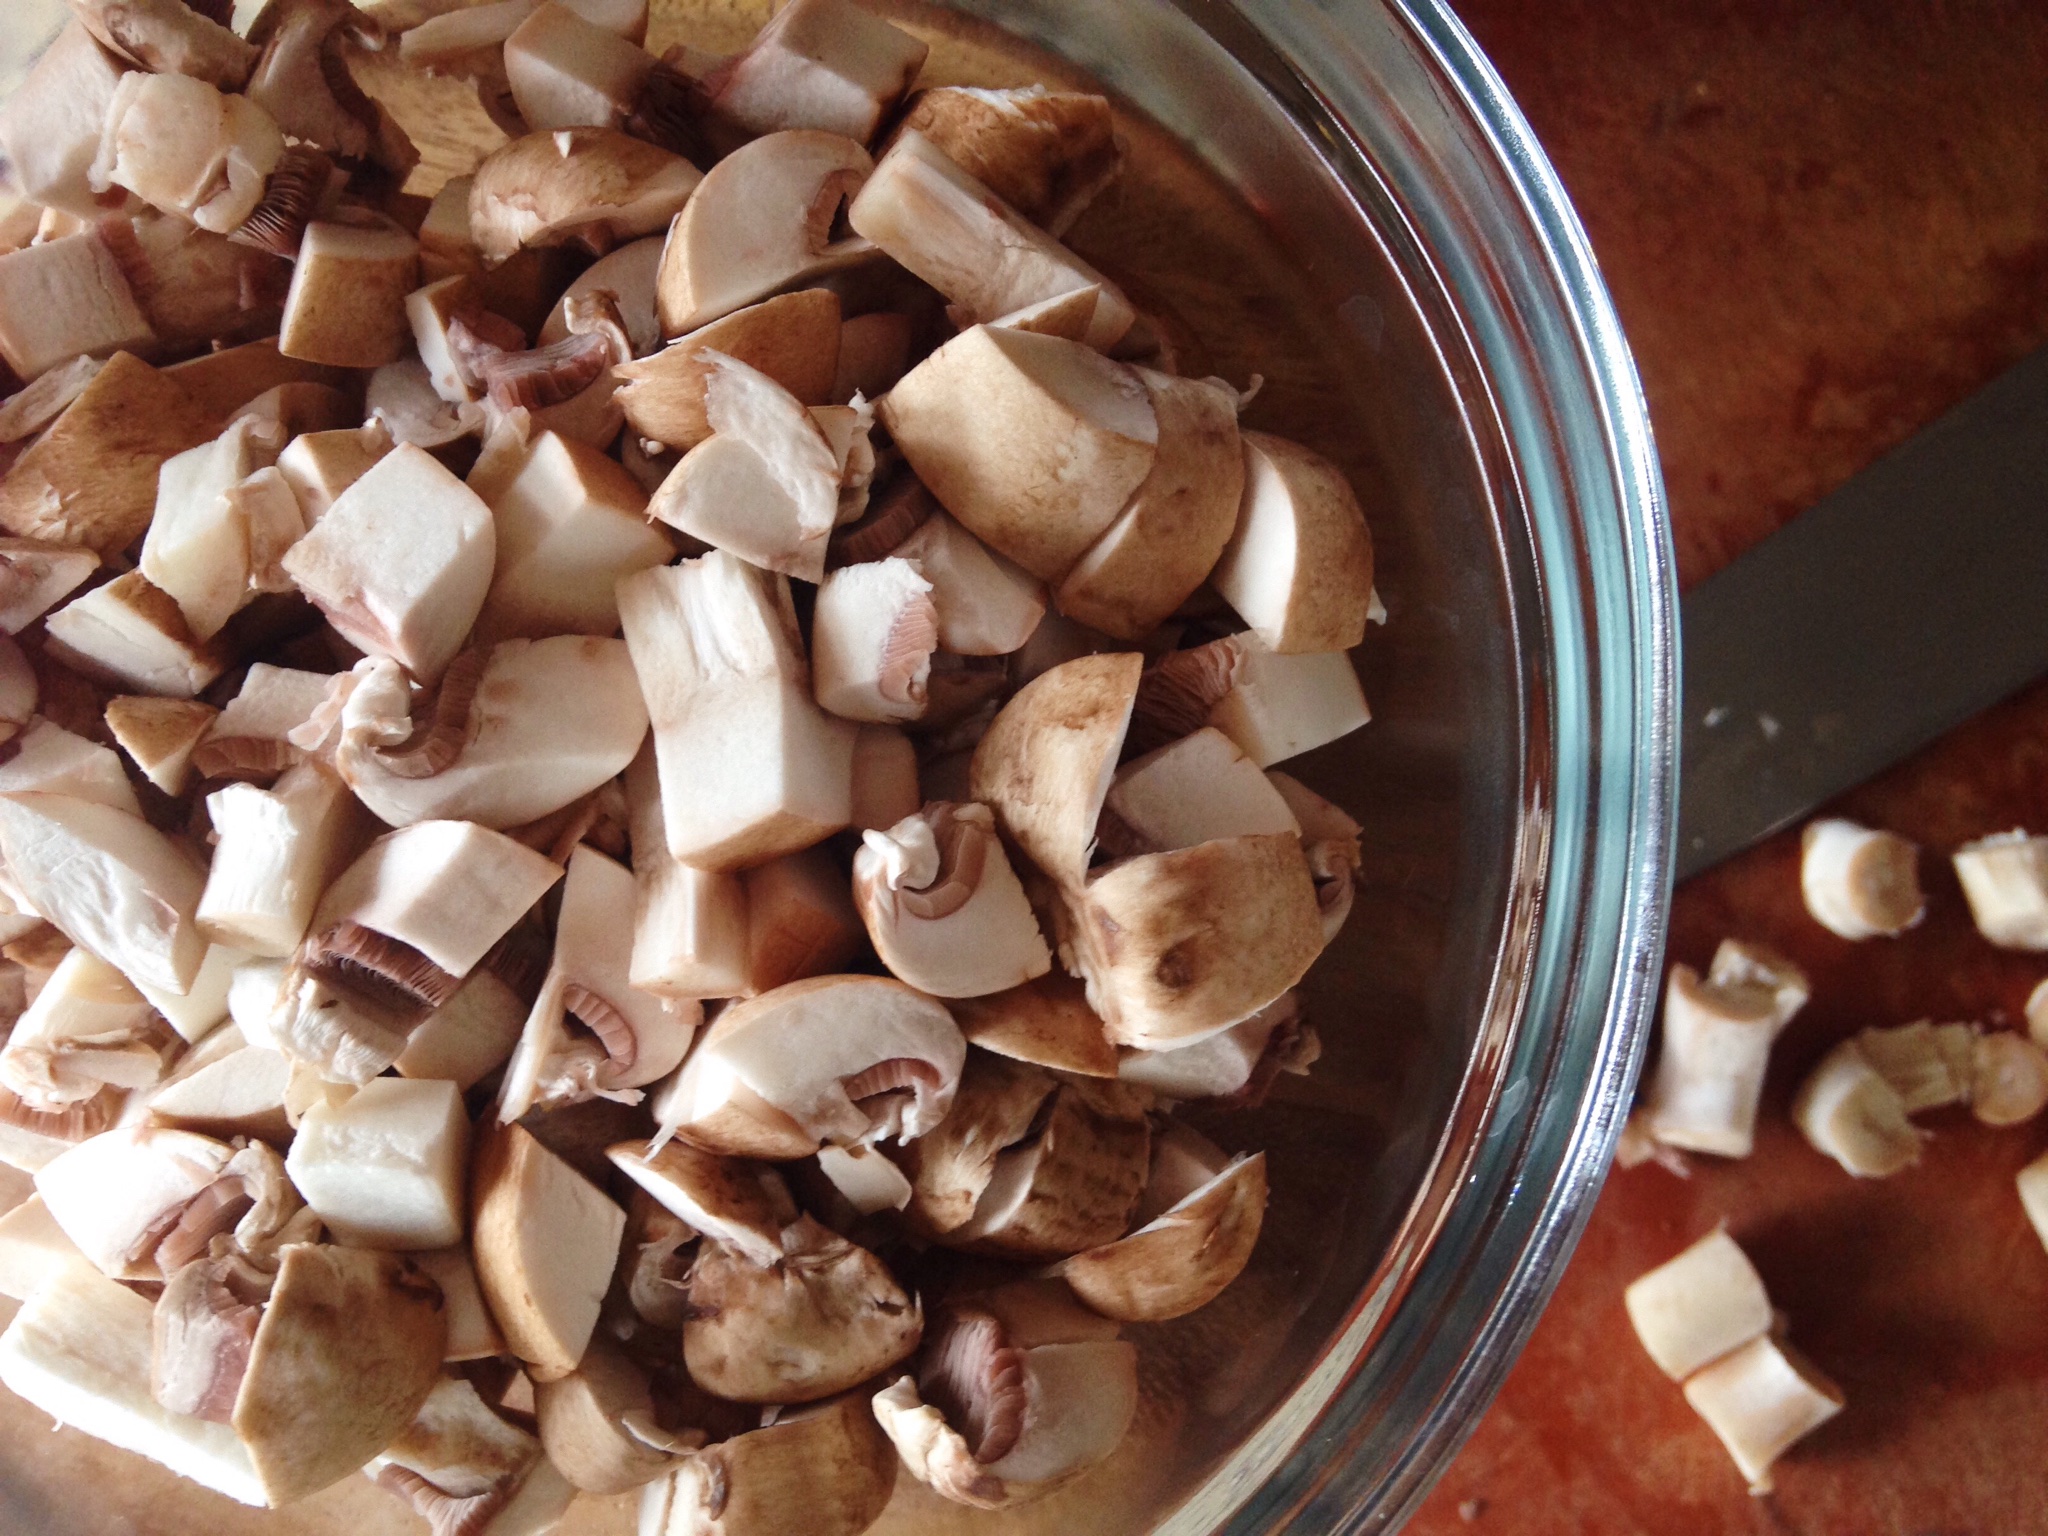
8 ounces mushrooms, cleaned and chopped (any variety is fine)
1/4 teaspoon Kosher salt
2 cloves garlic, chopped
1 1/2 teaspoons dried cumin
1 1/2 teaspoons chili powder
1 15-ounce can black beans, drained and rinsed2 tablespoons water
2 tablespoons lime juice
12 corn tortillas
1 cup cilantro leaves
1/2 cup finely chopped white onion
Instructions
Heat a skillet over medium heat. Add the oil and the onion and cook 5 minutes, stirring frequently. Add mushrooms and cook, stirring until golden, about five minutes. Season with salt and add the garlic, cook 1 more minute. Add the spices, stirring to toast them and prevent them from burning, another minute more. Stir in the black beans, water and lime juice and cook 3-4 minutes, until most of the liquid has been cooked off.
To serve: Fill each tortilla with about 1/4 cup of the black bean and mushroom sauté. Top with cilantro and onions and serve.
Notes
Additional optional toppings: salsa or hot sauce, shredded cheese, shredded lettuce, low-fat Greek yogurt
Summer means simplicity. On a 90 degree day here in Chicago, the last thing I want to do is heat my house up with the oven. So, that means I need to be cooking creatively. For moments like these, I turn to the grill. Sure, it’s hot, but that heat’s outside, where it belongs.
While some people use their grill mostly for steaks, burgers and brats, I tend to use mine more for vegetables. Sure, I love a good flank steak or turkey burger, but grilled vegetables are just plain good food. Plus, they are the perfect addition to almost any meal.
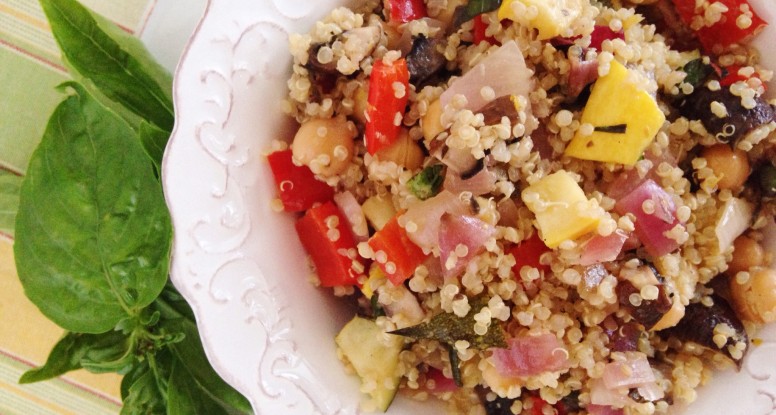
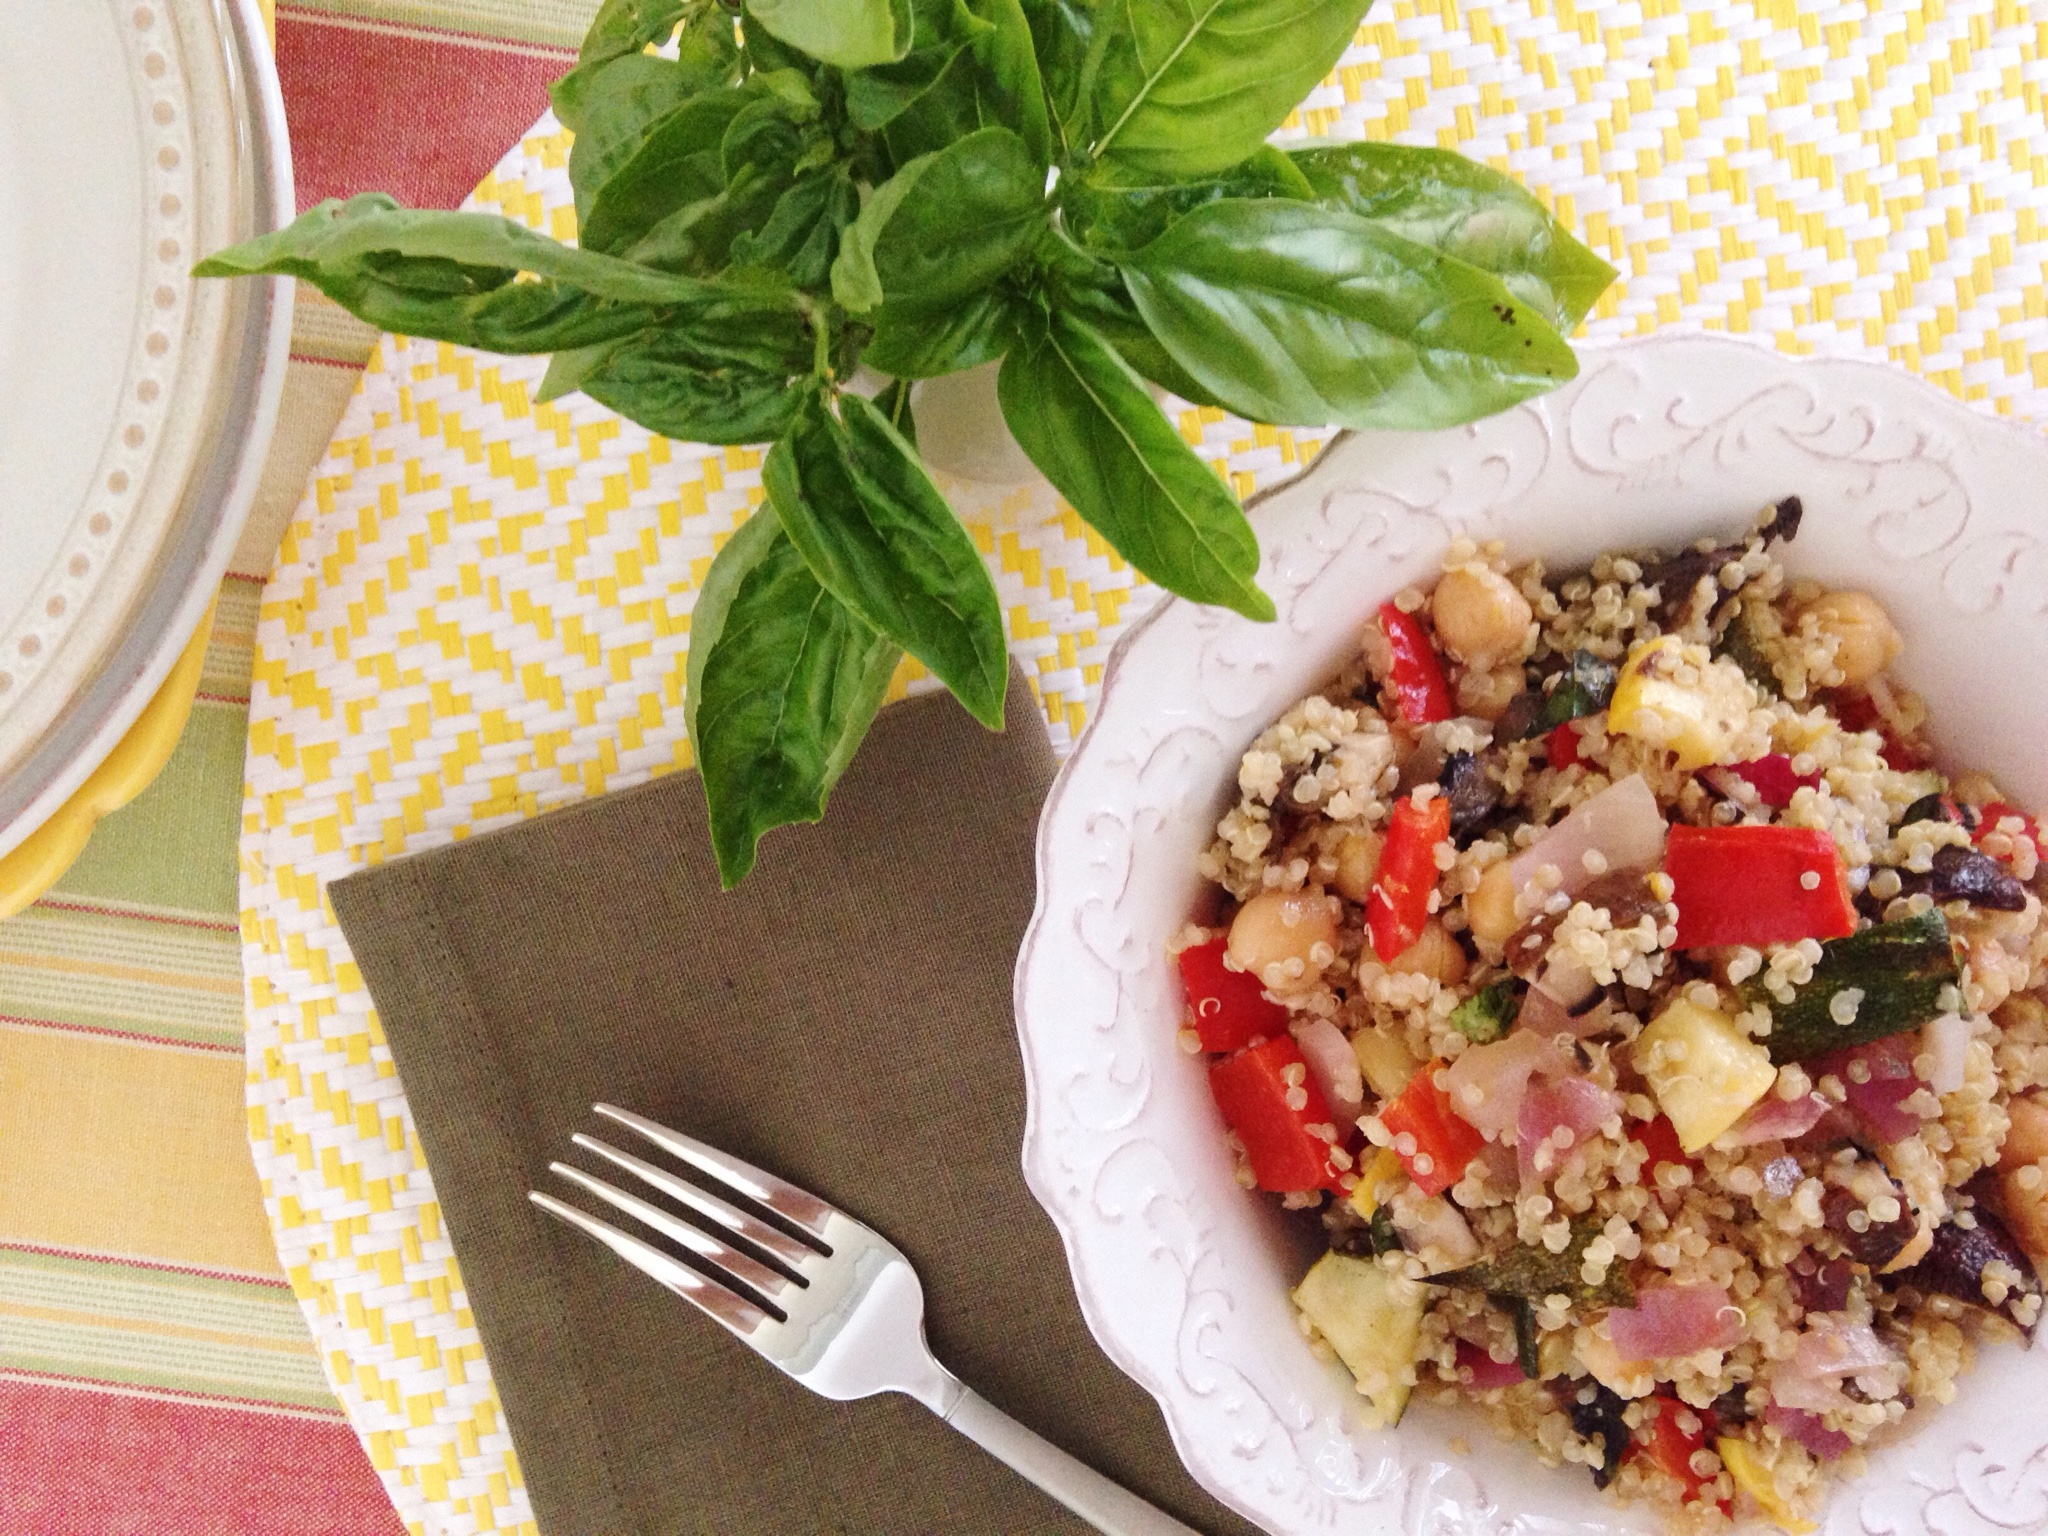
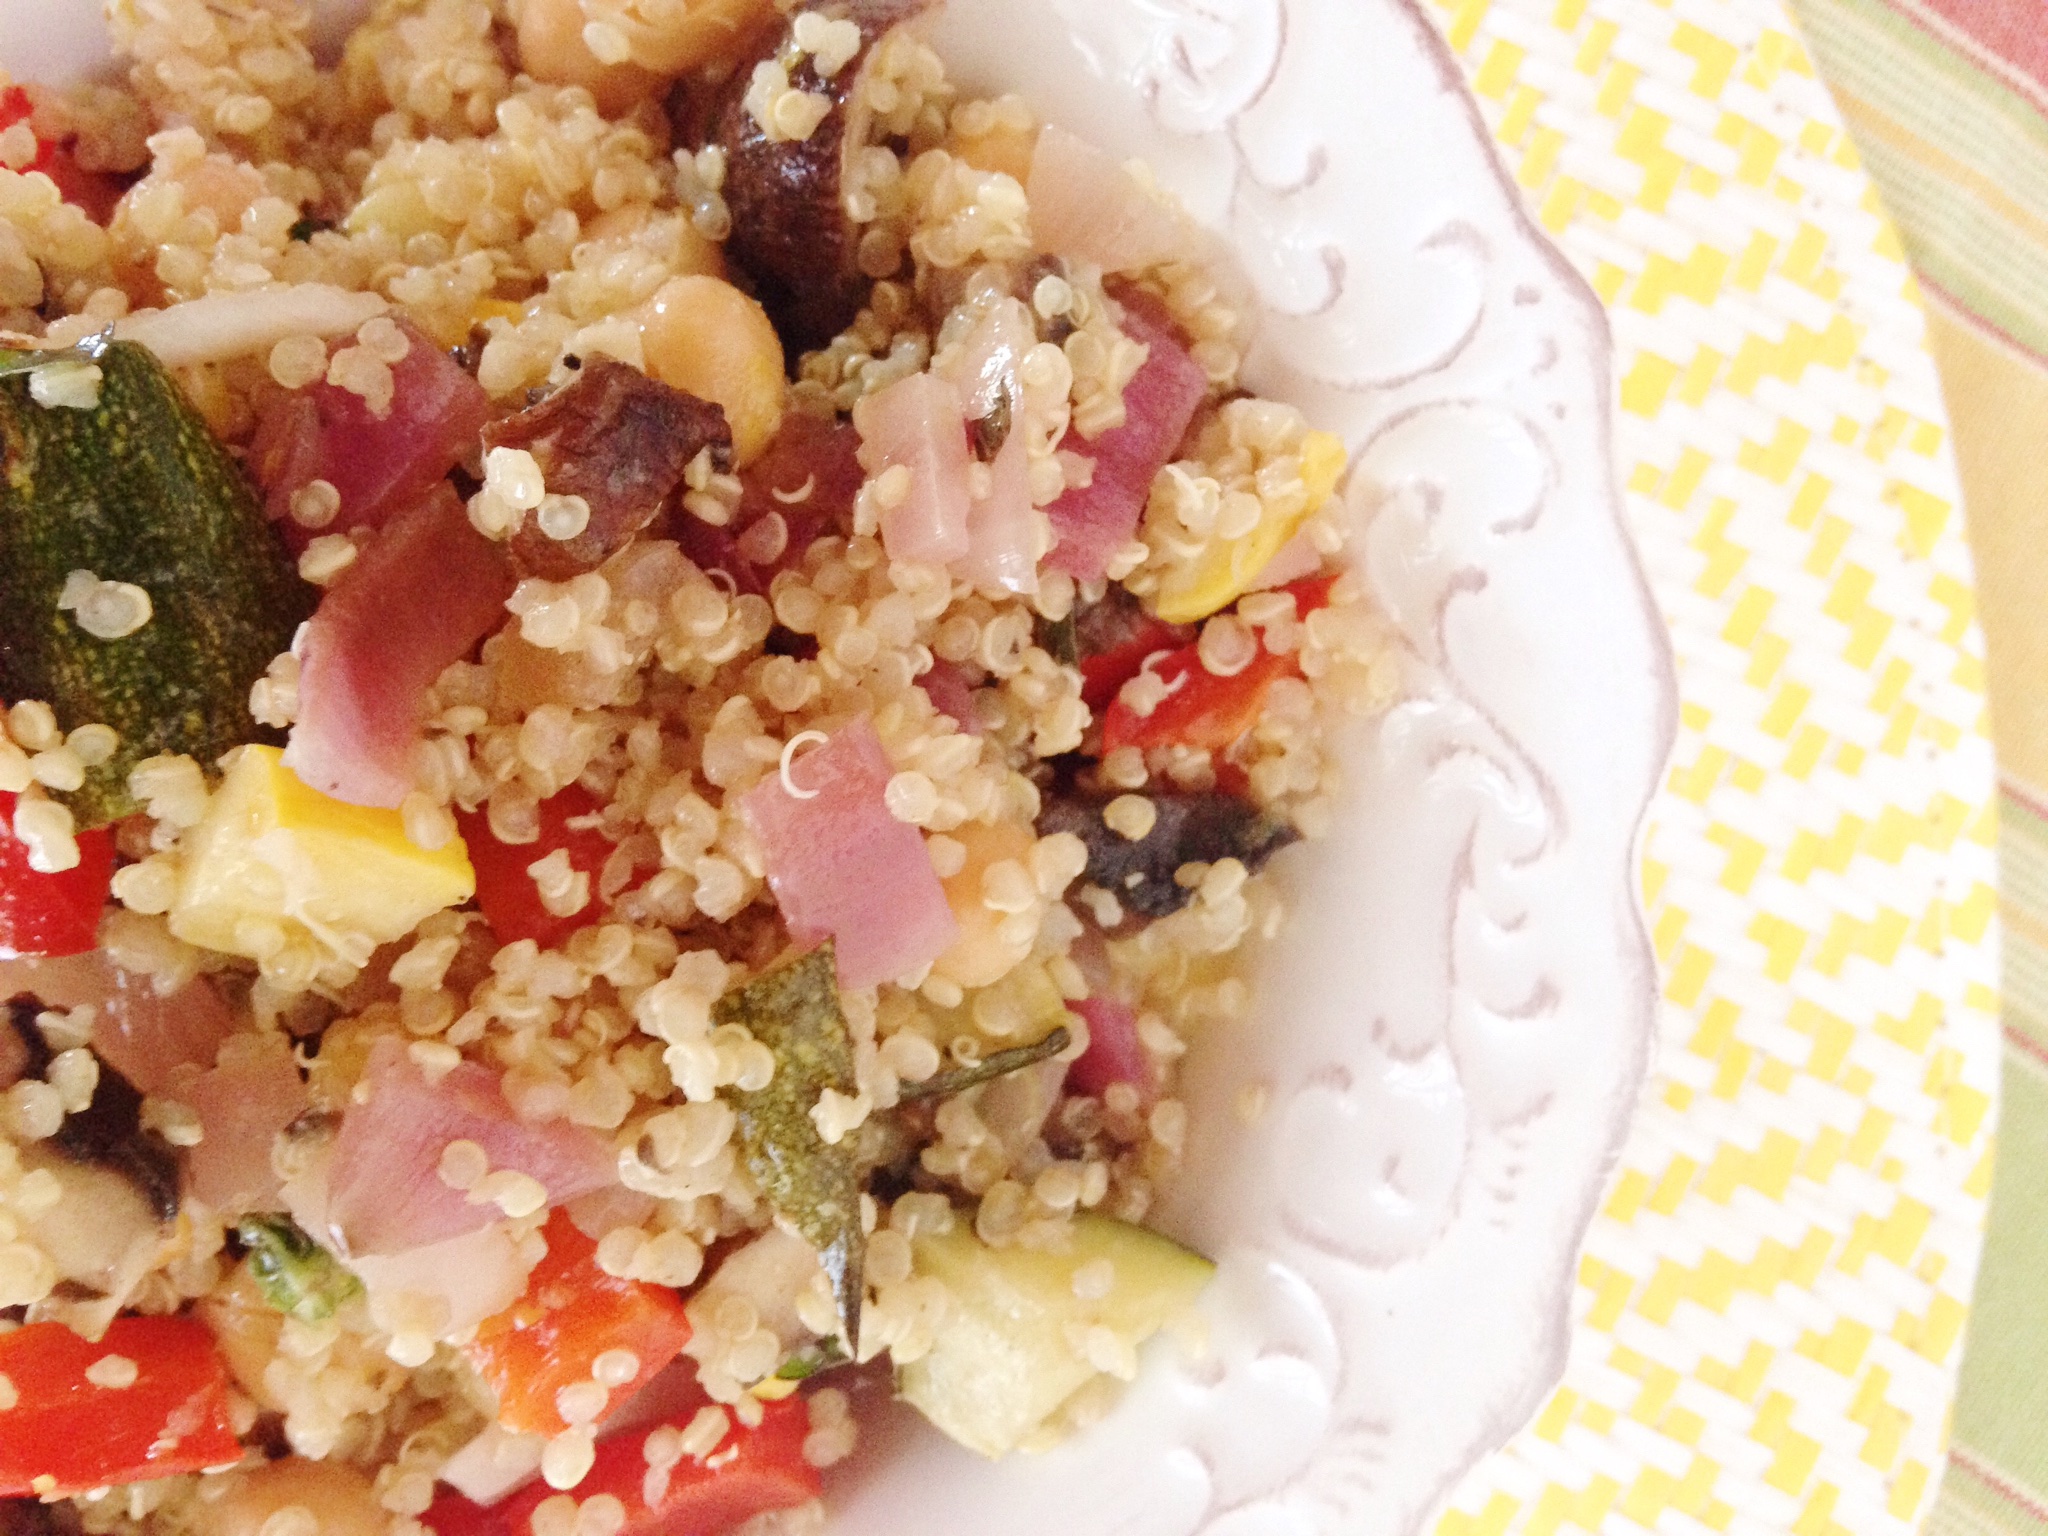
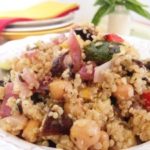
Which brings me to my Lemon Garlic Quinoa with Grilled Vegetables. It’s a recipe that starts with a dual purpose marinade. Yes, it’s a marinade, first and foremost, adding tons of flavor to the vegetables, but it’s also used to season the quinoa. Who doesn’t love making something once and using it twice!?
Here’s the best part! This is a dish you can feel good about serving your family and guests. It’s a nutritious food gift from me to you. All wrapped up in vitamin-rich vegetables, fiber-rific beans and perfect-protein quinoa. So grab a bowl and fill it up and put a bow on it. Enjoy your gift (but don’t eat the bow!)!
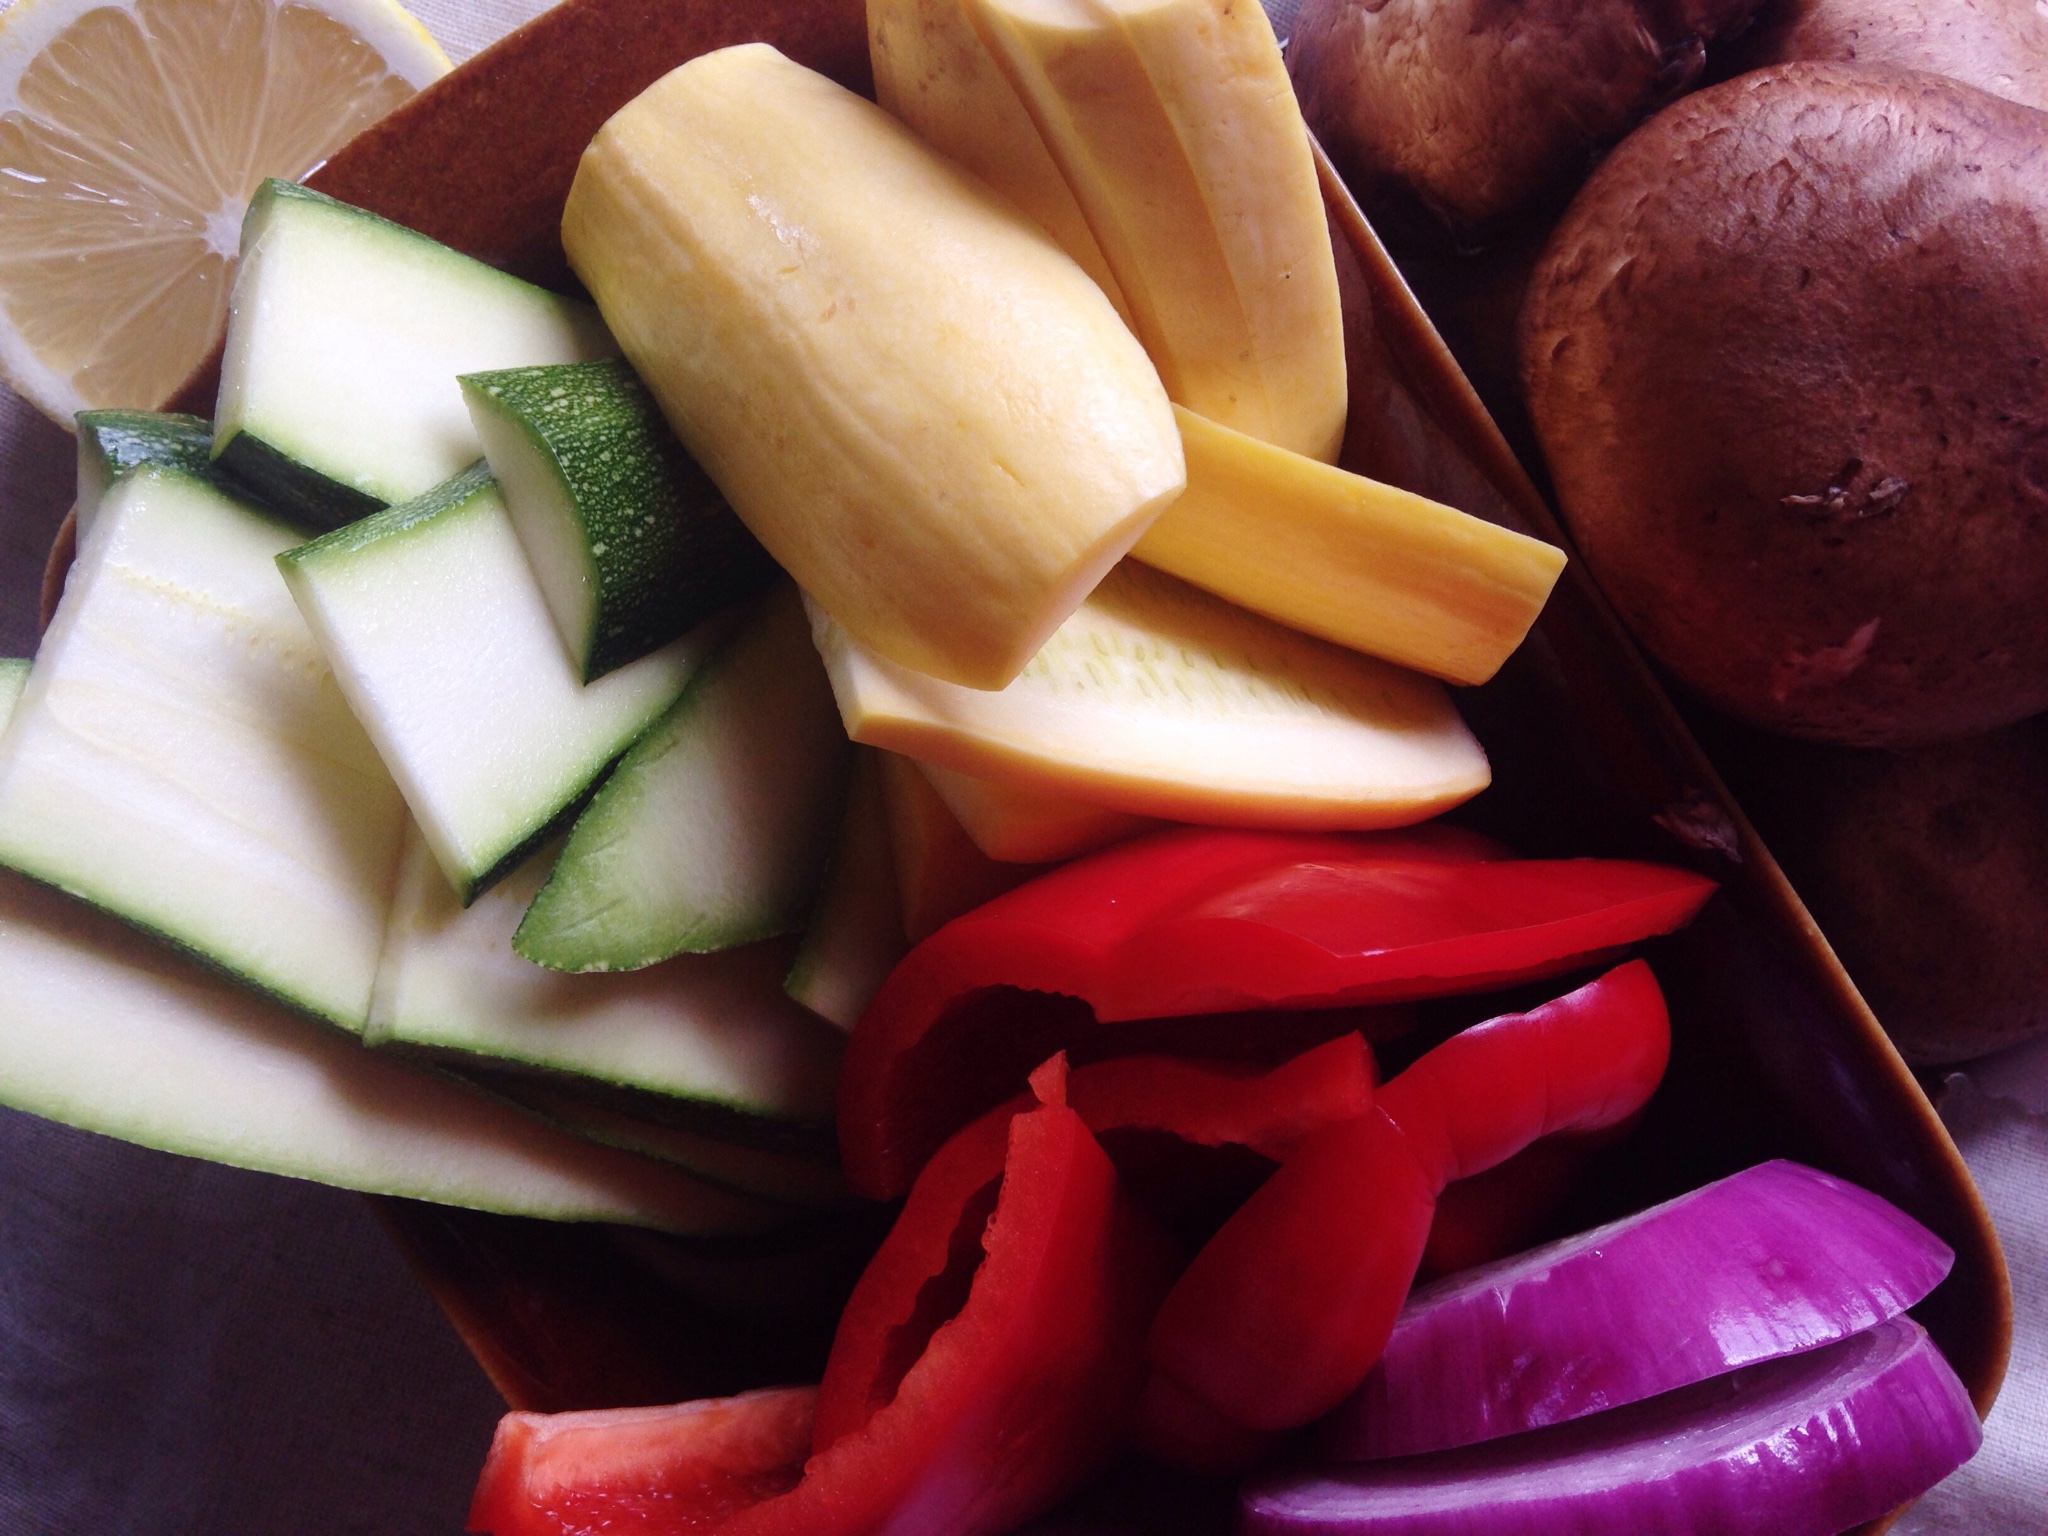
1 red bell pepper, stemmed seeded and cut into planks
1 zucchini, cut into planks lengthwise
1 yellow squash, cut into planks lengthwise
1 red onion, cut into 1/2 inch round slices
1 cup quinoa, rinsed
2 cups water
1/4 teaspoon salt
1–15 ounce can garbanzo beans, drained and rinsed, or about 1 3/4 cup cooked garbanzo beans 1/2 cup basil, thinly sliced
Instructions
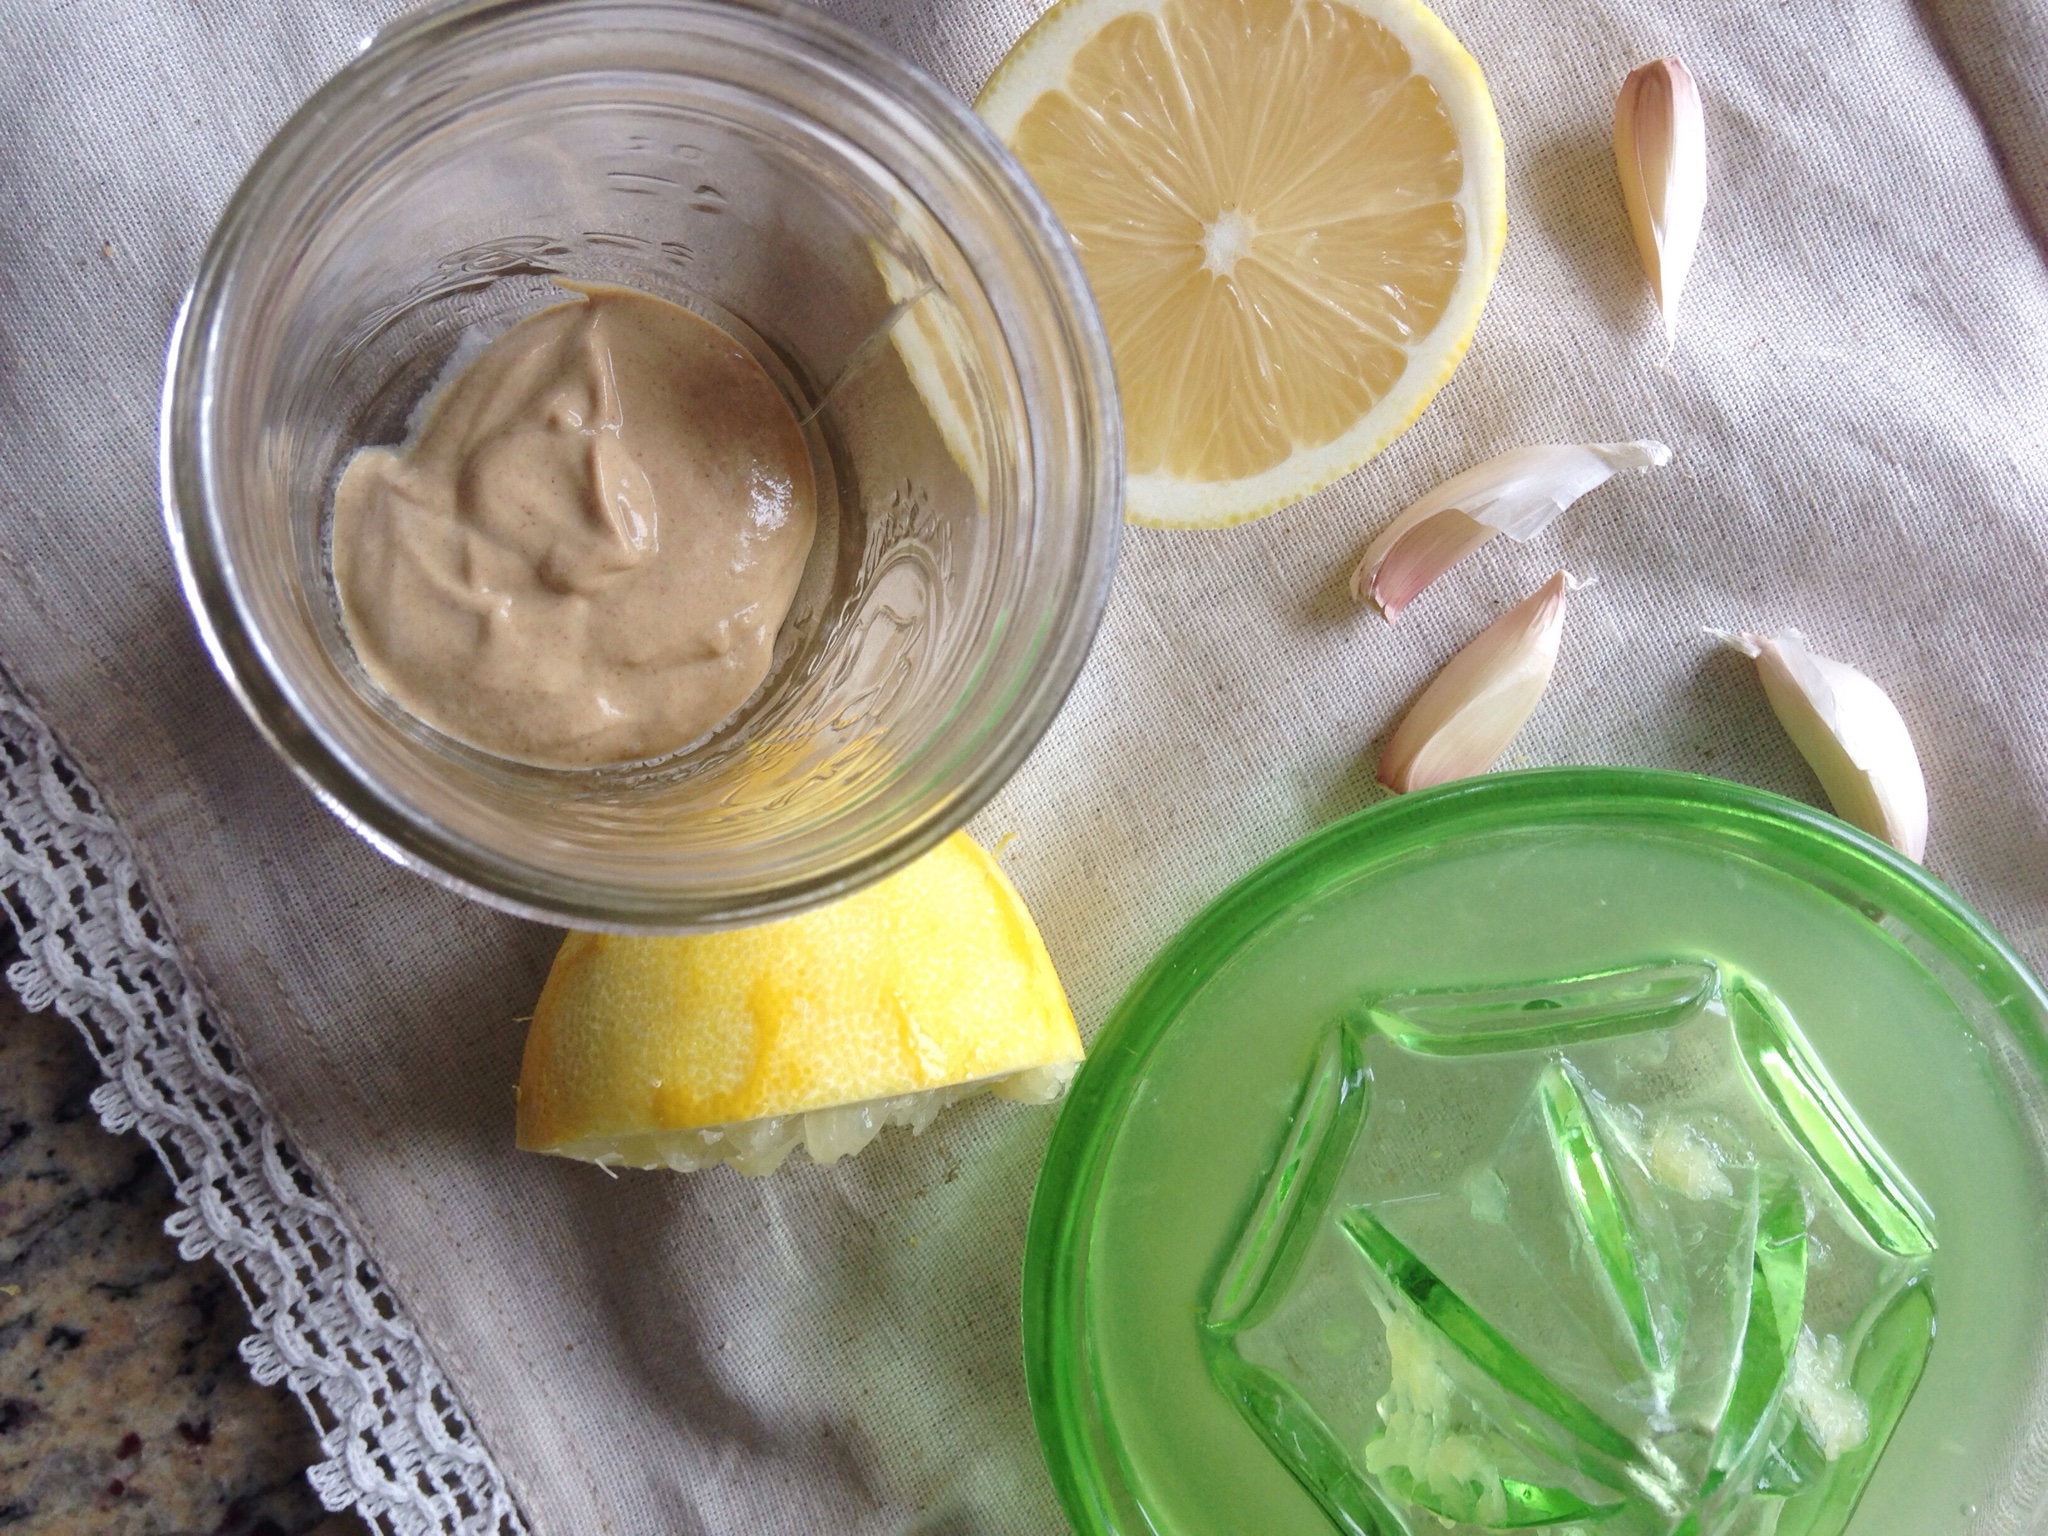
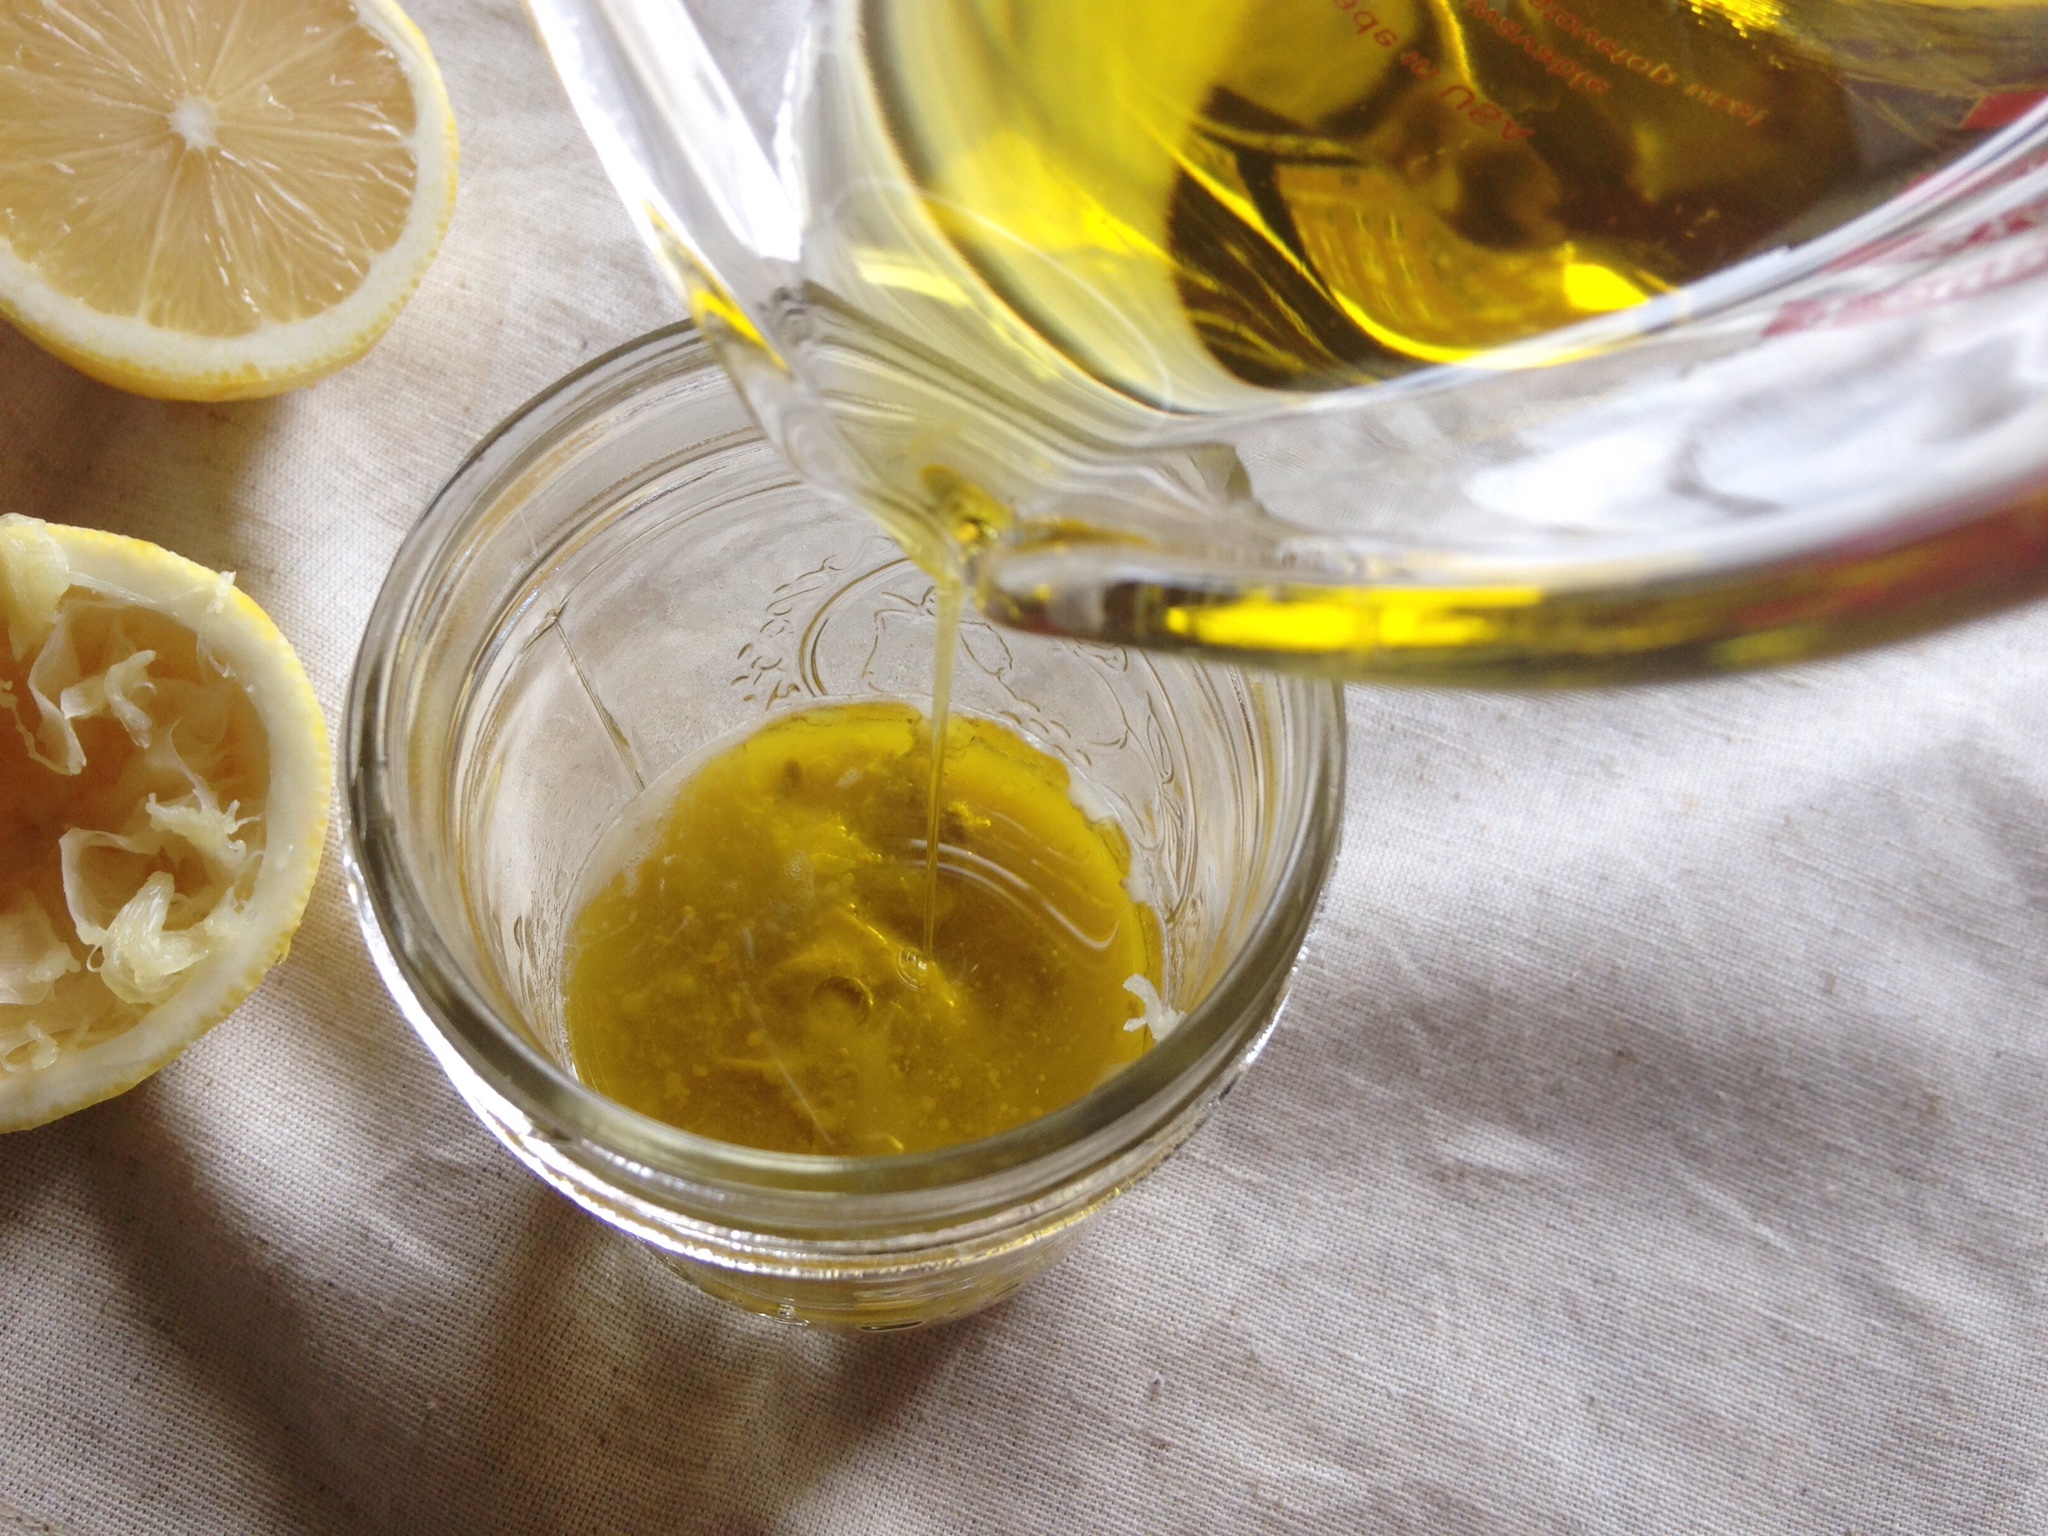
To make the marinade
Combine the mustard, lemon juice, garlic, black pepper and olive oil in a jar. Screw on the lid and shake well to combine. Alternatively, place the mustard, lemon juice, garlic and black pepper in a small bowl and whisk together. Stream in the olive oil, whisking until fully incorporated. Pour half of the mixture into a re-sealable bag and add the pepper, zucchini, squash and red onion. Cover the remaining marinade and refrigerate. Re-seal the bag and massage marinade into vegetables. Place in the refrigerator and marinate for at least 30 minutes and up to 2 hours.
To cook the quinoa
Place quinoa and water in a saucepan and bring to a boil over medium-high heat. Season with salt and reduce heat to a simmer and cook, uncovered for about 15 minutes. Drain off any excess liquid. Set aside.
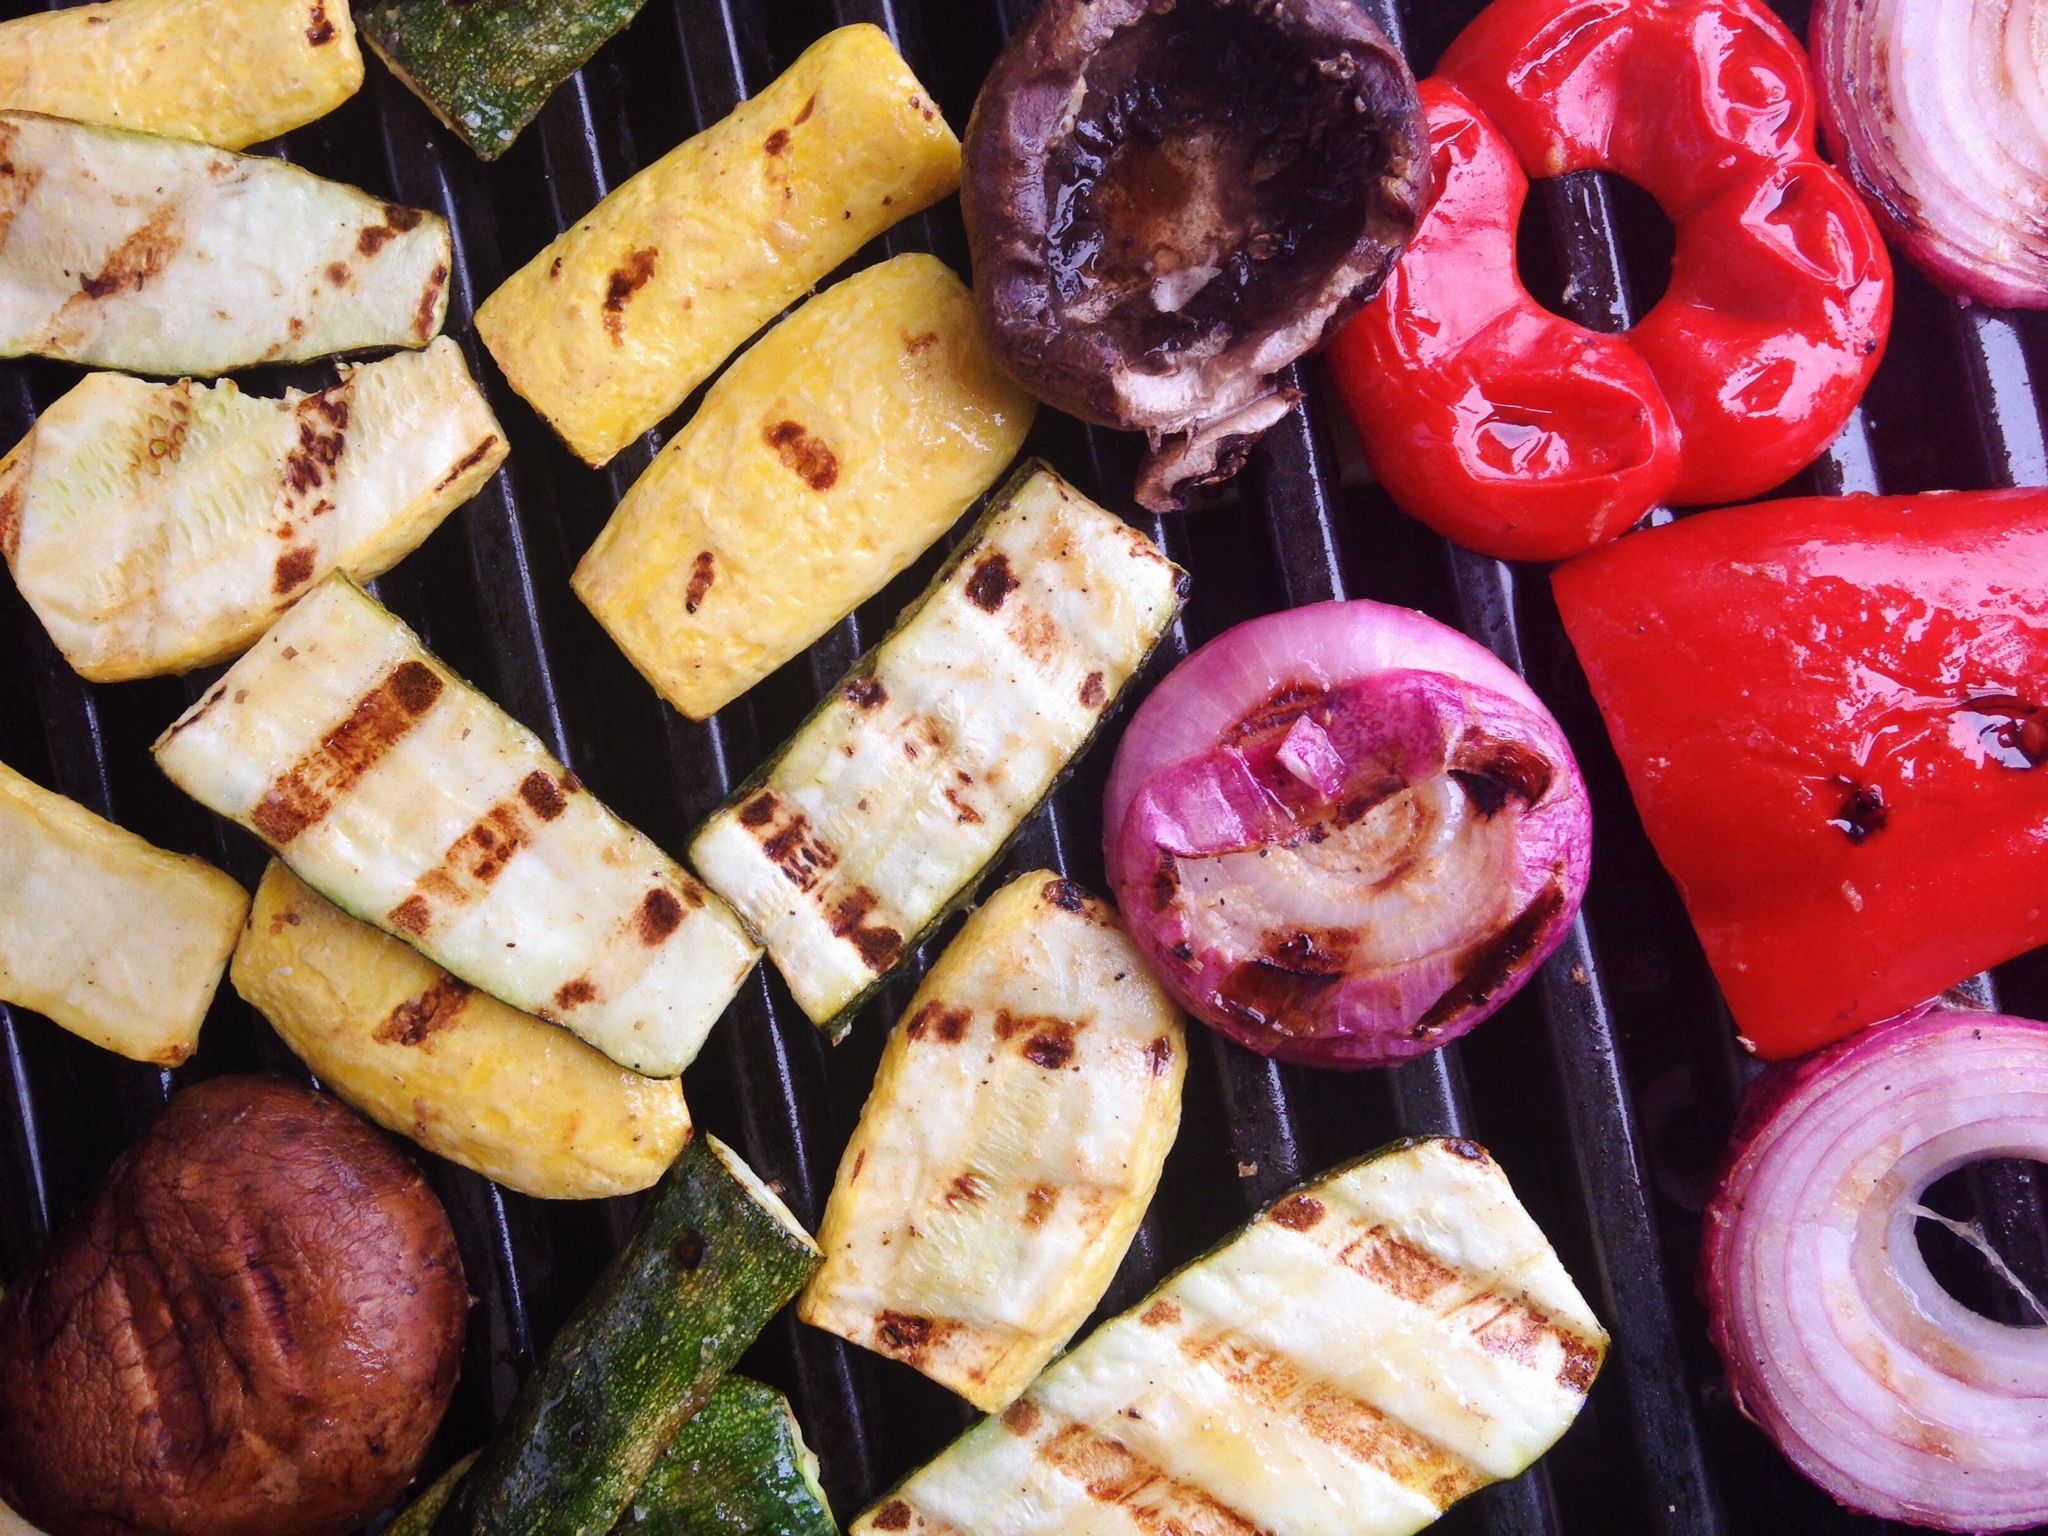
To grill the vegetables
Preheat grill to medium high heat. Clean grill grates and brush lightly with vegetable oil. Remove the vegetables from the bag. Place the vegetables on the grill and cook vegetables on both sides until grill marks form, about 5-10 minutes per side. Remove from the grill.
To make the dish
Transfer the quinoa to a large bowl and toss with the reserved marinade. Chop the grilled vegetables and add to the quinoa, along with the lemon zest, chickpeas and basil. Stir and serve.