That’s right, you read that correctly, I said “Fertility Friday + Smoothies!” A random pairing? Of course not, I do everything with intention…ok, well almost everything.
Today for Fertility Friday I would like to focus on the amazing nutritional power of smoothies. Yes, I know that people are crazy about smoothies these days. They make their own, they buy the fancy one that costs 10 dollars and they insist on having them every morning for their “bowl” breakfast. But this is one trend where you can believe the hype…at least to a certain extent.
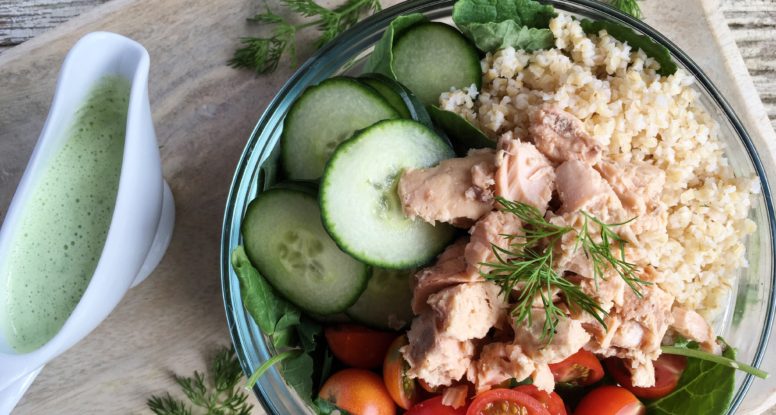
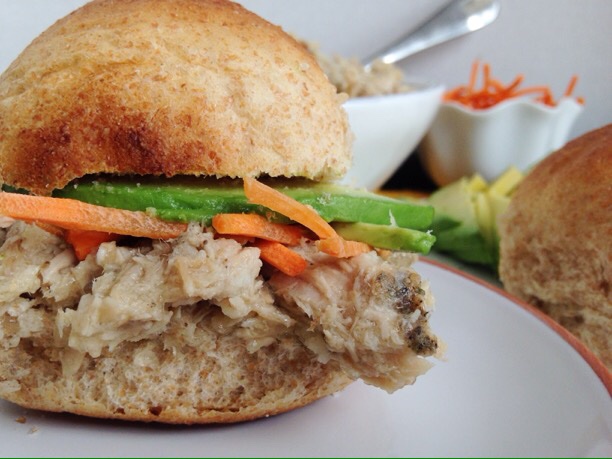
In my opinion, canned salmon is an unsung hero in the food and nutrition world. Convenient, versatile and super-nutritious, it’s a shame that it’s so under-appreciated.
Why don’t we use canned salmon more often in our recipes and meals? Perhaps it conjures up memories of the dry, flavorless salmon patties of your childhood. Perhaps it has to do with the lack of foodie “buzz”, because the culinary world hasn’t exactly embraced it either. I mean, when have you ever seen it featured in a dish on a menu at a trendy restaurant?
With the negative connotations and the lack of fanfare, canned salmon hasn’t had much of a chance to shine. I think it’s time to change that! Here’s why:
Bring on the Canned Salmon! 3 Reasons Why It’s Great.
It’s Versatile! – Canned salmon can be used for salads, burgers, meatballs and so much more! That seems like a pretty great blank canvas if you ask me!
It’s Convenient! – All you need is a can-opener, no cooking required. Highly portable and easy to use. The definition of the modern connivence food.
It’s Nutritious! – Loaded with nutritious Omega-3 fats as well as selenium and protein, canned salmon is an easy way to fit more fish (you should be eating at least 8 or more ounces per week!) into your diet.
Place bulgur in a medium bowl. Add salt, then cover with boiling water. Immediately cover the bowl with a piece of plastic wrap and let bulgur steam for about 20 minutes.
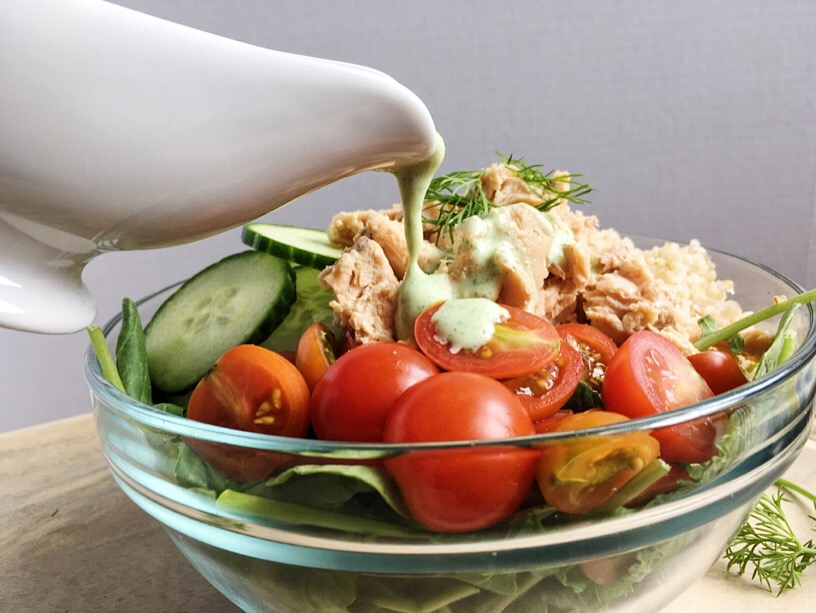
To a blender add the the Greek yogurt, lemon juice, garlic and dill. Add a pinch of Kosher salt and blend until smooth. (Dressing can be made without a blender, finely chop garlic and dill and then whisk all ingredients together.)
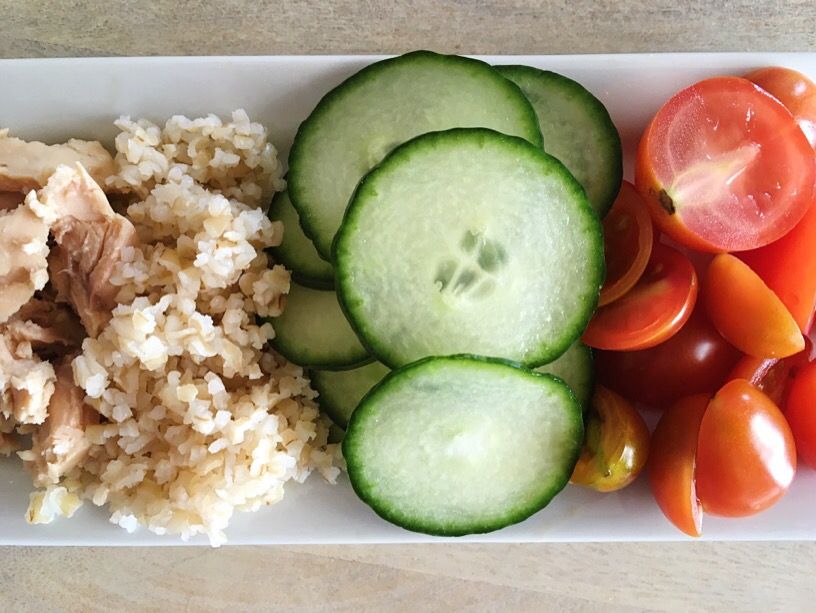
Divide lettuce and portion into bowls. Top each bowl with bulgur, salmon, cucumber and tomatoes. Drizzle with dressing and serve.
“Simplify, simplify, simplify!” Henry D. Thoreau, eloquently and prophetically proclaimed in his famous work, Walden.
That demand to simplify seems even more relevant today than it likely was in 1854, when Walden was first published. How many of us challenge that decree everyday? Adding more things that instead “complicate, complicate, complicate!” Ugh. Thoreau’s mantra is one I’m trying (somewhat successfully) to practice in my daily life. I’m not taking the easy way, but the smart, simpler way. Case in point, I recently got so frustrated with making healthy lunches for my family. PB&J was in the lunch box more than I would’ve liked. Of course there’s nothing wrong with that sandwich, but variety is a good thing.
Inspired by Thoreau, I decided to “simplify” lunch.
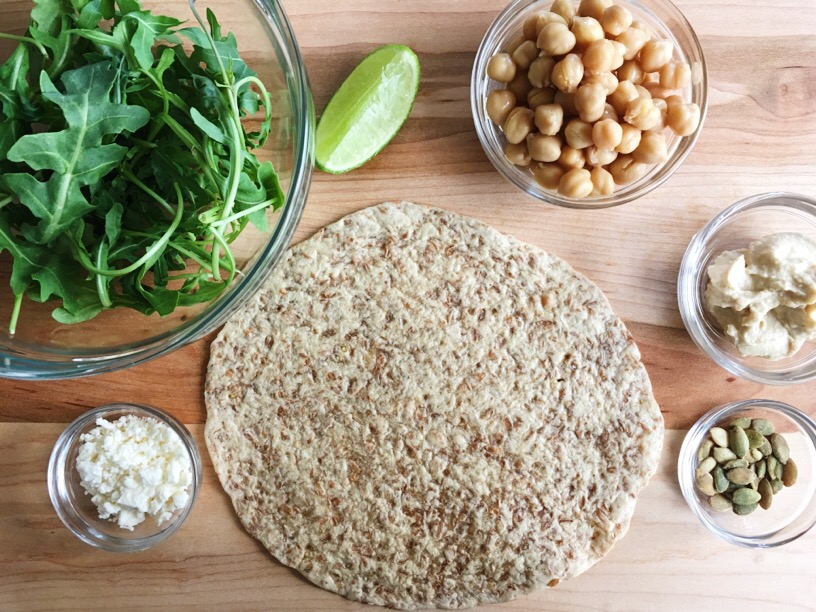
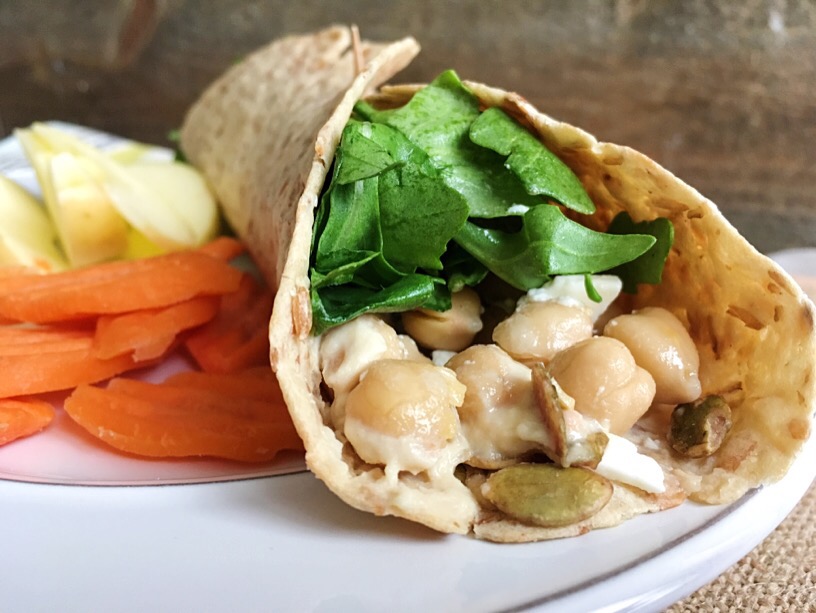
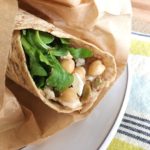
And with this Chickpea Hummus Wrap, I simplified on execution, but didn’t sacrifice taste or flavor! Yay! It all starts with a whole grain wrap and continues with layers of flavor. Canned chickpeas and pre-washed baby arugula keep things easy and fast. Flavor boosters like feta cheese and pepitas add a simple, yet tasty addition.
Luckily, the Recipe Redux theme for this month was how to get out of our “lunch rut.” How appropriate! Fortunately I figured out just how to do that with this Chickpea Hummus Wrap!
And here are the pretty picture of my Chickpea Hummus Wrap:
Time is of the essence! But don’t forget about good nutrition either! These simple chickpea hummus wraps make lunch easy, delicious and nutritious!
Ingredients
Scale
1 cup baby arugula
1 teaspoon fresh lime juice
pinch teaspoon freshly ground black pepper
pinch teaspoon Kosher salt
1 (8-inch) whole wheat tortilla or wrap
2 tablespoons plain hummus
1/3 cup chickpeas
1 teaspoon toasted pumpkin seeds
1 tablespoon crumbled feta cheese
Instructions
Toss the arugula with the lemon juice, black pepper and salt.
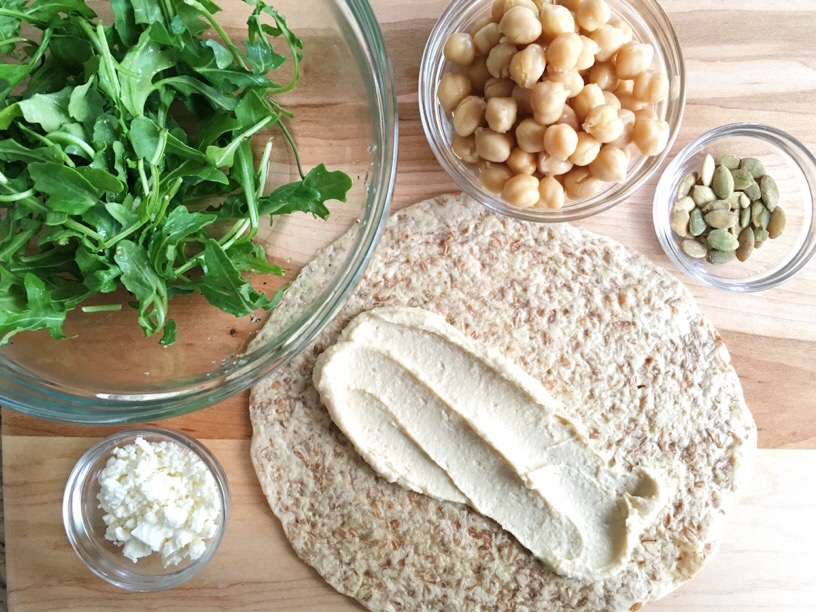
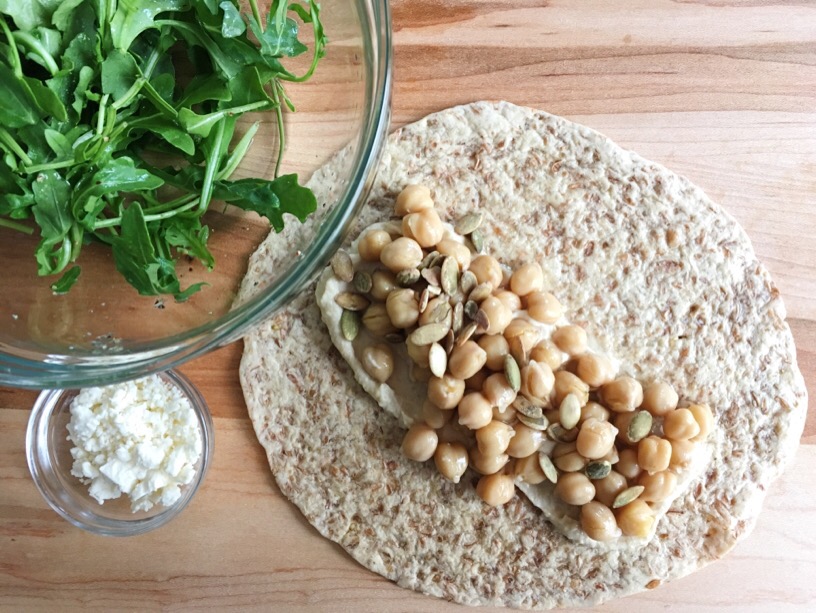
Lay tortilla on a clean work surface. Spread the hummus down the middle of the tortilla and top with the chickpeas. Sprinkle on the pumpkin seeds and feta cheese, then the arugula mixture.
Roll up and enjoy.
Notes
Want more? Just multiply ingredients by desired serving size and divide everything evenly among tortillas.
Why? Because they are awesome for you nutritionally (high in fiber, plenty of amazing vitamins and minerals, vegetarian protein, etc) and they taste great so many different ways.
Think I’m just pulling a crazy dietitian stunt on you?
No way! I love tasty food just as much, if not more, than you do. I would never recommend a food that I didn’t deem “tasty.” Now way!
But why chickpeas Sara?
Chickpeas are the underdog in the bean world seeming to only really be appreciated for their necessity in making hummus. Boo to that I say! Chickpeas belong front and center and here’s just the dish that does that.
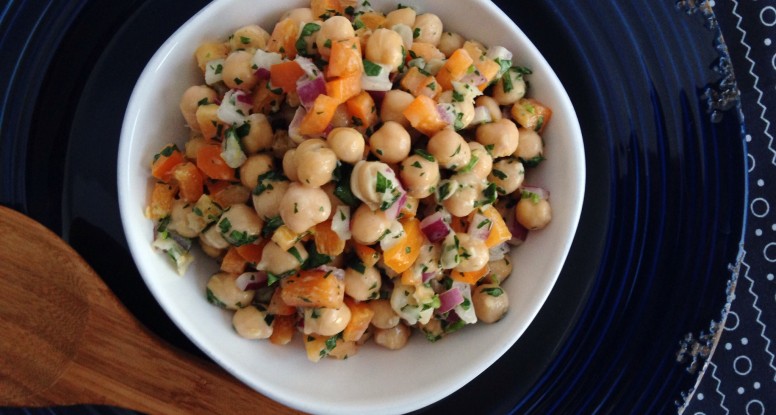
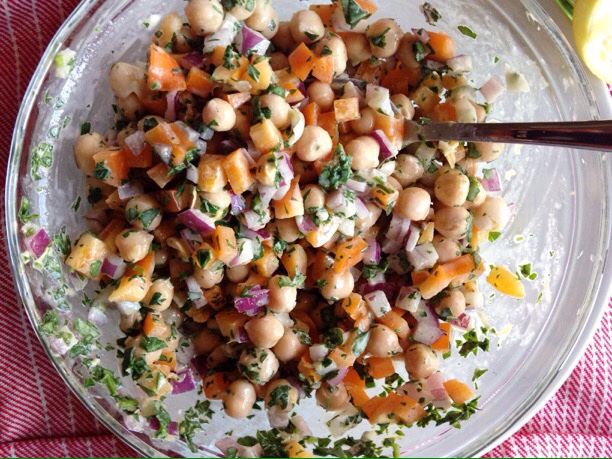
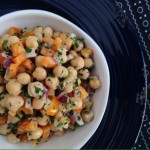
Meet my Chickpea Salad with Tahini Dressing!
This salad is booming with flavor and it’s not only craveable, it’s addicting. Nothing beats lots of fresh parsley and lemon and when you add in creamy tahini, you’ve got a dressing that really shines.
So here you go my friends, my Chickpea Salad with Tahini Dressing!
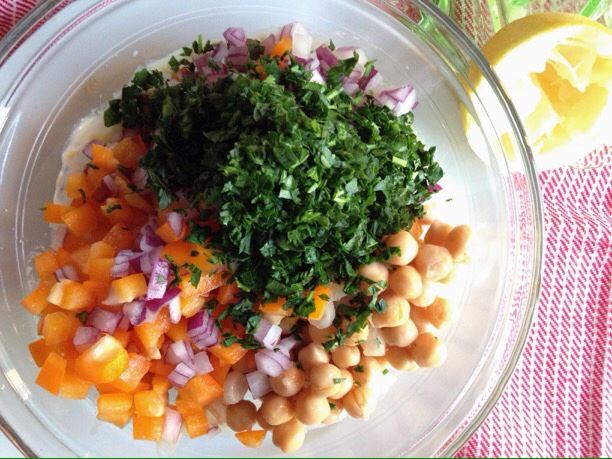
A refreshing, yet hearty salad made with chickpeas, bell peppers, parsley all tossed in a tangy lemon-tahini dressing.
Ingredients
Scale
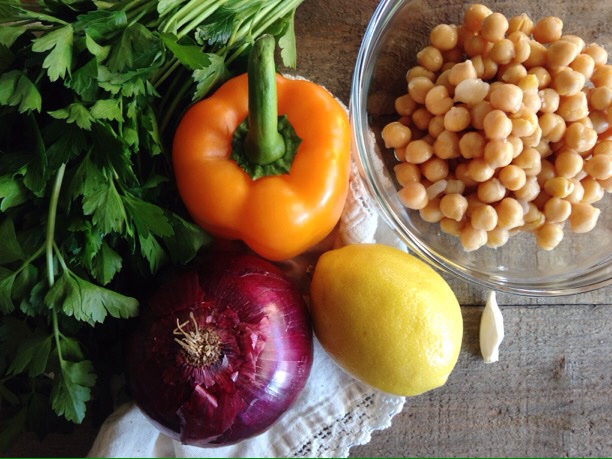
1 clove garlic, minced
1 tablespoon tahini
2 tablespoons fresh lemon juice
1 teaspoon honey
1 tablespoon olive oil
1 tablespoon water
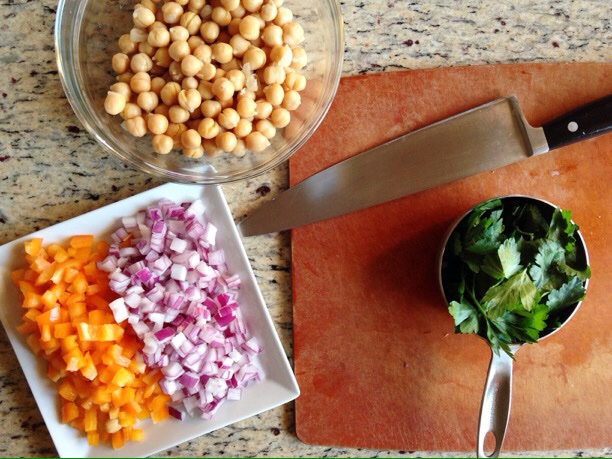
1 15-ounce can chickpeas, drained and rinsed
1 red or orange bell pepper, seeded and diced (about 1cup)
1 cup diced red onion
1 cup parsley, chopped
salt, to taste
black pepper, to taste
Instructions
In the bottom of a mixing bowl whisk together the garlic, tahini, lemon juice and honey. Add the olive oil and continue whisking until combined, then add the water. Toss in the chickpeas, bell pepper, red onion and parsley and toss to coat. Season with salt and pepper.
This month’s theme was to find a cookbook and “Redux” the recipe on page 54 or page 154. “Alrighty then…let’s see how this goes”, I thought to myself as I eagerly reached for Jackie Newgent’s new cookbook, The All Natural Diabetes Cookbook (the night before my “Redux” was due)! “Please Jackie, please let page 54 hold a recipe that I have most of the ingredients for…and let it be a breakfast dish!” I breathed a huge sigh of relief as I turned to page 54, because there, on that beautiful page was not only a good recipe, but a GREAT recipe! Her Homemade Granola-Raspberry Parfaits! If she would’ve been here, I would’ve given her a huge hug. Success!
There was this time a few weeks ago when I really thought I had it together and then, poof, it all collapsed.
I felt great, I had this fantastic veggie burger recipe all queued up and then, life hit me. Not a literal punch in the face, more of like a “hey, stop biting off more than you can chew!” kind of way. Hence, the delayed post and hence why I have yet to update and face-lift my little blog here. But you’re here and I’m here now, so let’s celebrate that little victory, shall we?
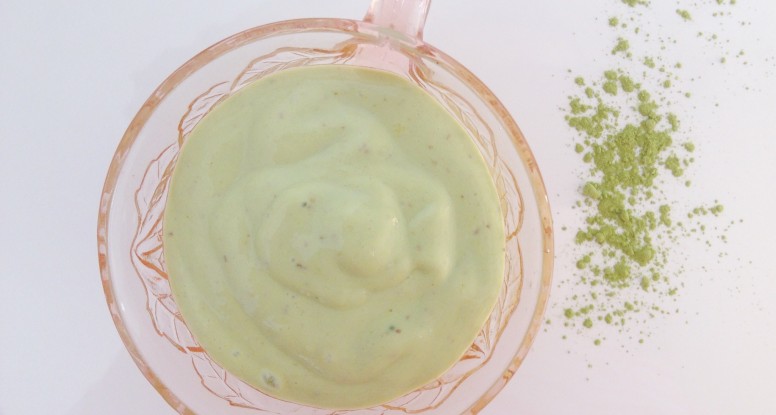
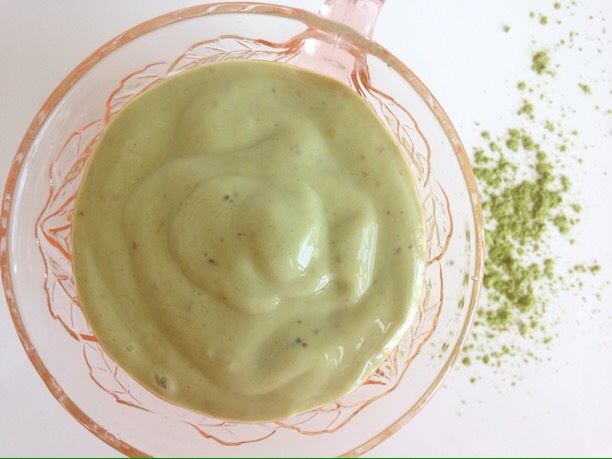
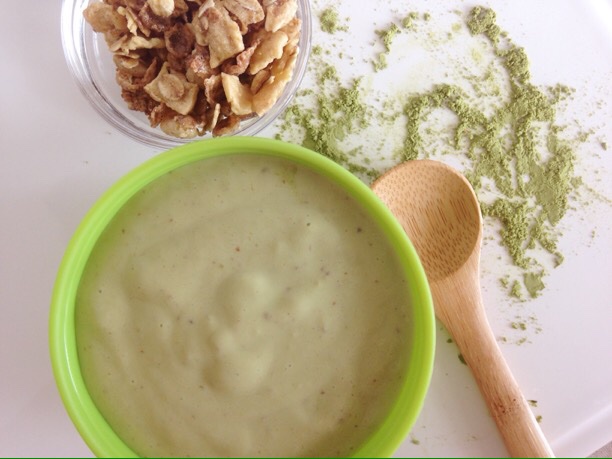
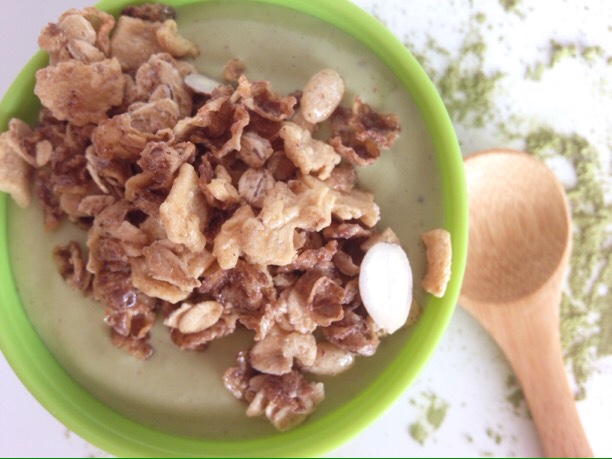
Why I made this recipe: Because I am smitten with smoothies and equally smitten with matcha tea. So why not combine the two? Oh, and because I was hungry and I had these things in my house. Just being honest.
Why I love this recipe: This mango matcha smoothie is one of those recipes that’s super simple to make, yet the ingredients make it feel sophisticated. Love it for that and also because it tastes great.
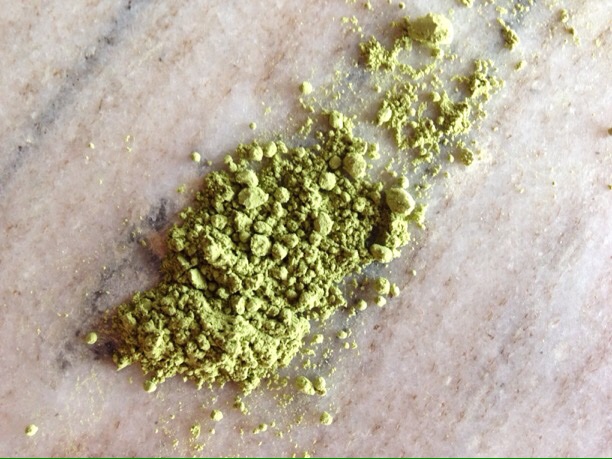
How this recipe is healthy: Lots of reasons. First, portion size. It’s just one cup, which in my world, is the perfect size for a smoothie. Because let’s face it, take-out smoothies end up more like colossal milk shakes rather than nutritious, cups of joy. Second, it’s got matcha tea powder in it, a really interesting type of tea made out of whole tea leaves, which means you get loads of antioxidants, including those that may help prevent certain diseases like heart disease. Nothing wrong with that, right? Also, I like it because it’s not super sweet. This isn’t dessert, it’s a snack or a nice supplement to breakfast or lunch. Enjoy it as is or use it as the base for an amazing smoothie bowl. Yum!
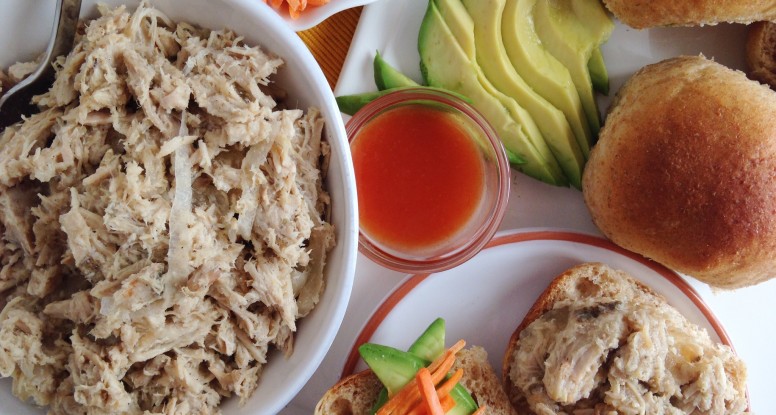
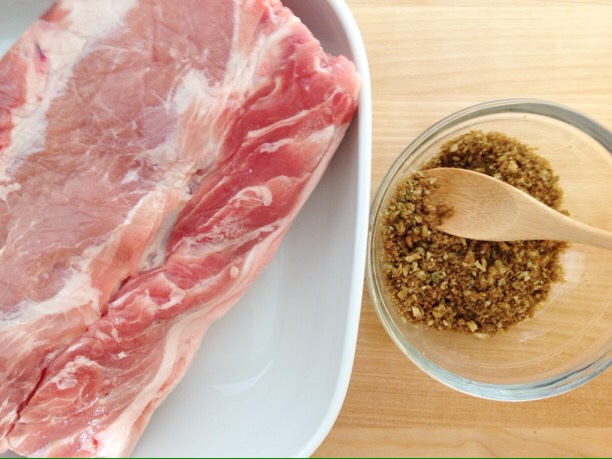
Why I made this recipe: Because certain people in my life (ahem, my friend since the 2nd grade, to be precise) told me they need quick recipes that taste good, can serve a small army, I mean, family, and aren’t loaded with unhealthy ingredients. Enter the Slow Cooker Jamaican Jerk Pork recipe.
Why I love this recipe: Mission accomplished! I’m pretty sure I met all of the criteria established during the serious brain storming session when said friend (see above) was last in town for a visit. Fast, simple ingredients, large quantity, tasty, healthy and freezable! Woo hoo! It’s always good to make sure your friends are happy.
Why this recipe is healthy: Instead of using pork shoulder, a relatively fatty cut of pork, I chose pork loin roast. This is a leaner cut and performs quite well in the slow cooker. Sometimes there’s a little extra layer of fat on this cut too, so feel free to cut some of that off before putting the rub on it. Besides that, pretty much that dry rub, pineapple and slow-cooking make this a relative healthy alternative to so many other pulled pork recipes.
A simple rub of vibrant jerk spices makes this pork perfect in a sandwich, on top of a bed of lettuce or whole grains, stuffed in a pita or as a topping for pizza.
Ingredients
Scale
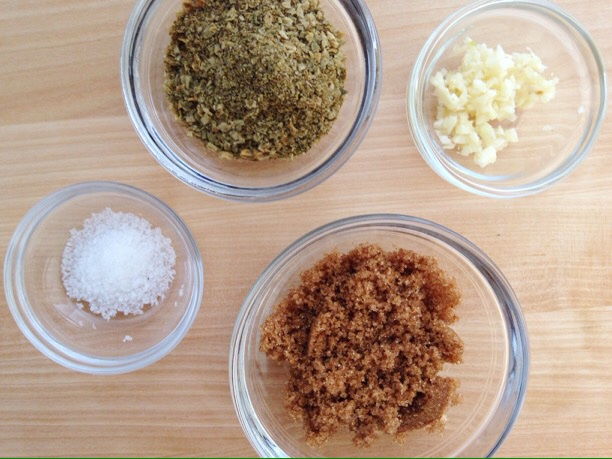
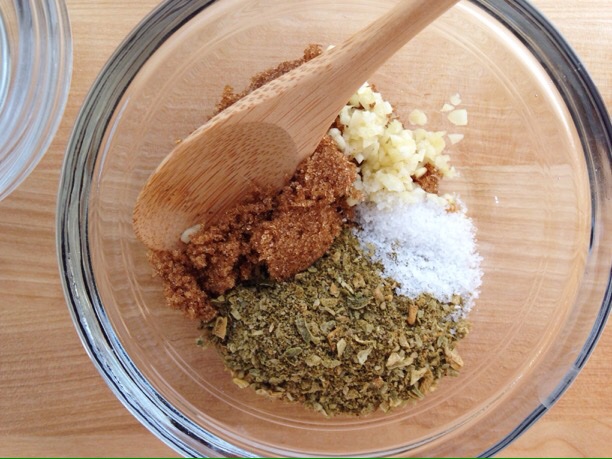
2–3 tablespoons jerk seasoning (use 2 for less heat, 3 for more heat)
2 tablespoons packed brown sugar
2 cloves garlic, minced
1/2 teaspoon Kosher or sea salt
2 1/2 pounds pork loin roast, trimmed of excess fat
1 small yellow or white onion, sliced
1/2 cup + 1/4 cup pineapple juice
1 1/2 cups chicken or vegetable broth
2 tablespoons apple cider vinegar
Kosher or sea salt, to taste
Instructions
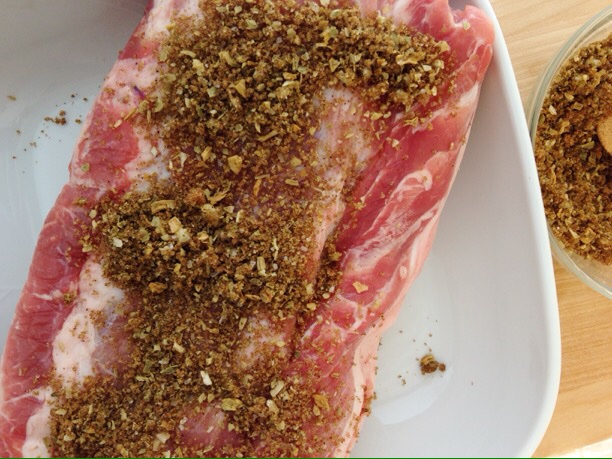
In a bowl, combine the jerk seasoning, brown sugar, garlic and salt. Rub seasoning mixture all over pork roast. If doing this step the night before, place the pork in a rimmed baking dish or rimmed sheet pan, cover and refrigerate.
Spread the sliced onions in the bottom of a 4 1/2-6 quart slow cooker. Place pork roast on top of the onions.
Pour 1/2 cup pineapple juice and the chicken broth around the roast. Cover slow cooker with a lid and cook on low for 8 hours.
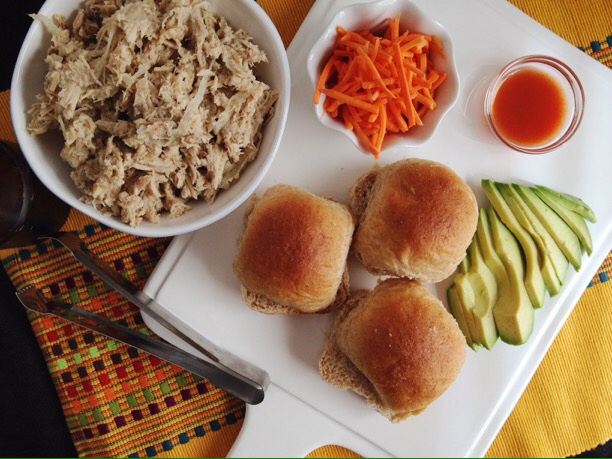
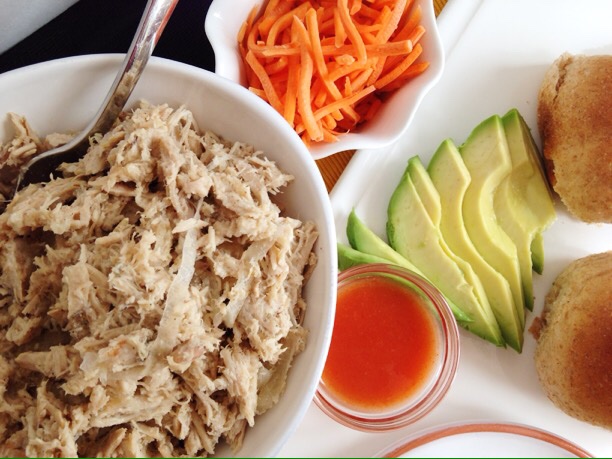
Carefully remove 1 1/2 cups of cooking liquid and discard. Using two forks, shred pork in the slow cooker. Add the remaining 1/4 cup pineapple juice and the apple cider vinegar. Cover and cook on low for at least 30 more minutes. Season with salt and serve.
Notes
This recipe makes about 6 cups of pulled pork. Lucky you!
Not hot enough? Top with a dash of hot sauce before serving.
Making sandwiches? Top with a carrot or cabbage slaw tossed with a simple dressing of apple cider vinegar, Dijon mustard and canola oil.
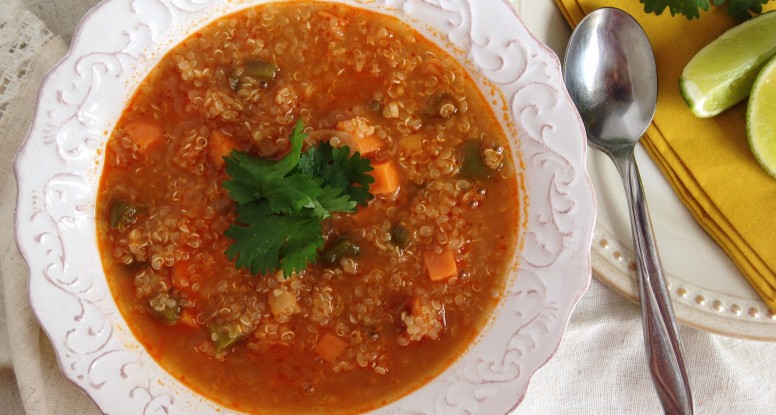
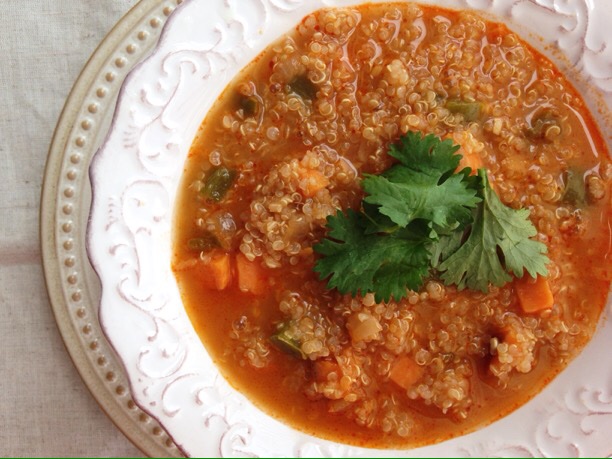
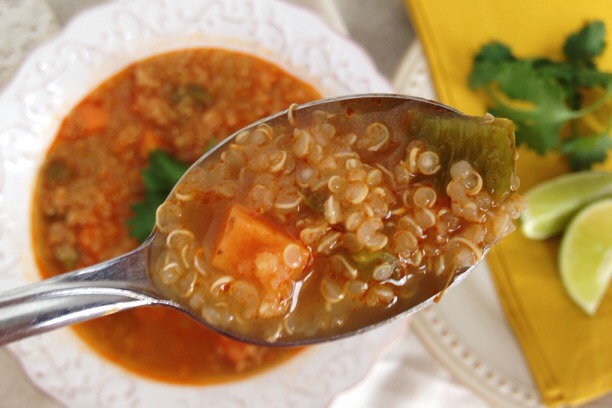
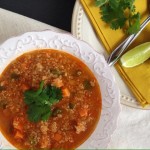
Why I made this recipe: Because “soup season” has officially begun in my household and because I really enjoy a bold-flavored, hearty soup like this Red Curry Quinoa Soup.
Why I love this recipe: Well, for the reasons I made this soup and for a few more too. First, quinoa is one of my favorite grains, not only is it nutritious, but it cooks super fast. That means this soup comes together fast too! Why else, you ask? Because it’s totally satisfying. There’s nothing I dislike more than a weak, bland, watery soup. This one is none of those things!
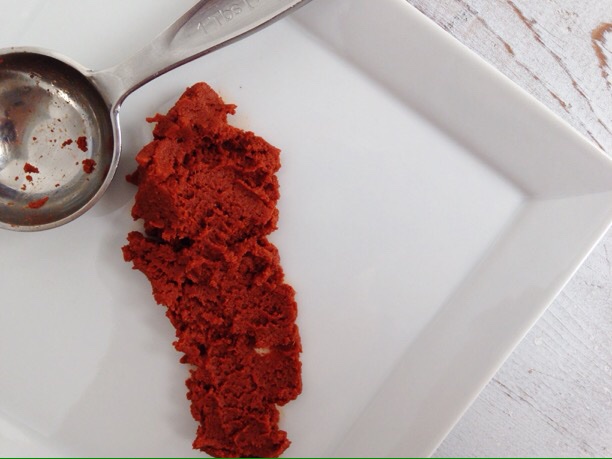
How this recipe is healthy: Oh, that quinoa! Not only does it cook fast, but it is so nutritious! A perfect source of vegetarian protein and loaded with fiber and iron, it’s a delightful alternative to rice and other grains. And how about that red curry paste! Never heard of it? Well, let me introduce you to your new kitchen staple. This stuff is simply magical. Typically used in Thai cooking, it adds serious depth of flavor to any dish you make, plus a little heat. All of that flavor doesn’t even come at a caloric cost either! The ingredients, usually chili peppers, garlic, galangal (or Thai ginger), shallot, spices and kaffir lime are foods that are loaded with antioxidants and other nutrients, that also happen to be amazingly flavorful. A true culinary and nutritional gem.
A hearty soup made with earthy, robust red curry paste, fresh vegetables and quinoa.
Ingredients
Scale
1 tablespoon olive oil
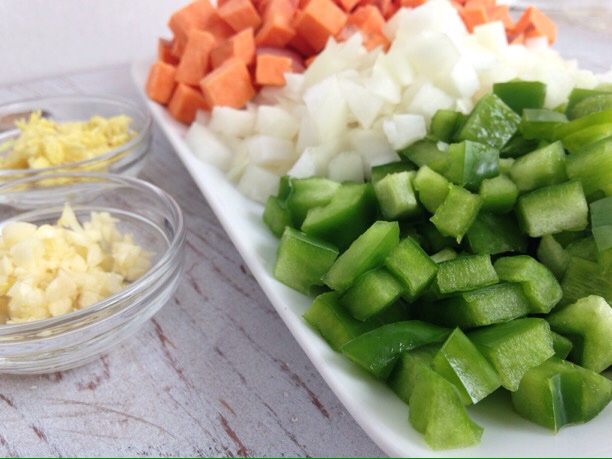
1/2 yellow onion, diced (about 3/4 cup chopped)
1 green bell pepper, seeded and diced
1 medium sweet potato, diced (about 1 1/2 cups chopped)
2 cloves garlic, chopped
1 tablespoon red curry paste
2 teaspoons peeled, chopped fresh ginger
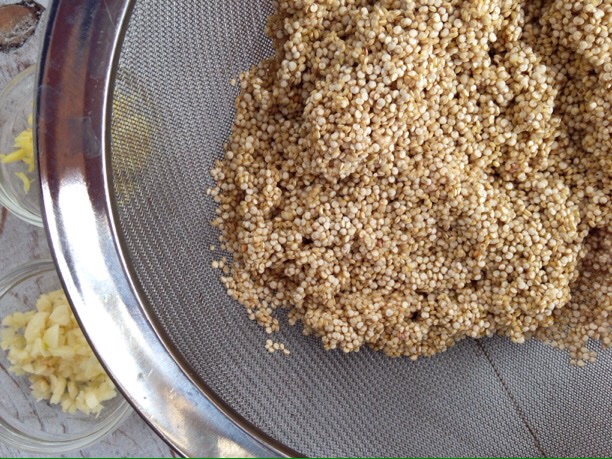
1 cup quinoa
4 cups vegetable or chicken broth (or water)
2 tablespoons lime juice
Sea or Kosher salt, to taste
1/4 cup chopped fresh cilantro
Instructions
Heat the oil in a pot set over medium-high heat. Add the onion, pepper and sweet potato and cook, stirring frequently, about 10 minutes.
Add the garlic, curry paste and ginger and cook, stirring, for 1 minute. Add the quinoa and cook 1 minute more. Stir in the broth and bring to a boil. Reduce heat to a simmer and cook for about 20 minutes or until potatoes are tender and quinoa is cooked.
Remove from heat and add the lime juice. Season with salt to taste and garnish with fresh cilantro before serving.
Notes
Cut the potatoes into half-inch cubes, this helps them to cook more quickly. And don’t worry if they’re not exactly a half-inch, just about that size is perfect! 🙂
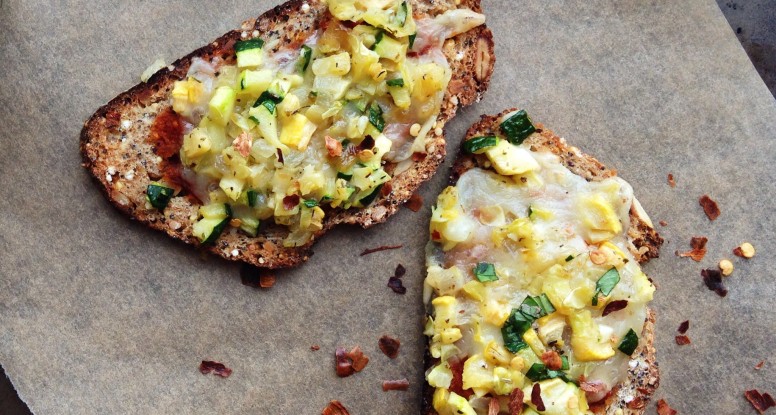
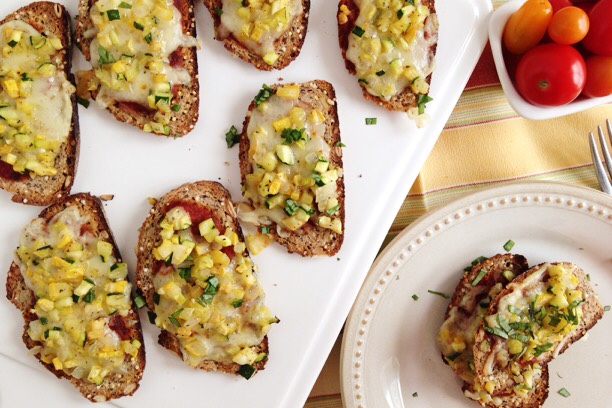
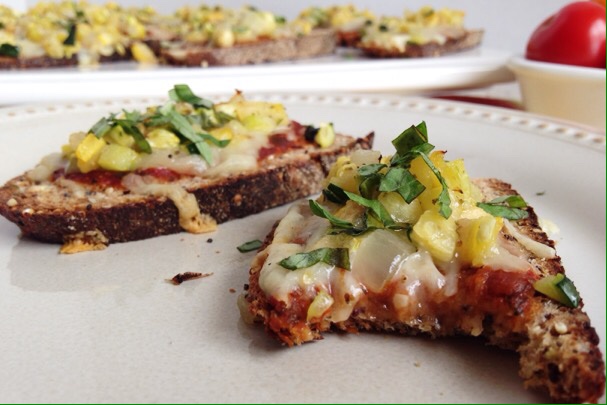
You love it so much that you insist on ordering it at least once a week from your favorite pizza place. While that’s fine and good, it’s um, actually not. Many pizza places load on the heavy toppings and leave you feeling like you just ate a vat of oil topped with a salt lick. Yuck. Ok, well, maybe it tastes good at the time, but it can leave you feeling pretty gross. But don’t worry, I have a solution! My famous (or soon-to-be-famous) Easy Pizza Toasts.
Yes, pizza can be yours and it can taste good and leave you feeling awesome!
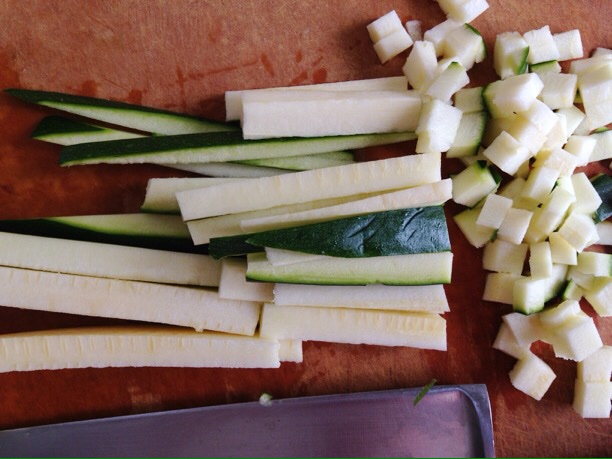
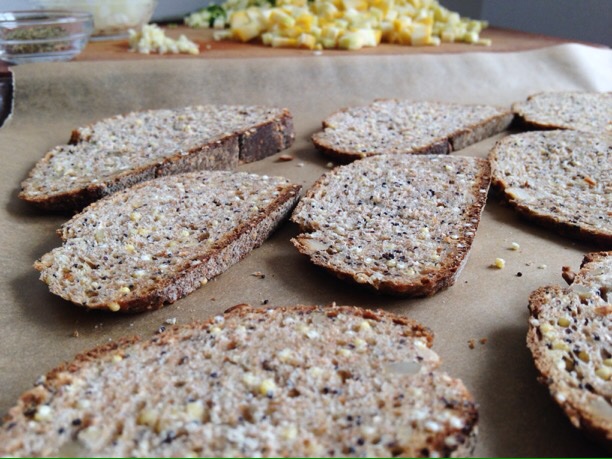
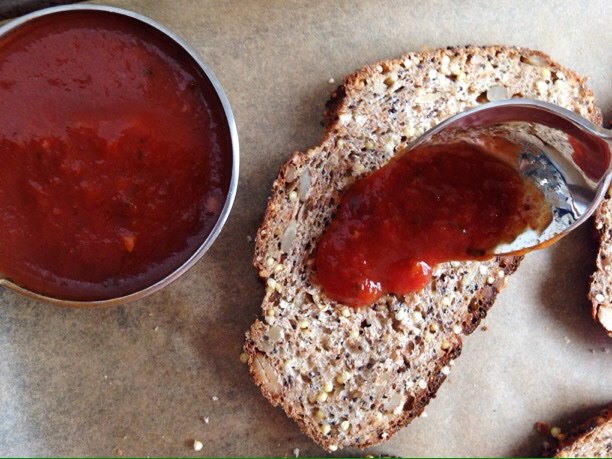
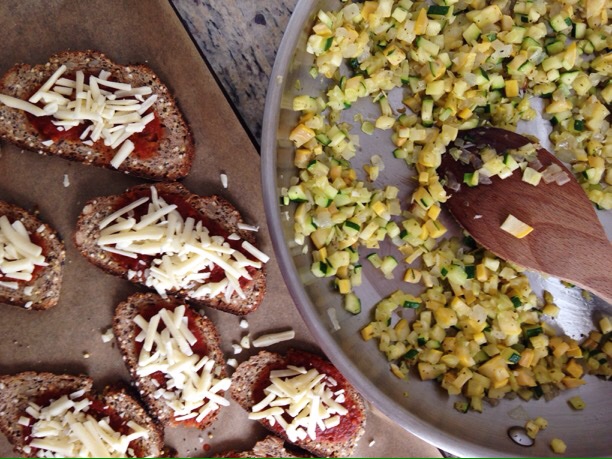
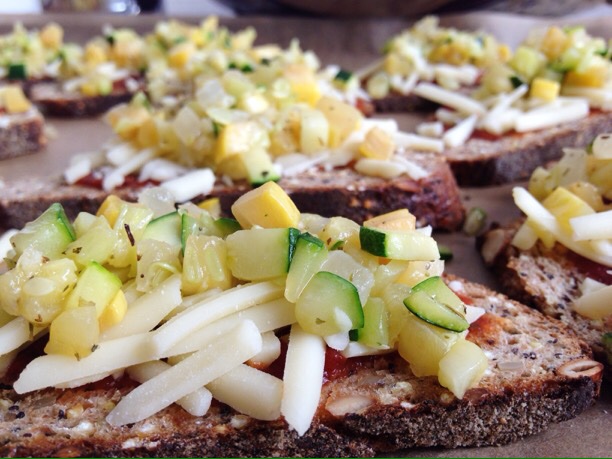
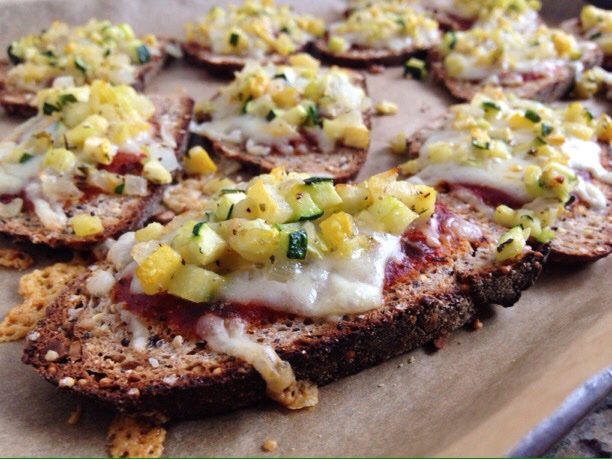
What’s the trick? There isn’t one! Yup, it really is easy. Let me explain. Start with some yummy whole wheat bread then slice it thinly. Cook up some yummy veggies (this toast I made with onions and squash) – hint, cut them up small so that they cook fast (this also makes them look super cute on your toasts). Spread a little marinara on top of those bread slices, top with a little cheese (a good, flavorful sharp cheddar is my favorite), then add the veggies. Slide them into the oven for about 10 minutes and you’ve got Easy Pizza Toasts!
So, no more heavy pizza for you (ok, have it every once in awhile), instead enjoy the crispy, crunchy, veggie-goodness of these Pizza Toasts!
Quickly sautéed veggies piled high on whole grain bread topped with cheddar cheese then toasted in the oven.
Ingredients
Scale
1/2 loaf, 15-ounce whole wheat baguette, cut into 1/2-inch thick slices on the bias
1 tablespoon olive oil
1/2 small onion (about 2 1/2 ounces), diced small
1/2 medium zucchini (about 5 ounces), diced small
1/2 medium yellow squash (about 5 ounces), diced small
1/2 teaspoon salt
1 clove garlic, finely chopped
1/2 teaspoon oregano
1 cup canned or jarred marinara sauce
2 cups shredded cheddar cheese
1/4 cup fresh basil, thinly sliced
Instructions
Preheat the oven to 400’F. Line a 9×13-inch sheet pan with parchment paper or foil.
Heat the oil in a large pan set over medium heat. Add the onion and cook stirring often, until softened, about 5 minutes. (You may need to adjust the heat to prevent burning.) Stir in the zucchini, squash and salt and cook an additional 5 minutes, stirring frequently. Add the garlic and oregano and cook one more minute. Remove pan from the heat.
Spread marinara sauce evenly over bread slices, then sprinkle with cheese. Top each slice with some of the squash mixture. Transfer pan to the oven and bake for 10 minutes or until bread is toasted and cheese has melted.
Garnish with fresh basil before serving.
Notes
This recipe makes 20 pizza toasts. A great appetizer or main dish!