No Fail, Winning Guacamole Recipe

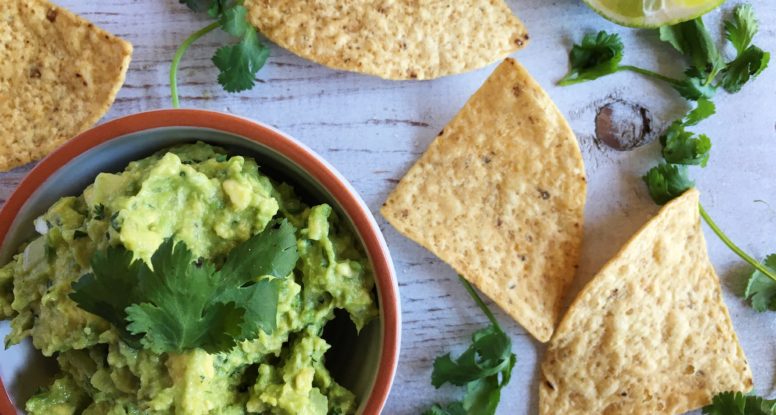
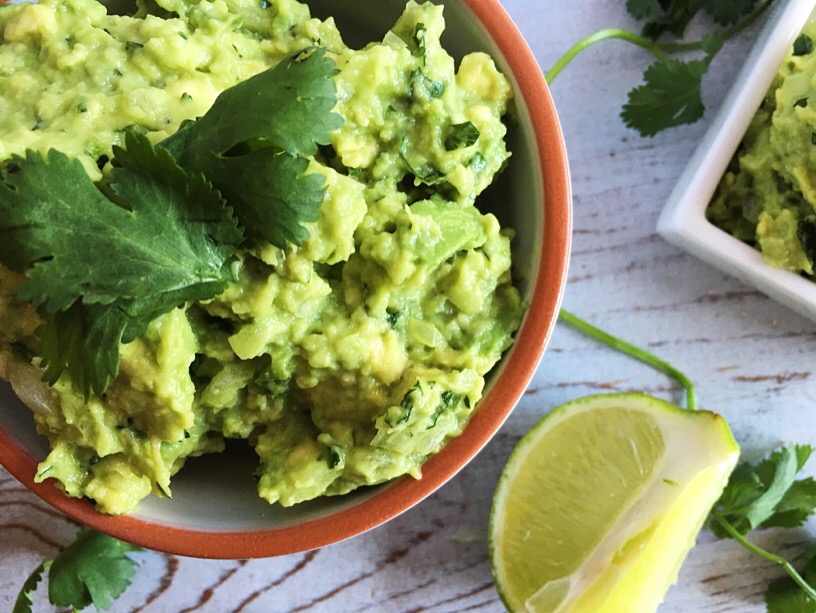
Award* Winning Guacamole Recipe

*Disclaimer – this recipe hasn’t actually won any official awards or titles. And it hasn’t been entered in any recipe contests or been featured on the Food Network.  So my guacamole is technically “award-less,” however it’s unofficially a “winner” (hence, Winning Guacamole) in my small circle of nearest and dearest. And I’m about to let you in on my not-so-secret recipe! But first, there are some things you should know.

Guacamole 101: What You Need to Know

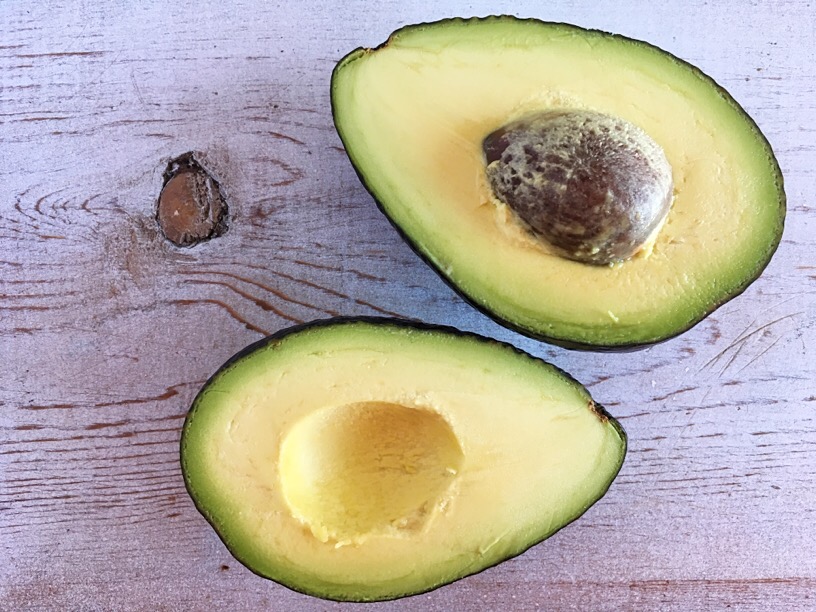
  • Pick the Avocado – This is a big deal, so it’s imperative you get it right. How do you choose the right avocado? Depends on when you want to make your guacamole. If you don’t need it until a couple of days from now, it’s ok to buy the rock-solid avocado because it will continue to ripen. If you want it tonight, buy the one that gives just a little when you apply a light pressure to it. Skip the super soft ones and the ones with dents and dings.
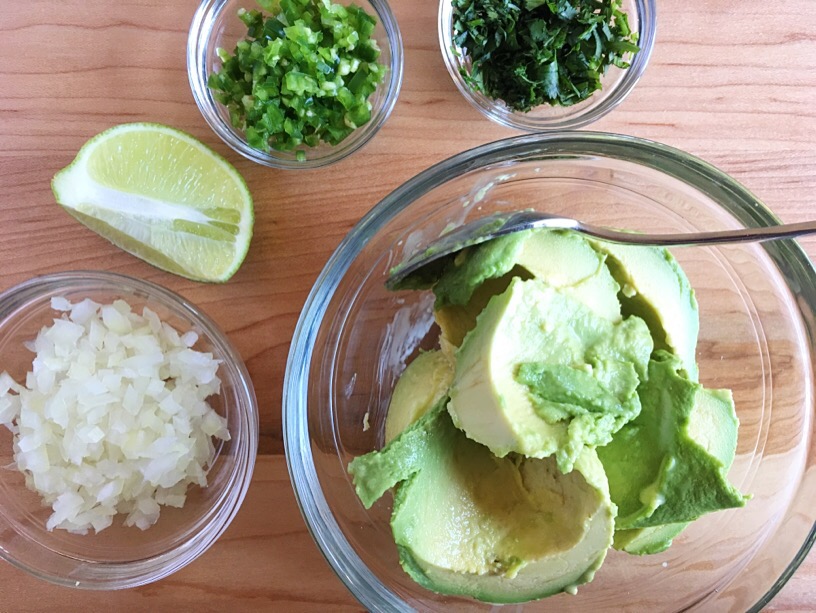
  • Don’t Skip the Onion – So many people tell me they want to leave out the onion, but I encourage you not to do that. Instead, if onion causes you trouble, consider this little trick – chop it and then add it to a bowl of water. Let it sit there while you’re making the guacamole and then drain it and add it. Soaking the onion will help remove some of the bitter compounds, so you won’t have that pungent onion taste in your mouth.
  • Add salt – Every time I make this guacamole someone always asks, “why does this taste so good?” It’s not that I am an awesome guacamole maker or that I have a special guacamole secret, it’s just salt. Yes, you heard me, salt. If you don’t add the right amount, it’ll just taste like mashed avocados and onion. Add the salt, and you’ve become a culinary genius! Afraid of salt, it’s ok, I understand, but in this recipe I’m only using 1/4 teaspoon of salt and that equals to about 145 milligrams of sodium per serving. That’s a relatively small amount considering 2300 milligrams per day is your cutoff. 

There, now you’re armed and dangerous. Time to get to the store and stock up on avocados so you can make a big batch of my No Fail Winning Guacamole!

Guacamole

Guacamole

Guacamole

Guacamole


Print
clock clock iconcutlery cutlery iconflag flag iconfolder folder iconinstagram instagram iconpinterest pinterest iconfacebook facebook iconprint print iconsquares squares iconheart heart iconheart solid heart solid icon

No Fail, Winning Guacamole


  • Author: Sara Haas

Description

A recipe for delicious guacamole that works every time!


Ingredients

Scale
  • 1 ripe avocado, sliced in half and seeded
  • 2 teaspoons -1 tablespoon fresh lime juice
  • 1/4 teaspoon Kosher salt
  • 1/4 cup fresh cilantro, chopped
  • 1/2 jalapeño, finely chopped*
  • 3 tablespoons finely chopped white or yellow onion**

Instructions

  1. Scoop out the avocado flesh into a bowl and gently mash. Stir in the lime juice and salt. Mix in the cilantro, onion and jalapeño.
  2. Serve and enjoy!

Notes

  • *If you prefer your guacamole less spicy, remove and discard the seeds and membrane from the jalapeño before chopping. Careful, those seeds are hot, so best to remove them with a spoon or knife.
  • **Do raw onions bother you? Try soaking them in water first before adding them to your guacamole.
  • Makes about 1 cup guacamole.

Nutrition

  • Calories: 339
  • Sugar: 3
  • Sodium: 608
  • Fat: 30
  • Saturated Fat: 4
  • Unsaturated Fat: 23
  • Trans Fat: 0
  • Carbohydrates: 21
  • Protein: 5
  • Cholesterol: 0

Maple Cinnamon Almonds

Fertility Friday + Recipe for Maple Cinnamon Almonds

Do you remember back in the ’80’s and ’90’s when all fat was considered “bad?”

Looking back on that time, it was almost comical the degree to which we feared fat. Companies worked so hard removing it from their products and people went crazy buying fat-free everything. I remember noshing on a box of fat-free cookies thinking, “wow, no fat, but they sure taste good, I’m so glad they’re good for me!”

Fat is Back?

Oh dear! Luckily research has improved and we are no longer shunning fat. In fact, now we know that fat is vital to our existence. Fats provide energy, help us absorb fat-soluble vitamins, and can keep our hearts healthy. We just have to be smart about the type of fats we’re choosing and how much of them we’re eating.

But I Can’t Eat as Much as I Want?

While all fats fit, it’s important to keep moderation in mind. Saturated and trans fats are the types of fats we should limit. Research is always on-going on this, and recently saturated fast have been in the news about not being as “bad” as we once thought. My advice? Stick with moderation. Go for the whole milk, but keep your serving to one cup. Enjoy that birthday cake, but choose the small slice instead of the massive monster piece. See where I’m going with this? Don’t over-indulge. It’s never wise to eat too much of one thing, right?

Instead, focus on getting more healthy fats into your diet. We call those unsaturated (specifically monounsaturated and polyunsaturated) fats. These unsaturated fats can also help support fertility by helping control blood sugar and tamper inflammation. Where do you find them? Great question!

Where to Find The Fantastic Fat:

Sources of polyunsaturated fats: fatty fish such as salmon, mackerel, sardines; flax seed and flax seed oil, walnuts and edamame

Sources of monounsaturated fats: nuts (like in these Maple Cinnamon Almonds!) and seeds, avocado, canola and olive oil 

Putting it Together

It’s easy! Eat fat, but make smart choices. Stick with moderation and balance your intake with other foods. Eating this way just makes sense! Feeling inspired? Get into your kitchen and make these yummy Maple Cinnamon Almonds so that you can enjoy some of those nutritious healthy fats!


Maple Cinnamon Almonds

Maple Cinnamon Almonds

Maple Cinnamon Almonds

Maple Cinnamon Almonds

Print
clock clock iconcutlery cutlery iconflag flag iconfolder folder iconinstagram instagram iconpinterest pinterest iconfacebook facebook iconprint print iconsquares squares iconheart heart iconheart solid heart solid icon

Maple Cinnamon Almonds


  • Author: Sara Haas

Description

Super easy snack made with almonds, maple syrup and ground cinnamon.


Ingredients

Scale
  • 1/2 teaspoon Kosher salt
  • 2 tablespoons maple syrup
  • 1 tablespoon water
  • 1/4 teaspoon ground cinnamon
  • 2 1/2 cups almonds

Instructions

  1. Preheat the oven to 300’F and line a sheet pan with parchment paper.
  2. Place the salt, maple syrup, water and cinnamon in a medium pot and set over medium heat. Bring to a boil and stir to combine. Pour in almonds and stir until almonds are well coated. Spread out on prepared sheet pan and bake 20 minutes, rotating the pan half way through cooking time.
  3. Remove and allow to cool before enjoying.

Nutrition

  • Calories: 2118
  • Sugar: 32
  • Sodium: 1192
  • Fat: 180
  • Saturated Fat: 14
  • Unsaturated Fat: 157
  • Trans Fat: 0
  • Carbohydrates: 90
  • Protein: 73
  • Cholesterol: 0

Chickpea Hummus Wrap

“Simplify, simplify, simplify!” Henry D. Thoreau, eloquently and prophetically proclaimed in his famous work, Walden.

That demand to simplify seems even more relevant today than it likely was in 1854, when Walden was first published. How many of us challenge that decree everyday? Adding more things that instead “complicate, complicate, complicate!” Ugh.  Thoreau’s mantra is one I’m trying (somewhat successfully) to practice in my daily life. I’m not taking the easy way, but the smart, simpler way. Case in point, I recently got so frustrated with making healthy lunches for my family. PB&J was in the lunch box more than I would’ve liked. Of course there’s nothing wrong with that sandwich, but variety is a good thing.

Inspired by Thoreau, I decided to “simplify” lunch.

And with this Chickpea Hummus Wrap, I simplified on execution, but didn’t sacrifice taste or flavor! Yay! It all starts with a  whole grain wrap and continues with layers of flavor. Canned chickpeas and pre-washed baby arugula keep things easy and fast. Flavor boosters like feta cheese and pepitas add a simple, yet tasty addition.

Luckily, the Recipe Redux theme for this month was how to get out of our “lunch rut.” How appropriate! Fortunately I figured out just how to do that with this Chickpea Hummus Wrap!

And here are the pretty picture of my Chickpea Hummus Wrap:

IMG_0015

Chickpea Hummus Wrap

Chickpea Hummus Wrap


Chickpea Hummus Wrap

Print

clock clock iconcutlery cutlery iconflag flag iconfolder folder iconinstagram instagram iconpinterest pinterest iconfacebook facebook iconprint print iconsquares squares iconheart heart iconheart solid heart solid icon
Chickpea Hummus Wrap

Chickpea Hummus Wrap


  • Author: Sara Haas
  • Yield: 1 serving 1x

Description

Time is of the essence! But don’t forget about good nutrition either! These simple chickpea hummus wraps make lunch easy, delicious and nutritious!


Ingredients

Scale
  • 1 cup baby arugula
  • 1 teaspoon fresh lime juice
  • pinch teaspoon freshly ground black pepper
  • pinch teaspoon Kosher salt
  • 1 (8-inch) whole wheat tortilla or wrap
  • 2 tablespoons plain hummus
  • 1/3 cup chickpeas
  • 1 teaspoon toasted pumpkin seeds
  • 1 tablespoon crumbled feta cheese

Instructions

  1. Toss the arugula with the lemon juice, black pepper and salt.
  2. Lay tortilla on a clean work surface. Spread the hummus down the middle of the tortilla and top with the chickpeas. Sprinkle on the pumpkin seeds and feta cheese, then the arugula mixture.
  3. Roll up and enjoy.

Notes

  • Want more? Just multiply ingredients by desired serving size and divide everything evenly among tortillas.

<


Arugula Salad with Apricots and Champagne Vinaigrette


It’s time to break out the salad bowl!

And it’s time to switch things up a bit. Yes, romaine is good and so are tomatoes and all of the other “usual” salad suspects, but why not try something new? What would you say to Arugula Salad with Apricots and Champagne Vinaigrette?

“That’s too fancy!” Is that perhaps your answer? I sure hope not because that’s just not true. Yes, it may sound fancy, but the ingredients are simple and the recipe is easy. See, not fancy at all!

My new salad obsession just happens to begin with my favorite green, baby arugula. There’s just something special about that little green leaf. It’s just so….spicy and interesting. And I like my food spicy and interesting! When you pair arugula with dried chopped apricots (for a little sweetness), sliced apples, pistachios, feta cheese and champagne vinaigrette, you’ve got a unique salad that is incredibly interesting (and nutritious).

So bust out that bowl and salad tongs and get mixing!

The Pretty Pictures of My Arugula Salad with Apricots and Champagne Vinaigrette:

IMG_0021

IMG_0022

IMG_0023

IMG_0024

IMG_0025

IMG_0026

IMG_0029


Print
clock clock iconcutlery cutlery iconflag flag iconfolder folder iconinstagram instagram iconpinterest pinterest iconfacebook facebook iconprint print iconsquares squares iconheart heart iconheart solid heart solid icon

Arugula Salad with Apricots and Champagne Vinaigrette


  • Author: Sara Haas

Description

Arugula tastes divine tossed with dried apricots, pistachios, fresh apple and a crisp champagne vinaigrette!


Ingredients

Scale
  • 2 teaspoons Dijon mustard
  • 1 teaspoon honey
  • 1 tablespoon champagne vinegar
  • 2 tablespoons olive oil
  • 1/8 teaspoon dried thyme leaves
  • 4 cups baby arugula, washed (2 ounces)
  • 1/2 medium apple, cored and sliced into thin strips or julienned (2 1/2 ounces)
  • 1/4 cup dried apricots, diced (1 1/2 ounces)
  • 1/4 cup crumbled feta cheese
  • 1/4 cup roasted, salted pistachios, roughly chopped (1 ounce)

Instructions

  1. In a small bowl, whisk together the mustard, honey and vinegar. Pour in the olive oil and whisk until combined. Stir in the dried thyme.
  2. To a large salad or mixing bowl, add the baby arugula along with the apple, apricots, feta cheese and pistachios. Pour dressing over the salad and toss to combine.
  3. Portion onto plates and enjoy!

Notes

  • Make it meal! Just add sliced chicken or garbanzo beans.
  • Recipe makes about 3 tablespoons dressing.

Nutrition

  • Serving Size: 4
  • Calories: 175
  • Sugar: 5
  • Sodium: 171
  • Fat: 12
  • Saturated Fat: 3
  • Unsaturated Fat: 9
  • Trans Fat: 0
  • Carbohydrates: 14
  • Protein: 4
  • Cholesterol: 8

Easy Freezer Burritos

Do you have 15 cents?

Of course you do!

Here’s the deal, you could spend 50 cents on a lackluster burrito, or you could spend half that and have a tasty burrito loaded with nutritious ingredients. If you’re like me, you’ll choose the 15 cent burrito. Not sure how to make this amazingly inexpensive, delicious burrito? Don’t worry, I’ve got you covered. My Easy Freezer Burritos recipe is below and some pictures in case you need inspiration or instruction.

The Pretty Pictures of Easy Freezer Burritos:

IMG_0032

IMG_0028

IMG_0029

IMG_0039

IMG_0040

IMG_0041


Print
clock clock iconcutlery cutlery iconflag flag iconfolder folder iconinstagram instagram iconpinterest pinterest iconfacebook facebook iconprint print iconsquares squares iconheart heart iconheart solid heart solid icon

Easy Freezer Burritos


  • Author: Sara Haas

Description

Don’t buy burritos anymore! Make them yourself with delicious, nutritious ingredients to fill you and nourish you.


Ingredients

Scale
  • 1 cup prepared quinoa*
  • 1 15-ounce can black beans, drained and rinsed (about 1 1/2 cups)
  • 3/4 cup frozen corn, thawed
  • 1/2 cup tomatillo salsa
  • 12 whole wheat or sprouted whole grain 8-inch flour tortillas
  • 3/4 cup shredded sharp cheddar cheese

Instructions

  1. In a large mixing bowl, combine the quinoa, black beans, corn, salsa and cheddar cheese.
  2. Lay tortillas out onto a clean work surface then spread 1/4 cup bean mixture down the middle of each tortilla.
  3. To roll: Fold one end of the tortilla to meet the other. Gently push back the tortilla and ingredients so they are tight. Fold outside edges inward, then roll until burrito is closed. Repeat the process with the remaining burritos.

To freeze

  1. Tear 12 sheets of foil. Place a burrito in the center of each piece of foil and tightly roll up. Place foil-wrapped burritos in a freezer bag. Label and date them before storing them in the freezer.

To enjoy

  1. Remove burritos from foil and place on a microwave-safe plate. Cover and cook on high heat for about 1 minute. Check and add more time if necessary. If you’re unsure, use a food thermometer and cook until internal temperature reaches 165’F.

Notes

  • Makes 12 burritos
  • *Of course I wouldn’t leave you hanging! Here’s how you prepare the quinoa: https://www.sarahaasrdn.com/freezer-quinoa/

Nutrition

  • Calories: 2886
  • Sugar: 10
  • Sodium: 1271
  • Fat: 46
  • Saturated Fat: 20
  • Unsaturated Fat: 21
  • Trans Fat: 0
  • Carbohydrates: 503
  • Protein: 115
  • Cholesterol: 89

Spring Rolls with Honey-Soy Dipping Sauce

I love spring rolls.

There’s just something so remarkably fresh about them that makes me happy. At one of my old jobs, I had to make spring rolls on a relatively regular basis. During that time, I could crank out hundreds of those little guys. I would be tired, with a sore back and cross-eyed when I was done. But that didn’t deter me from eating the scraps or messed-up rolls. Ah, the memories!

Here’s the deal with spring rolls, they are so delicious, but can be so annoying to make. Please, please don’t get mad if your first 2 or 10 look horrible. I promise you that they will still taste good. Just keep trying and soon you’ll be a professional “spring roller.”

Nutrition Spotlight:

Veggies abound in spring rolls and that makes them a fantastic, nutritious choice. They are the perfect vehicle for so many kinds of veggies too. You don’t have to stop at carrots and lettuce (like my version below), you can add peppers and jicama for example. Really, just be creative and have fun with them. But don’t forget the basil, mint and cilantro, they are the key to flavor and offer their own nutritive bonus too.


IMG_0003

These are bean thread noodles.


IMG_0004

Simple to make, just pull out of bag and plop in some water.


IMG_0001

Watch them grow and feel them soften. Takes about 15 minutes and they’re done.


IMG_0006

Get all of your ingredients together before rolling. Trust me on this one.


IMG_0007

Look how yummy that is, even before you roll it!


Spring Rolls Beauty

Roll ’em up! And don’t worry what they look like, ok?

Print
clock clock iconcutlery cutlery iconflag flag iconfolder folder iconinstagram instagram iconpinterest pinterest iconfacebook facebook iconprint print iconsquares squares iconheart heart iconheart solid heart solid icon

Spring Rolls with Honey-Soy Dipping Sauce


  • Author: Sara Haas

Description

Refreshing and satisfying, these spring rolls are a perfect for an appetizer or light lunch.


Ingredients

Scale
  • 1 tablespoon lime juice
  • 1 tablespoon honey
  • 1 tablespoon low sodium soy sauce
  • 1/8 teaspoon crushed red pepper
  • 2 tablespoons water
  • 1/3 package bean thread noodles, prepared according to package directions
  • 5 small lettuce leaves (Bibb or baby green or red leaf lettuce)
  • 1/2 cup shredded carrot
  • 1/4 cup peanuts, chopped
  • 1/3 cup mint leaves
  • 1/3 cup basil leaves
  • 1/3 cup cilantro leaves
  • 5 each spring roll skins/wrappers

Instructions

  1. Combine the lime juice, honey, soy sauce, crushed red pepper and water in a small saucepan. Set the pan over medium heat and bring to a simmer. Simmer for 3-4 minutes, then remove from the heat and allow to cool.
  2. Toss 1-2 teaspoons of the dipping sauce with the prepared bean thread noodles.
  3. Prepare a large bowl of warm water for softening the spring roll skins and lay out all of the filling ingredients; the lettuce, carrots, peanuts, mint, basil and cilantro.
  4. Remove 1 spring roll skin from the package and gently submerge in the bowl of warm water. Gently swish until spring roll skin becomes loose and flexible. Carefully remove it from the water and place on a clean kitchen countertop. Place one lettuce leaf on the bottom and then top with some noodles, carrots, peanuts and herbs. Take one edge and fold over to meet the other edge, then pull back on the fillings (like you’re making a burrito) until tight. Then fold in the sides and continue rolling the spring roll until sealed. (If you break the skin, just get another one and try again! If you can’t roll it, don’t worry about it. Just place everything in the middle and fold it up. I promise it will taste the same!)
  5. Slice rolls in half, if desired and serve with dipping sauce.

Nutrition

  • Serving Size: 5
  • Calories: 169
  • Sugar: 11
  • Sodium: 260
  • Fat: 5
  • Saturated Fat: 1
  • Unsaturated Fat: 4
  • Trans Fat: 0
  • Carbohydrates: 27
  • Protein: 8
  • Cholesterol: 1

Cacao Pretzel Snacks

Cacao.

It’s a fun word. Say it. Seriously, say it out loud. Super fun, right?

Fun and popular, cacao sure is sitting pretty these days. It’s trendy and it’s hip…even though it’s really nothing new.

Nope, cacao has been around for awhile. Never heard of it? Sure you have, it’s also known as cocoa, the more modern-ish term we typically use here in America. Cacao (and cocoa) refers to the dried beans from the cocoa tree. Generally, cacao is synonymous with the unroasted or raw version of the cocao bean, with cocoa being the roasted and sometimes more processed cacao bean. Cacao can be turned into everything from “nibs”( essentially broken pieces of cacao beans) to powder.  

If cacao isn’t new, then why this surge in popularity? Well my guess it’s because people are looking for all kinds of ways to add a nutritious boost to their smoothie bowls, oatmeal, shakes and everything in between. Cacao is a good choice then as it’s got a pretty nice nutrition profile, containing several antioxidants and minerals like magnesium and iron. But like anything, enjoy in moderation.

Looking to try cacao beans? Then try my recipe below for Cacao Pretzel Snacks. They are super easy to make and provide a nice introduction to cacao. 

And a big thank you to the Recipe Redux!  This recipe was inspired by this month’s theme of building a recipe using an ingredient I’ve never used before. 

And the Pretty Pictures of Cacao Pretzels Snacks:

IMG_0016

IMG_0018

IMG_0020

IMG_0021

Print

clock clock iconcutlery cutlery iconflag flag iconfolder folder iconinstagram instagram iconpinterest pinterest iconfacebook facebook iconprint print iconsquares squares iconheart heart iconheart solid heart solid icon

Cacao Pretzel Snacks


  • Author: Sara Haas

Description

A simple snack made with whole grain pretzels, Greek yogurt and cacao nibs.


Ingredients

Scale
  • 1 teaspoon Turbinado sugar
  • 1/8 teaspoon ground cinnamon
  • 2 tablespoons plain, low-fat Greek yogurt
  • 2 teaspoons cacao nibs
  • 20 whole grain pretzels twists

Instructions

  1. Combine the sugar and cinnamon in a small bowl. Place the yogurt and cacao nibs in separate small bowls.
  2. Dip half of each pretzel in the yogurt, then the cinnamon sugar mixture and finally in the cacao nibs. Place coated pretzels on a clean sheet pan and place in the freezer for 15 minutes.
  3. Remove from the freezer and enjoy.

Notes

  • Mix it up! Add a dash of cayenne pepper to the sugar mixture or add crushed nuts to the cacao nibs. Have fun by coming up with your own, unique flavors!

Nutrition

  • Serving Size: 4
  • Calories: 124
  • Sugar: 2
  • Sodium: 520
  • Fat: 1
  • Saturated Fat: 0
  • Unsaturated Fat: 1
  • Trans Fat: 0
  • Carbohydrates: 25
  • Protein: 3
  • Cholesterol: 0


Super Simple Tomatillo Salsa

You’ll wonder why you’ve never made tomatillo salsa before…

I know, you’re doubting me when I say that, right? Why make it when you can buy a perfectly decent canned version? Hear me out! Besides being fun to play with (I mean, how awesome are those papery skins they come in?), tomatillos are a breeze to work with. And I have to say, fresh tomatillo salsa is darn good! I mean, really good. So good you’ll want to add it to everything you make. From scrambled eggs to chicken salad, it’ll be your new favorite condiment!

Read More
A bean burger with a Mediterranean twist! Check out these easy and delicious Mediterranean Veggie Burgers! @cookinRD | sarahaasrdn.com

Mediterranean Veggie Burger

When life hands you lemons…

There was this time a few weeks ago when I really thought I had it together and then, poof, it all collapsed.

I felt great, I had this fantastic veggie burger recipe all queued up and then, life hit me. Not a literal punch in the face, more of like a “hey, stop biting off more than you can chew!” kind of way. Hence, the delayed post and hence why I have yet to update and face-lift my little blog here. But you’re here and I’m here now, so let’s celebrate that little victory, shall we?

Read More

Meal Plan like a Pro! Grab my NEW Meal Planning Workbook!

X